
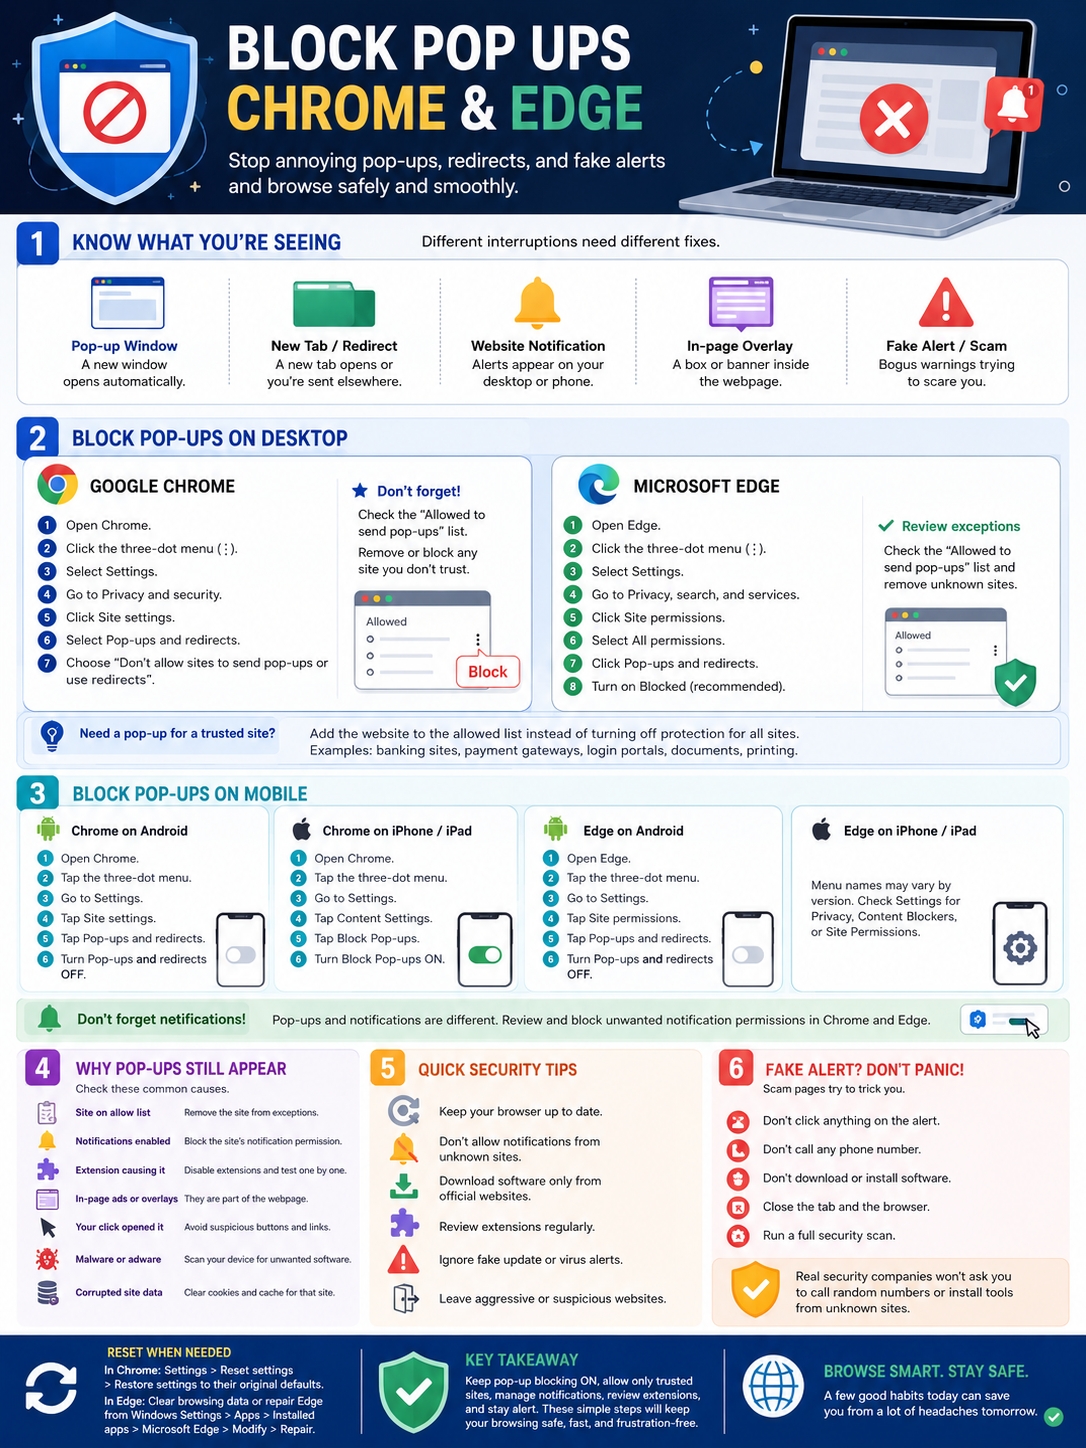
Pop-ups aren’t always small windows that appear over a webpage. They can open new tabs, send you to fake download sites, show bogus virus warnings, or push ads to your desktop long after you leave the site.
That’s why people searching for block pop ups Chrome Edge often need to check more than one setting. A browser’s pop-up blocker only handles certain windows and redirects. It won’t always stop website notifications, ads built into a page, or tabs opened by a bad extension.
Chrome and Microsoft Edge already include solid blocking tools. In most cases, you don’t need to install anything else. You just need to find the source of the problem and change the right permission.
This guide walks through the current settings on desktop and mobile. It also explains why some pop-ups keep coming back and how to deal with fake alerts, unwanted extensions, and suspicious redirects.
Work Out What Kind of Pop-Up You’re Seeing
|
What appears |
Most likely cause |
Where to look |
|
A new window opens by itself |
Standard browser pop-up |
Pop-ups and redirects |
|
A new tab opens without warning |
Redirect, extension, or adware |
Pop-up settings and extensions |
|
An alert appears near the taskbar |
Website notification |
Notification permissions |
|
A box covers the webpage |
In-page overlay |
Website controls |
|
The browser sends you elsewhere |
Redirect |
Pop-ups and redirects |
|
A full-page virus warning appears |
Scam page or malicious ad |
Close the page and run checks |
Before changing settings, take a second to look at what’s actually happening.
A real browser pop-up opens a separate window, tab, or panel. A redirect sends you to another web address, often without asking.
Website notifications are different. They use your computer or phone’s notification system. In Edge, those notifications may still appear after you close the browser.
Some ads only look like pop-ups. Cookie banners, newsletter forms, chat boxes, paywalls, and full-screen offers often sit inside the webpage itself. The browser may not block them because they aren’t separate windows.
There’s another common case. You click a play button, download link, or “Continue” message, and a new tab opens. The browser may treat that as a window you asked for because your click triggered it.
Once you know what type of interruption you’re dealing with, the fix becomes much easier.
Block Pop Ups Chrome Edge on a Computer
|
Browser |
Settings path |
Setting to choose |
|
Google Chrome |
Settings > Privacy and security > Site settings > Pop-ups and redirects |
Don’t allow sites to send pop-ups or use redirects |
|
Microsoft Edge |
Settings > Privacy, search, and services > Site permissions > All permissions > Pop-ups and redirects |
Turn on Blocked (recommended) |
|
Chrome exceptions |
Pop-ups and redirects > Allowed sites |
Remove or block unwanted sites |
|
Edge exceptions |
Pop-ups and redirects > Allowed sites |
Remove unknown addresses |
The basic block pop ups Chrome Edge setup only takes a few minutes.
Block Pop-Ups in Google Chrome
Chrome blocks most automatic pop-ups by default. Still, it’s worth checking the setting. A website may have been added to the allowed list, or someone may have changed the default option.
Follow these steps:
- Open Chrome.
- Select the three-dot menu in the upper-right corner.
- Choose Settings.
- Open Privacy and security.
- Select Site settings.
- Choose Pop-ups and redirects.
- Select Don’t allow sites to send pop-ups or use redirects.
Stay on the same page and check the allowed-sites section.
A site listed there can still open pop-ups, even when the main blocking option is on. Remove anything you don’t recognize.
To change an allowed site:
- Find the website in the list.
- Select the three-dot menu beside it.
- Choose Block or Remove.
You can also block a site while you’re visiting it.
- Open the website.
- Select the site information icon beside the address bar.
- Open Site settings.
- Find Pop-ups and redirects.
- Change the permission to Block.
Block Pop-Ups in Microsoft Edge
The Edge steps are similar, though the menu names are slightly different.
- Open Edge.
- Select the three-dot Settings and more menu.
- Choose Settings.
- Open Privacy, search, and services.
- Select Site permissions.
- Choose All permissions.
- Open Pop-ups and redirects.
- Turn on Blocked (recommended).
Edge shows a small blocked-pop-up icon in the address bar when it stops a window.
Check the allowed-sites list below the main setting as well. If one website keeps opening tabs while others behave normally, there’s a good chance it has an exception.
Remove sites you no longer use. Be especially careful with unfamiliar domains or addresses that look slightly misspelled.
Allow Pop-Ups on Trusted Websites
|
Legitimate reason |
Common example |
Best approach |
|
Payment confirmation |
Bank or payment provider |
Allow the exact verified site |
|
Account sign-in |
Workplace login portal |
Add a site-specific exception |
|
Document viewing |
Invoice or bank statement |
Allow only when needed |
|
Printing |
Receipt or booking confirmation |
Use a narrow exception |
|
Web application tool |
Internal dashboard |
Confirm the domain first |
Blocking every pop-up sounds ideal, but some legitimate websites still use separate windows.
Banks may open statements in a new tab. Payment systems may launch a confirmation window. Business platforms may use pop-ups for sign-in, printing, reports, or document previews.
The safest option is simple. Keep global blocking on, then allow only the site that needs access.
Allow a Trusted Site in Chrome
- Visit the website.
- Select the button that should open the new window.
- Look for the blocked-pop-up icon in the address bar.
- Select it.
- Choose the option to always allow pop-ups and redirects from that site.
- Select Done.
- Reload the page if needed.
You can remove the permission later from Chrome’s Pop-ups and redirects settings.
Allow a Trusted Site in Edge
- Open Settings.
- Go to Privacy, search, and services.
- Select Site permissions > All permissions.
- Open Pop-ups and redirects.
- Find the allowed-sites section.
- Select Add site.
- Enter the full address, including https://.
- Select Add.
Check the spelling before saving it. Scam sites often copy the look of real banking, shopping, and software pages while using a slightly different address.
Block Pop-Ups on Android, iPhone, and iPad
|
Device and browser |
Menu path |
Correct setting |
|
Chrome on Android |
Settings > Site settings > Pop-ups and redirects |
Turn the option off |
|
Chrome on iPhone or iPad |
Settings > Content Settings > Block Pop-ups |
Turn the option on |
|
Edge on Android |
Settings > Site permissions > Pop-ups and redirects |
Turn the option off |
|
Edge on iPhone or iPad |
Menu names may vary |
Check current site and privacy settings |
Chrome on Android
- Open Chrome.
- Tap the three-dot menu beside the address bar.
- Select Settings.
- Tap Site settings.
- Choose Pop-ups and redirects.
- Turn the option off.
The wording can feel backward at first. On Android, turning Pop-ups and redirects off means websites can’t use them.
If ads still appear after this change, check notification permissions. Those alerts use a separate setting.
Chrome on iPhone or iPad
- Open Chrome.
- Tap the three-dot menu.
- Select Settings.
- Open Content Settings.
- Tap Block Pop-ups.
- Turn it on.
Sometimes a bad page traps you inside a warning box that won’t close. In that case, turn on Airplane Mode, close the tab, and then close Chrome. This cuts the page’s connection before you reopen the browser.
Edge on Android
- Open Edge.
- Tap the three-dot menu.
- Select Settings.
- Open Site permissions.
- Tap Pop-ups and redirects.
- Turn the option off.
Edge’s menu layout may change slightly between app versions, but the setting should remain under site permissions.
Edge on iPhone or iPad
Microsoft’s current mobile help doesn’t provide one fixed step-by-step path for Edge on iPhone or iPad.
Open the Edge menu and check the latest Privacy, Content blockers, or Site permissions section. Avoid relying on old screenshots because mobile menu labels can change after app updates.
Stop Website Notifications That Look Like Pop-Ups
|
What you notice |
What it probably is |
What to change |
|
Ads appear in the screen corner |
Website notification |
Block notification access |
|
Alerts arrive after Edge closes |
Edge website notification |
Remove the site permission |
|
A site keeps asking to send alerts |
Notification prompt |
Block it or use quieter prompts |
|
Ads appear on a phone lock screen |
Browser or app notification |
Check browser and device settings |
Website notifications cause a lot of confusion. They look like pop-ups, but the normal pop-up blocker doesn’t control them.
A site may have asked to “Show notifications” while you were trying to watch a video, download a file, or close a banner. Once allowed, it can send alerts through your browser.
Read Also: How to Import Passwords Into Chrome in 2026
Block Notifications in Chrome
- Open Settings.
- Select Privacy and security.
- Choose Site settings.
- Open Notifications.
- Review the allowed list.
- Block or remove unfamiliar websites.
Chrome also includes a quieter notification option. Instead of showing a large permission box, it displays a smaller icon near the address bar.
You can block a site directly as well:
- Open the website.
- Select the site information icon beside the address.
- Find Notifications.
- Choose Block.
Block Notifications in Edge
- Open Settings.
- Select Privacy, search, and services.
- Go to Site permissions > All sites.
- Select the website.
- Find Notifications.
- Choose Block.
You can also change the permission from the site information icon beside the address bar.
Remember that notification and pop-up permissions are separate. A site may have access to one, both, or neither. Check both settings when a website keeps bothering you.
Why Pop-Ups Still Appear After You Block Them
|
Possible cause |
How to spot it |
What to do |
|
Site is on the allow list |
Only one website causes trouble |
Remove its exception |
|
Notifications are enabled |
Alerts appear outside the page |
Block notification access |
|
An extension is injecting ads |
Ads appear on unrelated sites |
Disable extensions |
|
The ad sits inside the page |
It doesn’t open a new window |
Close it or leave the site |
|
Your click triggered the tab |
It opens after pressing a button |
Avoid the misleading link |
|
Unwanted software is installed |
Settings change by themselves |
Run a security scan |
|
Site data is broken |
One site behaves strangely |
Clear its cookies and cache |
The built-in blocker isn’t a full advertising filter. It mainly stops websites from opening windows and redirects without permission.
It may not block a tab that opens after you click something. That’s why fake play buttons and download links still work on some sites.
The same goes for ads placed inside a webpage. If the advertisement is part of the page’s layout, the browser may not treat it as a pop-up.
Check Chrome’s Intrusive Ads Setting
Chrome has another control for sites that show misleading or disruptive advertising.
- Open Settings.
- Select Privacy and security.
- Choose Site settings.
- Open Additional content settings.
- Select Intrusive ads.
- Choose the option that blocks intrusive ads on affected sites.
This won’t remove every ad. It focuses on advertising that Chrome considers intrusive or deceptive.
Avoid turning off JavaScript across the whole browser. It can break logins, payment pages, forms, video players, menus, and other common website features.
Check Extensions and Unwanted Software
|
Warning sign |
Likely cause |
Best next step |
|
Ads appear on many websites |
Bad extension or adware |
Disable extensions one by one |
|
Search engine changes itself |
Browser hijacker |
Remove software and reset settings |
|
An unknown toolbar appears |
Unwanted extension |
Delete it |
|
New tabs keep returning |
Malware or aggressive site |
Run a full security scan |
|
Fake virus warnings appear often |
Scam site or adware |
Don’t click anything |
|
Homepage changes without permission |
Extension or installed program |
Reset the browser |
Test Chrome Extensions
- Open Chrome.
- Select the three-dot menu.
- Choose Extensions > Manage extensions.
- Turn every extension off.
- Restart Chrome.
- Test the browser.
- Turn extensions back on one at a time.
When the ads return, the extension you just enabled is probably the cause.
Remove anything you don’t recognize. Pay close attention to unofficial download tools, video converters, coupon extensions, search assistants, and shopping add-ons.
Also check what each extension can access. A tool that can read and change data on every website has a lot of control over your browsing.
Test Edge Extensions
- Select Extensions beside the address bar.
- Choose Manage extensions.
- Turn all extensions off.
- Restart Edge.
- Test the affected websites.
- Enable extensions one at a time.
This slow one-by-one test works better than guessing. It helps you find the exact extension causing the problem.
Scan Your Device
Sometimes the browser isn’t the real source. An installed program may be opening ads or changing settings.
On Windows:
- Open Windows Security.
- Select Virus & threat protection.
- Check for security updates.
- Run a quick scan.
- Run a full scan if the problem continues.
Keep Microsoft Defender SmartScreen and potentially unwanted app protection turned on. These tools can warn you about phishing pages, suspicious downloads, scam sites, and unwanted software.
Deal With Fake Virus Alerts Safely
|
Fake alert says |
What you should do |
|
“Your computer is infected” |
Close the tab |
|
“Call support now” |
Don’t call the number |
|
“Install this security tool” |
Don’t download it |
|
“Your subscription has expired” |
Check the official provider directly |
|
“Allow notifications to continue” |
Leave the page |
|
“Click here to remove the virus” |
Don’t interact with the message |
Fake virus alerts rely on panic. They want you to click before you think.
A real browser warning won’t usually ask you to call a random phone number or install software from an unknown website.
When one appears:
- Don’t click inside the warning.
- Don’t call any displayed number.
- Don’t download the suggested software.
- Close the tab.
- Force-close the browser if the page won’t let you leave.
- Check extensions and notification permissions.
- Run a security scan.
When you need a browser, antivirus, or software update, go directly to the company’s official website or use the app’s built-in update option.
Reset the Browser When Nothing Else Works
|
Option |
What it changes |
What it usually keeps |
|
Chrome reset |
Startup pages, permissions, search settings, extensions, and themes |
Bookmarks and saved passwords |
|
Edge cache clearing |
Temporary files and selected browsing data |
Data you don’t choose to remove |
|
Edge repair on Windows |
Repairs damaged browser files |
Browser data and settings |
Reset Chrome
- Open Settings.
- Select Reset settings.
- Choose Restore settings to their original defaults.
- Confirm the reset.
Chrome keeps bookmarks and saved passwords. It resets startup behavior, site permissions, extensions, themes, cookies, and some other browser settings.
After the reset, don’t enable every extension at once. Add them back slowly and test the browser as you go.
Clear or Repair Edge
Start by clearing cached files:
- Open Edge.
- Go to Settings.
- Select Privacy, search, and services.
- Find Delete browsing data.
- Choose what to clear.
- Select Cached images and files.
- Clear the data.
If Edge itself keeps crashing or acting strangely on Windows, repair it:
- Open Windows Settings.
- Select Apps.
- Open Installed apps.
- Find Microsoft Edge.
- Select Modify.
- Choose Repair.
The repair process should keep your browser data and settings.
Safer Browsing Habits That Cut Down Pop-Ups
|
Habit |
Why it helps |
|
Keep the browser updated |
Installs security fixes |
|
Reject random notification requests |
Stops future desktop alerts |
|
Download from official sites |
Avoids bundled adware |
|
Review extensions regularly |
Removes forgotten tools |
|
Ignore fake update prompts |
Reduces malware risk |
|
Leave aggressive websites |
Stops repeat redirects |
A few simple habits prevent most pop-up problems.
Don’t press Allow just because a site says you need to prove you’re human. Legitimate CAPTCHA checks don’t normally require permanent notification access.
Be careful with pages that claim you must enable notifications to watch a video, confirm your age, or download a file. That’s often a trick.
Install software from official stores or the developer’s own website. Free download portals sometimes bundle extra programs you didn’t ask for.
Review your extensions every few months. If you no longer use one, remove it.
Most importantly, leave sites that behave aggressively. A page that keeps opening tabs, blocking the back button, or showing fake warnings isn’t worth fighting with.
Frequently Asked Questions
|
Question |
Quick answer |
|
Does Incognito mode stop more pop-ups? |
No, it isn’t a full ad blocker |
|
Can a work administrator control the setting? |
Yes |
|
Will a Chrome reset delete passwords? |
No |
|
Do cookies control pop-ups? |
No, they use separate settings |
|
Can the blocker remove cookie banners? |
Usually not |
|
Should you install several blockers? |
Usually no |
Does Incognito Mode Stop Pop-Ups?
Incognito mode limits the browsing data saved after you close the session. It doesn’t replace pop-up controls, notification settings, or malware protection.
Why Is the Pop-Up Setting Greyed Out?
A workplace, school, parental-control app, or device administrator may control the setting. On a managed device, you may need to contact the administrator.
Will Resetting Chrome Delete Bookmarks and Passwords?
No. Chrome keeps saved bookmarks and passwords. It resets extensions, permissions, themes, startup settings, cookies, and some site data.
Does Blocking Third-Party Cookies Stop Pop-Ups?
No. Cookie controls and pop-up permissions handle different things. Blocking cookies may limit tracking, but it won’t replace the pop-up blocker.
Why Won’t the Browser Block Cookie Banners?
Cookie notices and newsletter boxes often sit inside the webpage. Since they don’t open a separate browser window, the standard pop-up blocker may leave them alone.
Why Do Alerts Appear After I Close Edge?
They’re probably website notifications. Edge can send them through Windows even when the browser isn’t open. Remove the site from Edge’s notification permissions.
Can I Allow Pop-Ups Without Turning Off Protection Everywhere?
Yes. Keep the global blocker on and add a site-specific exception for a trusted bank, payment service, school portal, or business tool.
Should I Install a Pop-Up-Blocking Extension?
Try the built-in browser controls first. An extension may block more in-page ads, but it also gets access to your browsing activity. Use a trusted one and check its permissions carefully.
Final Thoughts
|
Final check |
Best choice |
|
Pop-ups and redirects |
Keep blocking on |
|
Trusted websites |
Add narrow exceptions |
|
Notifications |
Block unknown sites |
|
Extensions |
Remove unused tools |
|
Persistent redirects |
Scan the device |
|
Fake security alerts |
Close them without clicking |
To block pop ups Chrome Edge users should start with the browser’s built-in pop-up and redirect controls. Keep them active across all sites, then add exceptions only when a trusted service genuinely needs a separate window.
If alerts continue, check website notifications. They use a different permission and may appear outside the browser.
Next, review extensions, clear site data, update the browser, and scan the device for unwanted software. These steps solve most cases where tabs, redirects, or fake warnings keep coming back.
No browser setting can make every bad website behave. Some ads live inside the page, while others open after you click a misleading button. When a site feels aggressive or suspicious, the safest move is often the simplest one: close it and don’t return.