
You click “Update and Restart,” go to sleep, and wake up to a bricked PC. Classic. Your printer suddenly ignores you. The Wi-Fi drops completely. Or worse, you stare blankly at a Blue Screen of Death. Microsoft forces automatic updates to patch security holes and push new features. Most of the time, they install flawlessly. But when they completely tank your system, knowing how to roll back a Windows update safely is your absolute fastest way out.
If a recent patch killed your gaming frame rates or locked you out of your work applications, don’t wipe your hard drive. Windows hides powerful recovery tools right beneath the surface. I am going to show you exactly how to strip out that buggy code, get your machine running perfectly again, and keep all your personal files safe.
Why You Usually Need to Undo Recent Patches
I see forced updates completely destroy working systems on a regular basis. You shouldn’t avoid updates forever—you need those security patches. But sometimes, Microsoft’s generic code clashes violently with your specific motherboard, graphics card, or software configuration.
Let’s look at recent, real-world disasters. In April 2026, Microsoft pushed update KB5083769. It immediately caused black screen crashes and weird mosaic graphics, heavily hitting Dell and HP laptops using NVIDIA GTX 1080 Ti GPUs. Fast forward to June 2026, and update KB5094126 broke Microsoft Office apps completely. It triggered 0xc0430001 BSOD errors on HP business PCs due to Secure Boot verification failures, and even caused the Recycle Bin to show internal file codes like $R4ABC12.docx instead of the actual file names.
When you remove a buggy patch, you force your PC to forget the latest code changes. You jump back in time to yesterday’s working state. You keep your personal files, but you permanently dump the broken system files causing the chaos.
|
Problem Type |
Common Symptom |
The Technical Reason |
|
Driver Clashes |
No audio, broken Wi-Fi. |
The patch replaced your working OEM driver with a generic one. |
|
System Crashes |
Random freezing, BSODs. |
Core OS files conflict with background antivirus or VPN software. |
|
Performance Tanks |
Massive battery drain, lag. |
Telemetry or indexing loops peg your CPU usage at 100%. |
|
Boot Loops |
Endless restarts at the logo. |
The install failed halfway, corrupting the boot sector. |
Mandatory Prep Before You Roll Back a Windows Update
Before we start ripping out system files, you must set up a safety net. If the power drops during an uninstall, you will corrupt the Windows registry and lock yourself out of your PC forever.
First, plug your laptop into the wall. A dead battery mid-rollback guarantees total operating system failure.
Second, back up your work. Yes, this process leaves your documents alone by design. But Windows is highly unpredictable. Toss your critical files on a USB drive or sync them to Google Drive right now.
Finally, locate your BitLocker recovery key. If you run Windows 11, device encryption defaults to on. Ripping out core updates often triggers a firmware security lockdown. Without that 48-digit key saved to your Microsoft account or printed out, your hard drive remains permanently locked.
|
Prep Step |
Action Required |
Why You Must Do It |
|
Secure Power |
Plug directly into a wall outlet. |
Power loss during a rollback corrupts the Windows registry. |
|
Back Up Data |
Move critical files to a flash drive. |
Protects you against a catastrophic uninstallation failure. |
|
Check BitLocker |
Log into your Microsoft account on your phone. |
Prevents firmware lockouts after the system reboots. |
|
System Restore |
Manually save your current OS state. |
Gives you a solid fallback option if the uninstallation fails. |
How to Uninstall a Quality Update in Windows 11 and 10
Microsoft releases updates in two main categories: quality and feature. Quality updates are the smaller, monthly downloads—often hitting on “Patch Tuesday”—that fix bugs and tighten security. Luckily, they are incredibly easy to delete.
If your PC started acting up just a few days ago, a quality update is almost certainly your culprit. It takes just a few clicks to roll back a Windows update via the modern settings menu.
The Windows 11 Route
Windows 11 hides the uninstall button slightly deeper than older versions, but the path takes seconds to navigate.
1. Open Settings:
Use the Win + I shortcut.
Press the Windows key and the ‘I’ key together, or click the Start button and hit the gear icon.
2. Go to Update History:
Click Windows Update on the left sidebar. On the right, scroll down and click Update history.
3. Find the Uninstall Menu:
Scroll to the absolute bottom of the page. Under the Related settings header, click Uninstall updates.
4. Remove the Bad Patch:
Check dates carefully.
Look at the list of recent updates categorized by KB number. Click Uninstall next to the most recent one, confirm your choice, and let the PC restart automatically.
Read Also: How to Fix Windows Search Not Working
The Windows 10 Route
Still running Windows 10? The path relies on the legacy Control Panel interface.
Press Win + I to open Settings. Navigate to Update & Security, then click Windows Update. Click View update history, then hit Uninstall updates at the very top. This kicks you over to a classic desktop window. Find the offending patch, right-click it, and hit Uninstall.
|
Windows Version |
Navigation Path |
Best Used For |
|
Windows 11 |
Settings > Windows Update > Update history |
Removing the latest Patch Tuesday security fixes. |
|
Windows 10 |
Settings > Update & Security > Update history |
Undoing recent driver pushes or monthly bug patches. |
|
Control Panel |
Win + R > type appwiz.cpl |
Power users who want to sort all system patches by date. |
Beating the Clock: Reverting a Major Feature Update
Feature updates are the massive, multi-gigabyte overhauls Microsoft drops roughly once a year (like jumping from 23H2 to 24H2). They completely rewrite core system mechanics and user interfaces. Naturally, things break heavily during the transition.
When you install a feature update, Windows quietly hides a backup of your old operating system inside a C: drive folder named Windows.old. This folder is your literal time machine.
The catch? You only get 10 days. After that deadline, Windows automatically deletes the folder to free up hard drive space, and your “Go back” button grays out permanently. If you are still inside the time limit, open Settings > System > Recovery, and click Go back.
Power users can actually extend this window using the Deployment Image Servicing and Management (DISM) tool before the 10 days run out.
Open Command Prompt as an Administrator and type this exact command:
DISM /Online /Set-OSUninstallWindow /Value:60
Hit Enter. You now have two full months to test the new feature update for stability before losing your safety net.
|
Update Type |
Release Schedule |
Rollback Time Limit |
|
Quality Update |
Monthly (Patch Tuesday) |
Indefinite (remove anytime). |
|
Feature Update |
Annually |
Strictly 10 days (requires the Windows.old folder). |
|
Feature (Extended) |
Annually |
Up to 60 days (if you run the DISM modification command). |
Advanced Fixes: Using WUSA and WinRE for Boot Loops
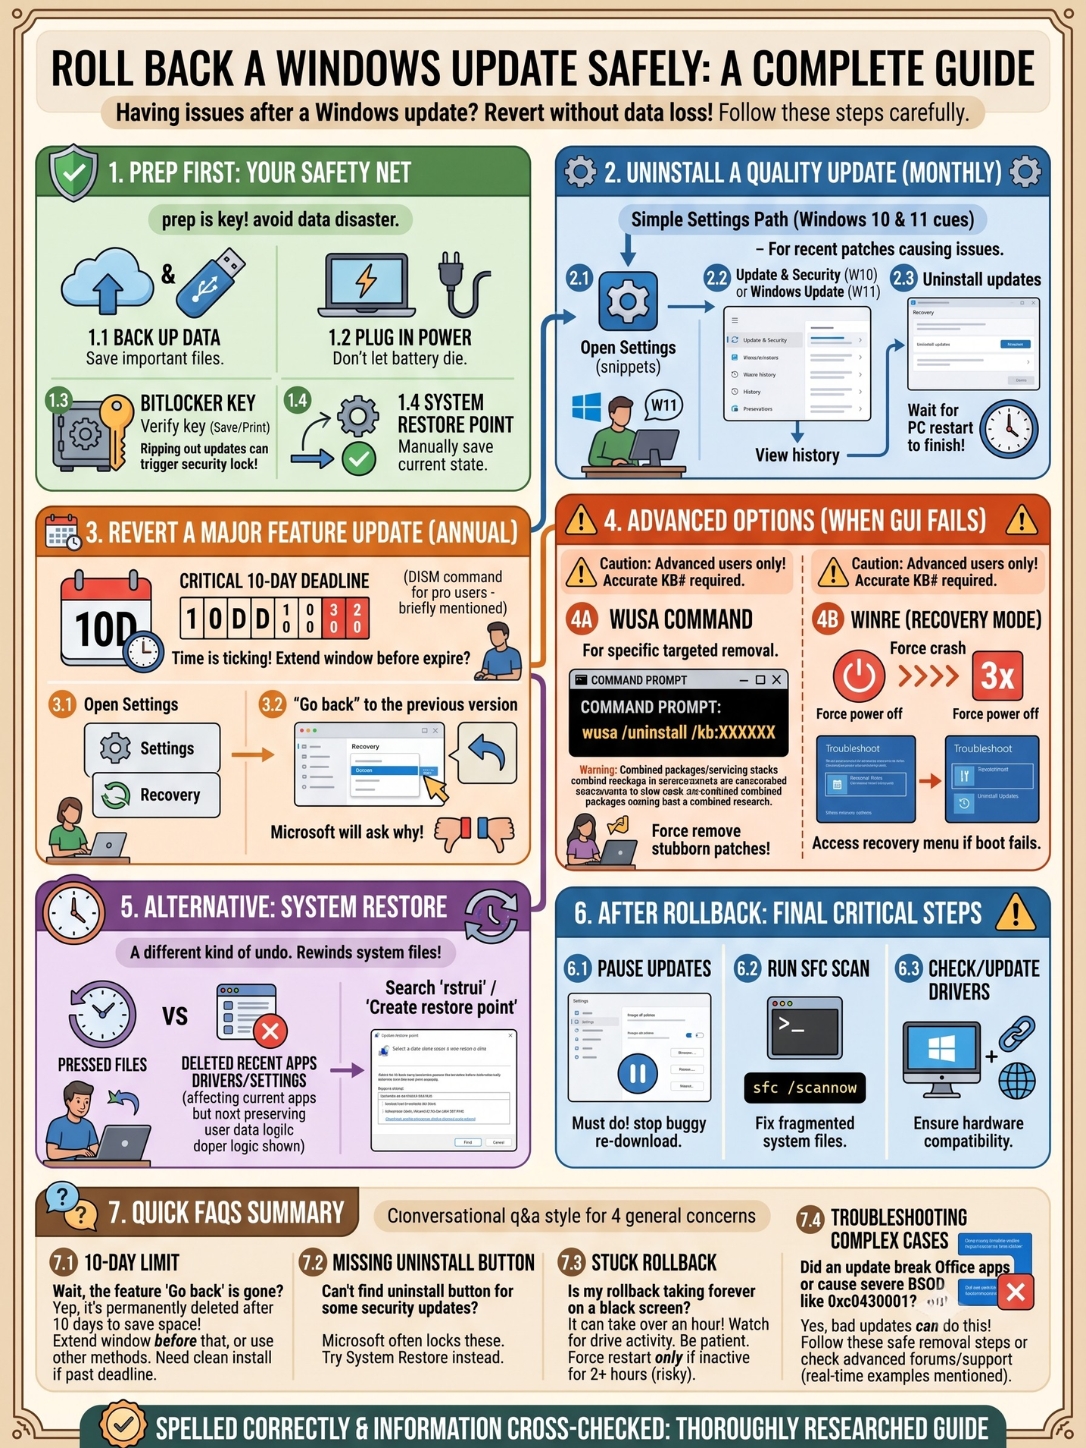
Sometimes the Settings app freezes solid. Or worse, your PC won’t even boot to the desktop to let you click anything. When the regular buttons fail, bring in the heavy machinery to roll back a Windows update directly from the command line or recovery screen.
Using Command Prompt (WUSA)
The Windows Update Standalone Installer (WUSA) forces a patch out by targeting its specific KB number. System administrators use this method constantly.
- Press Win + R, type cmd, and press Ctrl + Shift + Enter to run it with full Admin rights.
- Type wmic qfe list brief /format:table to see a clean list of installed updates. Find the offending KB number (e.g., KB5094126).
- Type wusa /uninstall /kb:5094126 (swap with your actual number) and hit Enter. Let the tool rip the files out.
Using Windows Recovery Environment (WinRE)
Stuck in an infinite boot loop? Attack the problem from the outside using WinRE.
Turn on the PC. The second you see the Windows logo spinning, hold your physical power button for 5-10 seconds until the machine shuts off completely. Do this exact process three times in a row. On the third boot, Windows realizes it is crashing and triggers the blue Automatic Repair screen.
Click Advanced options, select Troubleshoot, then hit Advanced options again. Click the Uninstall Updates button. Choose either “Uninstall latest quality update” or “Uninstall latest feature update” based on what installed right before the crashes started.
|
Advanced Method |
When to Use It |
What You Need |
|
WUSA Command Line |
The Settings app freezes or crashes entirely. |
Admin Command Prompt, specific KB number. |
|
WinRE (Recovery) |
The PC is stuck in an infinite boot loop. |
Physical access to the power button to force crashes. |
|
Safe Mode Uninstall |
Background apps block the standard uninstall. |
F8 key during boot to load minimal system drivers. |
The Nuclear Option: System Restore and Known Issue Rollbacks
Sometimes a bad patch corrupts your registry so badly that the uninstall button breaks. In other cases, Microsoft actually blocks the uninstallation of specific Servicing Stack Updates (SSUs) for security reasons. Your escape hatch here is System Restore. This is the absolute safest way to roll back a Windows update when core system files get severely fragmented.
System Restore doesn’t just delete a package. It rewinds your entire system registry, drivers, and system files to a past snapshot.
Hit the Windows key, type Recovery, and open System Restore. Pick a date from right before the crashes started, click Next, and step away for about 30 minutes. It fixes the operating system without touching a single one of your photos or documents.
For enterprise users, IT admins rely on Known Issue Rollback (KIR). When a patch breaks specific functionality, Microsoft releases a KIR policy. Admins push this policy via their network servers to instantly neutralize the bad code without uninstalling the whole update across thousands of machines.
|
Recovery Tool |
How It Works |
What It Touches |
|
Update Uninstall |
Removes a specific Microsoft patch manually. |
Only the update file and its related background services. |
|
System Restore |
Rewinds the registry to a snapshot in time. |
System files, recent app installs, and driver updates. |
|
Known Issue Rollback |
Neutralizes bad code via Group Policy. |
Specific targeted files (enterprise environments only). |
Post-Rollback Survival: Pausing Updates and Driver Scans
You did it. The bad patch is gone, and your PC works normally again. But watch out—Windows will relentlessly try to download that exact same broken file tonight while you sleep.
Go to Settings > Windows Update and click Pause updates. Push the pause out for a few weeks. That buys Microsoft engineers enough time to fix their broken code and release a quiet hotfix that actually works.
Next, run a system file scan. Open an Admin Command Prompt and type sfc /scannow. Hit Enter. This tool hunts down and automatically fixes any fragmented system files left behind by the bad patch.
Finally, hit up your PC manufacturer’s website. Grab the latest BIOS and hardware drivers. Often, a Windows crash happens purely because an outdated hardware driver threw a fit when it met the new Microsoft code.
|
Post-Rollback Action |
How to Do It |
Why It Matters |
|
Pause Updates |
Click pause in Windows settings. |
Stops the broken patch from downloading again tonight. |
|
Run SFC Scan |
Type sfc /scannow in Admin CMD. |
Fixes corrupted OS files left behind during the uninstall. |
|
Check Drivers |
Visit your PC maker’s support page. |
Outdated hardware often triggers the actual system crash. |
|
Create Restore Point |
Save your system state manually. |
Sets a known-good baseline for the next time updates fail. |
Final Thoughts
Technology works for you, not the other way around. You should never feel locked out of your own hardware just because Microsoft pushed a buggy string of code on a Tuesday night. Since no amount of corporate beta testing catches every glitch, you need to stay prepared.
Whether you click through the basic Settings menu, extend your time limit with the DISM tool, or force a fix straight through the Windows Recovery Environment, you now have the exact blueprint to rescue your PC whenever you need to roll back a Windows update.
Always back up your data, never interrupt a reboot while the screen is spinning, and immediately pause those automatic updates the second your machine stabilizes.
|
Key Takeaway |
Actionable Rule |
|
Act Fast |
Don’t wait. You only have 10 days to revert major feature updates natively. |
|
Command Line Power |
Use WUSA or WinRE when the graphical menus freeze or fail. |
|
Stop the Loop |
Always pause updates for 2-3 weeks immediately after a successful rollback. |
Uncommon FAQs About Windows Rollbacks
Search any tech forum, and you see the exact same panicked questions popping up after a bad patch Tuesday. Let’s clear up the confusion.
What causes the 0xc0430001 BSOD after an update?
Recent patches (like June 2026’s KB5094126) caused this exact Blue Screen, heavily impacting HP business laptops. It happens when Secure Boot refuses to trust the new boot path after the update alters the EFI storage partition. Turn off Secure Boot in your BIOS, uninstall the update via WinRE, and re-enable Secure Boot afterward.
Why did my Office apps crash right after a Windows update?
Microsoft accidentally broke OLE automation in a recent security patch. If third-party software tries to automatically open Word or Excel, the programs crash instantly. You have to remove the specific KB patch to restore that functionality until Microsoft issues a permanent fix.
I missed the 10-day limit. Can I still revert?
You are out of luck officially. Windows wiped the backup folder to save hard drive space. You have to back up your files manually and perform a completely clean installation of the older OS from a bootable USB drive.
Microsoft permanently locks down certain core security updates and Servicing Stack Updates. You cannot remove them manually via the Settings app. You must use System Restore instead.
Stuck on a black screen during the rollback?
Wait it out. Rollbacks take anywhere from 5 minutes on a fast NVMe SSD to over an hour on an older mechanical hard drive. Only force a hard reset if the machine sits dead silent with zero hard drive light activity for over two hours.
|
FAQ Topic |
The Fast Answer |
Your Next Step |
|
0xc0430001 BSOD |
Secure Boot rejected the new boot path. |
Disable Secure Boot in BIOS, remove patch, re-enable. |
|
Missing Uninstall Button |
Core security patches are locked. |
Use System Restore to bypass the restriction. |
|
10-Day Limit Passed |
Rollback functionality is disabled. |
Do a clean OS install via a USB flash drive. |
|
Frozen Black Screen |
Uninstalls take up to an hour. |
Don’t force a restart unless it sits inactive for 2+ hours. |