
You just ripped the plastic off a brand-new device. Peeling that screen protector feels amazing, but reality sets in ten seconds later. Moving your entire digital footprint—massive photo libraries, messy group chats, banking apps, and weirdly specific alarm settings—used to be an absolute nightmare.
Thankfully, Apple finally fixed this chaotic mess. If you are upgrading your hardware in 2026, the migration process is surprisingly painless. Whether you are jumping from an old Lightning port to the newer USB-C standard, or just bumping up a generation to the latest iOS, you have a few rock-solid options. I’ll show you exactly how to transfer data to new iphone without losing your mind, your streak on language apps, or your Apple Watch health history. Let’s get your digital life moved over smoothly so you can actually start enjoying your new screen.
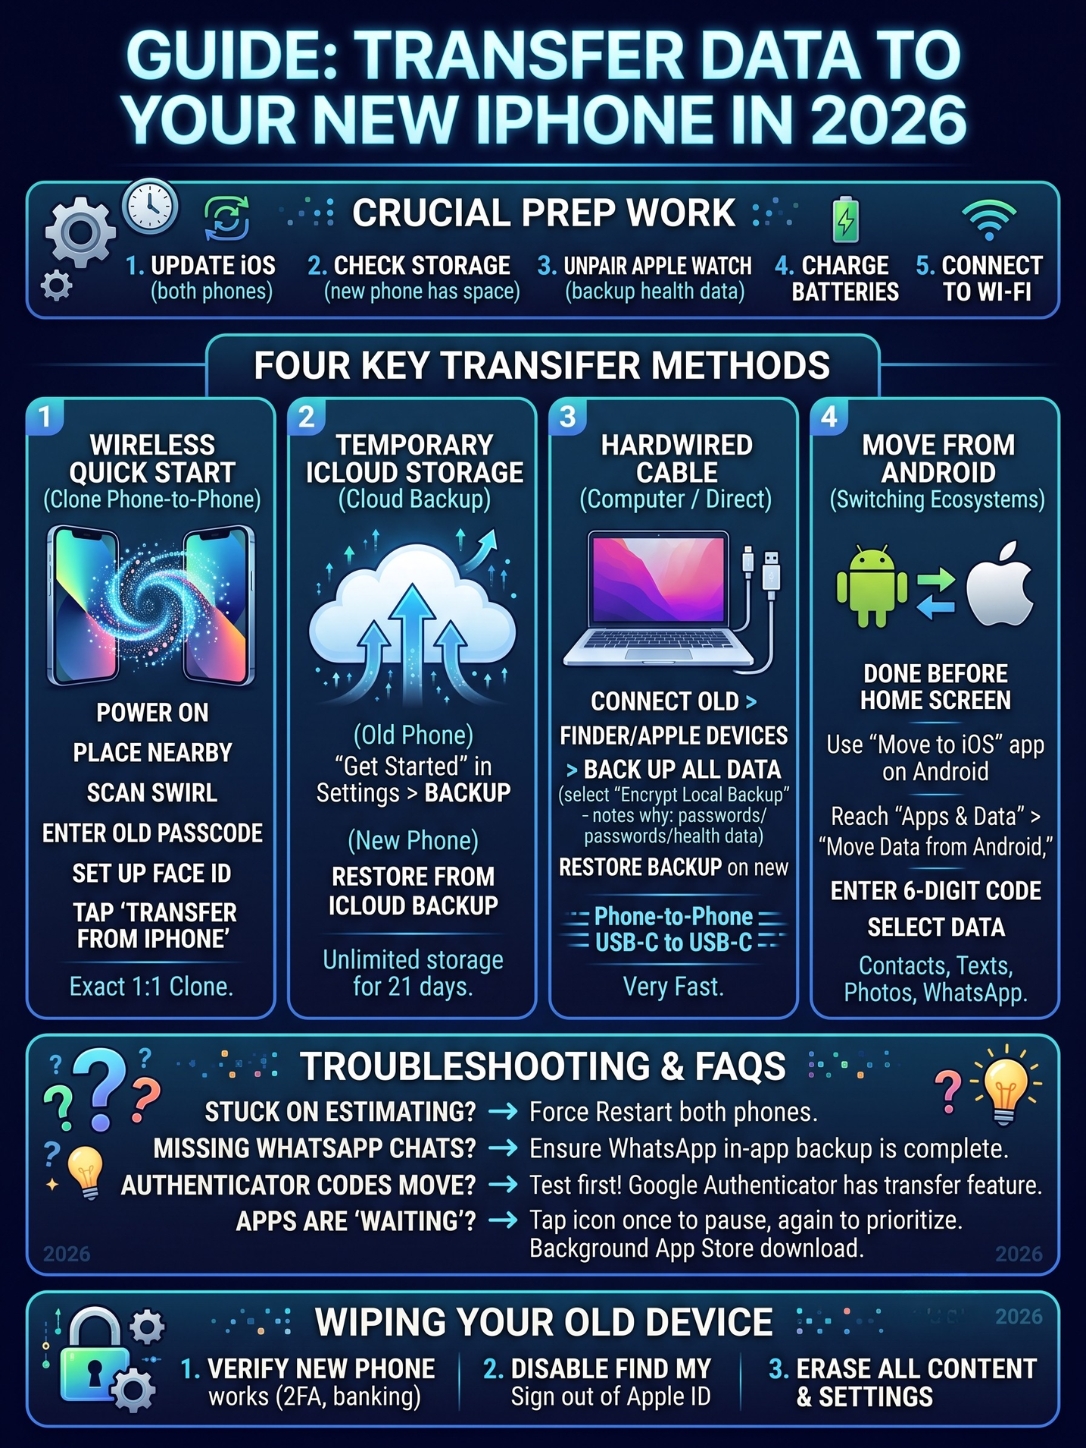
Crucial Prep Work Before You Start
Don’t just slam the phones together and hope for the best. A tiny bit of prep work prevents those annoying “transfer failed” errors that force you to start over from scratch. Give yourself ten minutes to prep the old hardware first.
|
Prep Task |
Why You Must Do It |
Time Needed |
|
Update iOS |
Fixes bugs that cause wireless transfers to freeze at 90%. |
15 mins |
|
Check Storage |
Ensures the new device actually has room for your old files. |
2 mins |
|
Unpair Watch |
Forces a backup so you do not lose your health and workout data. |
5 mins |
|
Charge Up |
A dead battery midway corrupts the entire migration. |
Varies |
Grab your old phone first. Head to Settings > General > Software Update. If there is a pending update, run it immediately. Apple’s Quick Start features practically demand both phones run the same software version. If you skip this, your setup will probably stall out halfway through.
Also, if you wear an Apple Watch, unpair it right now. I see people skip this step constantly, and they end up losing months of hard-earned workout history. Unpairing automatically forces a fully encrypted backup of your watch to your old phone, which then seamlessly moves to the new one. Finally, take a quick peek at Settings > General > iPhone Storage. Make sure you aren’t trying to squeeze 256GB of data onto a 128GB phone. If you are out of space, delete some heavy video files before you start.
Method 1: The Wireless Quick Start Approach
This is the route I recommend for almost everyone. It uses local Wi-Fi and Bluetooth to build a direct, temporary bridge between your devices. It effectively clones your old phone’s layout, right down to your Safari tabs and lock screen widgets.
|
Quick Start Feature |
What You Need to Know |
|
Best Used For |
Getting an exact, 1:1 clone of your old home screen and settings. |
|
What You Need |
Both phones on hand, Wi-Fi connected, and Bluetooth active. |
|
Average Time |
20 minutes to 2 hours (heavily depends on camera roll size). |
|
The Main Catch |
Both screens are locked. You cannot use either phone during this. |
Here is the exact breakdown of how to run the proximity transfer:
- Turn on the new device and place it right next to your old one.
- A prompt pops up on your old screen saying “Set Up New iPhone.” Hit Continue.
- A swirling blue animation will appear on the new display. Scan it with your old phone’s camera, centering the animation in the circle.
- Punch in your old passcode on the new device when asked. This unlocks your encrypted keychain passwords.
- Set up Face ID when prompted.
- When you hit the “Transfer Your Data” screen, tap Transfer from iPhone.
Leave them plugged into the wall and walk away. Don’t separate them, or the connection breaks. When you transfer data to new iphone directly like this, you bypass the cloud entirely. Once the progress bar finishes, your new screen will boot up looking exactly like your old one. Even your app login sessions are usually still active.
Read Also: How to Stop iPhone Apps From Tracking You
Method 2: How to Transfer Data to New iPhone Using the Cloud
Trading in your old phone at the store today? You can’t use the direct Quick Start method if the cashier needs to wipe and take your old device immediately. You need a cloud backup. Apple now hands out free, unlimited temporary iCloud space specifically for this exact scenario.
|
iCloud Feature |
What You Need to Know |
|
Best Used For |
Mail-in trade-ins or setting up a phone when you lack the old hardware. |
|
What You Need |
A strong home Wi-Fi connection and your Apple ID password. |
|
Cost |
100% free. Apple gives you unlimited space for 21 days. |
|
The Main Catch |
Heavy apps and massive photo albums take hours to finish downloading. |
If you need to move fast before handing your old device over, this is your lifeline. A few days before you switch, grab your old phone and go to Settings > General > Transfer or Reset iPhone. Tap Get Started under the top banner. Apple instantly grants you 21 days of unlimited storage to back up every single byte. Tap Turn On Backup to Transfer.
When you finally unbox the new device, bypass the initial proximity prompt and tap “Set Up Manually.” Connect to Wi-Fi, reach the “Apps & Data” screen, and hit Restore from iCloud Backup.
Here is the best part about this method: your core settings, contacts, and text messages load almost instantly, making the phone usable right away. Your heavier apps and massive photo library will quietly download in the background over the next 48 hours while you go about your day.
Method 3: The Hardwired Cable Route for Massive Files
Wireless transfers are super convenient right up until you realize you have 500GB of 4K video sitting on your camera roll. Pushing that much weight over the air can take an eternity, and a single Wi-Fi drop means starting over.
|
Wired Setup |
Cable You Need |
Software Required |
|
Direct Phone-to-Phone |
A single USB-C to USB-C cable. |
None (built directly into iOS). |
|
Mac (Catalina or newer) |
Any compatible charging cable. |
Finder. |
|
Windows PC |
Any compatible charging cable. |
iTunes or the Apple Devices App. |
Using a physical cable to transfer data to new iphone is the absolute safest bet if you are a heavy content creator or have a spotty home internet connection.
If you have a Mac or PC, plug the old phone in. Open Finder (or the Apple Devices app on Windows). Click your phone icon, then hit Back up all of the data on your iPhone to this Mac/PC. Here is the most critical part: check the box that says Encrypt Local Backup and type in a password. If you skip encryption, Apple deliberately excludes your saved Wi-Fi passwords and health data from the backup for security reasons. Once the backup finishes, plug the new phone in and hit Restore Backup.
Don’t want to use a computer? Plug the two phones directly into each other. Since all recent Apple releases use standard USB-C ports, a standard USB-C to USB-C cable works perfectly. Just follow the Quick Start steps from Method 1. The phones automatically detect the cable and route the file payload through the physical wire instead of Wi-Fi. It is incredibly fast and avoids local network congestion entirely.
Method 4: Switching from Android to Apple
Switching teams from Google to Apple? The process is a breeze now, but there is a major catch: you have to run the migration before you reach the Apple home screen.
|
Data Type |
Does It Move from Android? |
|
Contacts & Texts |
Yes, they map perfectly to the native Apple apps. |
|
Photos & Videos |
Yes, they drop straight into the iOS Camera Roll. |
|
WhatsApp Chats |
Yes, but only if you explicitly select it during the setup. |
|
Paid Apps |
No, you have to buy them again on the App Store. |
You cannot merge Android data onto an iOS device that is already set up and running. You have to trigger the move from the factory “Hello” welcome screen.
Boot up the Apple device. Stop when you hit the “Apps & Data” screen and tap Move Data from Android. On your Android, download Apple’s official Move to iOS app from the Google Play Store. Open it up, enter the six-digit code displayed on your iPhone, and pick exactly what you want to bring over.
Leave both phones completely alone until the Apple loading bar finishes. The Android screen might say it finished early, but ignore it. Wait for the iPhone to confirm the migration.
How to Handle eSIM Activation During Setup
Physical SIM cards are essentially dead in 2026. Most modern carriers rely entirely on eSIMs, which are digital SIM cards tied directly to your hardware. Moving your phone number used to require calling your carrier, but now it happens automatically during the setup.
|
eSIM Scenario |
What to Expect |
|
Carrier Supports Quick Transfer |
A prompt asks to “Transfer Cellular Plan.” You tap confirm, and it works instantly. |
|
Carrier Requires Authentication |
You will receive a text message on the old phone with a PIN to authorize the swap. |
|
Buying Unlocked |
You might need to scan a QR code provided by your carrier’s app. |
During the Quick Start or iCloud restore process, the setup screen will usually pause and ask if you want to bring your phone number over. Just tap the number you recognize and confirm. Your old phone drops network service, and the new one immediately picks up the 5G signal.
If it fails, don’t panic. Finish setting up the phone over Wi-Fi. Once you hit the home screen, go to Settings > Cellular > Add eSIM and follow the prompts to ping your carrier directly.
Verifying Your Transfer and Wiping the Old Device
Once you successfully transfer data to new iphone, do not just toss the old phone in a junk drawer or hand it to the store clerk immediately. You need to verify your apps and securely wipe the storage drive so your personal data cannot be recovered.
|
Post-Transfer Task |
How to Do It |
|
Check 2FA Apps |
Open Google Authenticator or Authy on the new phone. Ensure your codes generate properly. |
|
Log into Banking |
Open your financial apps. Security protocols require you to manually log into these again. |
|
Disable Find My |
Go to Settings > [Your Name] > Sign Out. This removes the Activation Lock. |
|
Factory Wipe |
Go to Settings > General > Transfer or Reset iPhone > Erase All Content and Settings. |
Take ten minutes to open your most important apps. The biggest headache people face is getting locked out of their accounts because they wiped their old phone before moving their Two-Factor Authentication (2FA) tokens. Test your authenticator apps right away.
Once you know the new device works perfectly, sign out of your Apple ID on the old hardware. This disables Find My and removes the theft protection. Finally, hit “Erase All Content and Settings.” This permanently destroys the encryption keys on the old device, making your leftover data totally unreadable to whoever buys it next.
Final Thoughts
Learning to transfer data to new iphone shouldn’t require a degree in computer science or a stressful gamble with your digital memories. By knocking out a few minutes of prep work—like running software updates and checking your storage capacity—you dodge almost every major roadblock.
Pick the method that fits your situation best. The wireless Quick Start is perfect for cloning a device at home, the temporary iCloud storage is a lifesaver for mail-in trade-ins, and a direct USB-C cable handles massive file libraries like a champ. Keep both batteries charged, stay patient while the progress bar does its thing, and enjoy exploring your upgraded hardware without missing a beat.
Uncommon FAQs and Troubleshooting
Even the smartest software gets stuck sometimes. Here is how to fix the weird glitches that pop up during the migration, pulled straight from the most common search trends this year.
|
The Problem |
The Quick Fix |
|
Stuck on “Estimating Time Remaining” |
Force restart both phones, keep them physically touching, and run the process again. |
|
Apps grayed out and stuck on “Waiting” |
Tap the grayed-out icon once to pause it, then again to force the download to prioritize. |
|
Missing WhatsApp chat history |
You didn’t run an in-app backup first. Back up WhatsApp on the old phone via its own settings menu. |
Why do some apps take so long to appear?
Quick Start doesn’t actually move the heavy application files over Bluetooth. It moves your personal profile data, then tells the new phone to download a fresh, optimized copy of the app directly from the App Store. If you have a slow home internet connection, pulling down 50 massive apps takes hours. Tap a stuck app once to pause it, then tap it again to bump it to the front of the download queue.
Do my Google Authenticator codes move over automatically?
Yes, but you have to be careful! Google Authenticator supports cloud syncing now. Open Authenticator on the old device and make sure cloud syncing is active. Alternatively, use its internal “Transfer Accounts” feature to generate a massive QR code on the old screen, then scan it with the new phone. Always test your codes on the new hardware before factory resetting the old one.
Can I use my old phone while it transfers?
If you use the iCloud or Mac/PC backup method, yes. You can use it normally the second the snapshot backup finishes. But if you use the device-to-device Quick Start method, no. Both screens lock you out completely until the progress bar hits 100%. Plan your migration for a time when you won’t need to answer urgent texts.