
Deleting the wrong file on a Mac is painfully easy. One quick cleanup, one empty Trash click, and an important document can disappear.
Maybe it was a work folder on the Desktop. Maybe it was a photo, a downloaded PDF, or a file you spent hours editing. Whatever went missing, don’t panic yet.
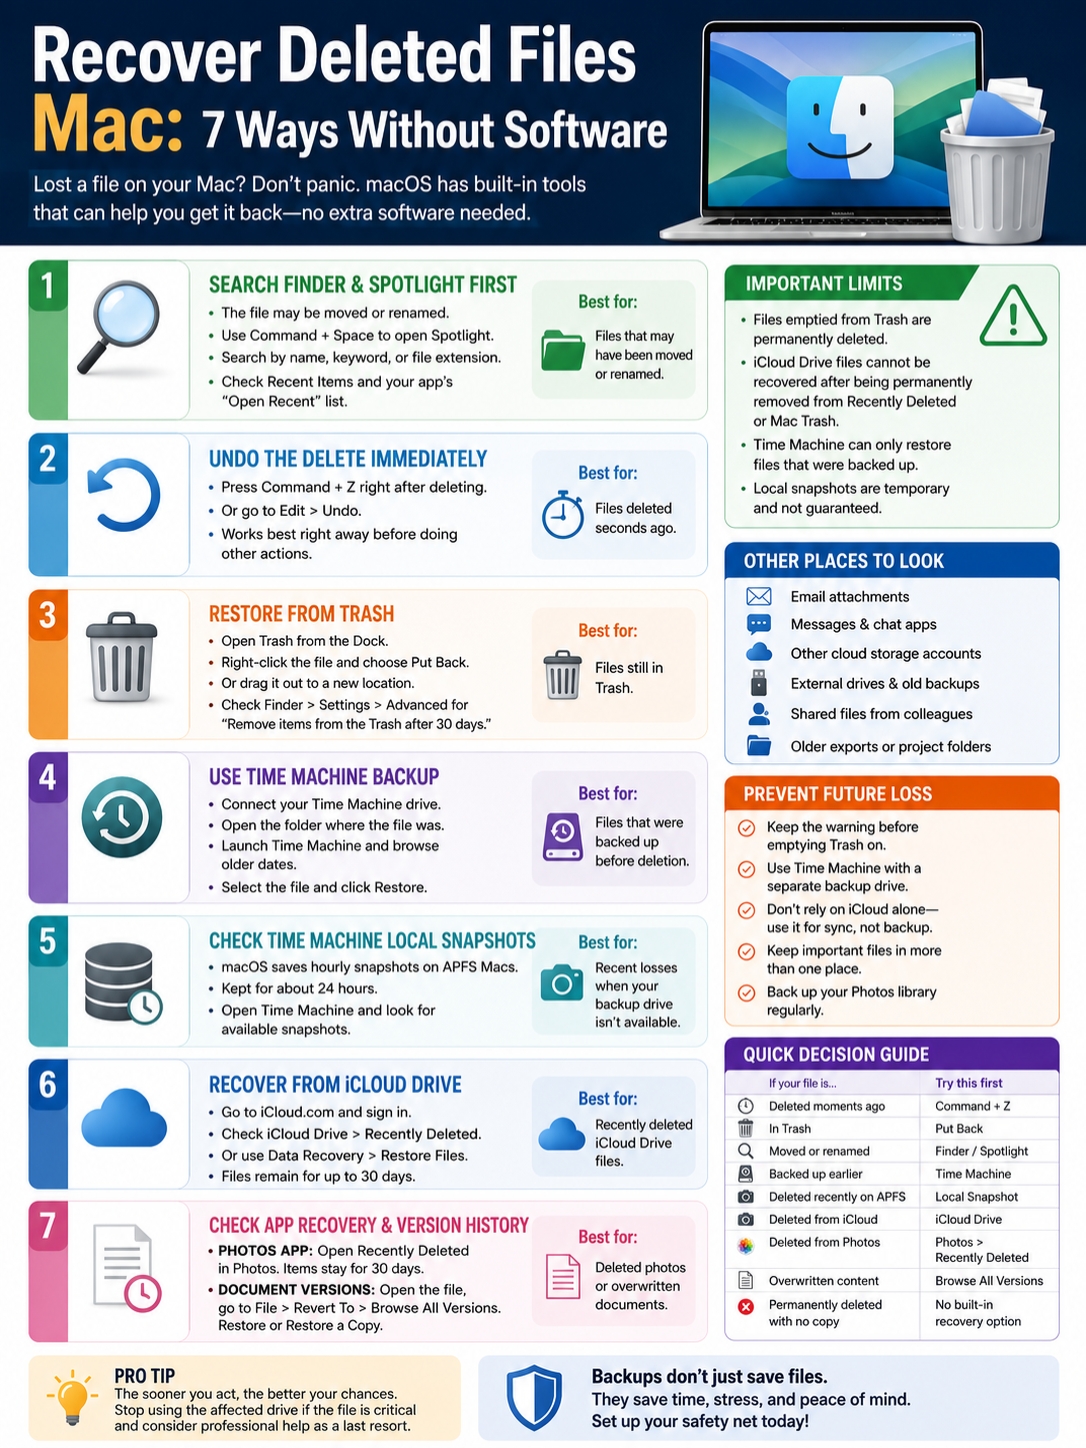
macOS has several built-in recovery tools. You may be able to recover deleted files on Mac without downloading anything. The right method depends on where the file was stored and how long ago you deleted it.
Start with Finder, Undo, and Trash. If the file isn’t there, move on to Time Machine, local snapshots, iCloud, Photos, or document version history.
There is one catch. If the file was permanently deleted and no other copy exists, macOS can’t magically rebuild it. Apple treats files emptied from Trash as permanently deleted and no longer available there.
Recover Deleted Files Mac: Start With These Options
A missing file isn’t always deleted. It may have been moved, renamed, or saved somewhere you didn’t expect.
Work through these methods in order. The quickest fix is often the simplest one.
|
Priority |
Method |
Best For |
Main Limit |
|
1 |
Finder and Spotlight |
Files that may have moved |
Search won’t restore deleted data |
|
2 |
Command-Z |
A file deleted seconds ago |
Undo history doesn’t last forever |
|
3 |
Trash and Put Back |
Files still sitting in Trash |
Won’t work after Trash is emptied |
|
4 |
Time Machine |
Deleted files included in a backup |
The file must have been backed up |
|
5 |
Local snapshots |
Recent losses without the backup disk |
Snapshots are temporary |
|
6 |
iCloud recovery |
Recently deleted iCloud files |
Usually limited to 30 days |
|
7 |
App recovery and versions |
Photos or overwritten documents |
Support varies by app |
Before you start, write down what you remember about the file:
- Part of the file name
- The file type, such as PDF, DOCX, JPG, or MOV
- The folder it was in
- The last time you opened it
- The app used to create it
- Whether it was stored in iCloud Drive
A few small details can save a lot of searching.
Search Finder and Spotlight Before Assuming It’s Gone
Files get moved by accident all the time. A document dragged into the wrong folder can feel just as lost as a deleted one.
|
Search Tool |
What to Try |
Why It Helps |
|
Spotlight |
File name, phrase, or extension |
Searches the Mac quickly |
|
Finder search |
Name, kind, or date |
Gives you better filters |
|
Recents |
Recently opened documents |
Helps when you forgot the location |
|
App history |
Open Recent or recent files |
May reveal the file’s new location |
Press Command-Space to open Spotlight. Type the file name, part of the name, or even the extension.
For example:
- .pages
- .xlsx
- .jpg
Finder gives you more control. Open a Finder window and use the search box in the top-right corner. You can filter results by file type, date, or name.
You should also check the app you used to open the file. Many apps keep a list under File > Open Recent. Even if the file moved, the app may still point to its current location.
This step won’t recover a deleted file. It simply confirms whether the file is really gone.
Undo the Delete Right Away
Deleted the file a few seconds ago? Try Undo before doing anything else.
|
Action |
Shortcut |
What It Does |
|
Undo |
Command-Z |
Reverses the previous supported action |
|
Redo |
Shift-Command-Z |
Reverses an Undo |
|
Open Trash |
Click Trash in the Dock |
Shows files that haven’t been permanently removed |
Click the Desktop or open Finder first. Then press Command-Z.
That matters because the shortcut affects whichever app is active. If you’re working in another app, Command-Z may undo something there instead.
You can also open the Edit menu. macOS often shows the exact action it can undo, such as moving a file to Trash.
Undo works best immediately. Don’t count on it after several other actions, a logout, or a restart.
If nothing happens, check Trash next.
Restore the File From Trash
Most deleted Mac files go to Trash first. They stay there until you empty it or macOS removes them automatically.
|
Trash Option |
What Happens |
|
Put Back |
Sends the file to its old location |
|
Drag out |
Lets you choose a new location |
|
Delete Immediately |
Permanently removes one item |
|
Empty Trash |
Permanently removes everything |
|
Remove after 30 days |
Clears older Trash items automatically |
Use Put Back
- Click Trash in the Dock.
- Find the missing file.
- Control-click it.
- Choose Put Back.
You can also select the file and use File > Put Back from the menu bar.
Put Back is handy when you can’t remember where the file came from. macOS returns it to the folder it occupied before deletion.
You can also drag the file out of Trash and drop it into any folder you like.
Check the 30-Day Trash Setting
Open:
Finder > Settings > Advanced
Look for:
Remove items from the Trash after 30 days
When this setting is on, older items may disappear automatically.
iCloud Drive files follow a similar rule. Apple says deleted iCloud Drive files are removed from Mac Trash after 30 days, even if the normal Finder setting is off.
That makes timing important. The longer you wait, the fewer recovery options you may have.
Recover Deleted Files With Time Machine
If Trash is empty, Time Machine is usually your best built-in option.
It can restore one file, one folder, or an older version. You don’t need to restore the whole Mac.
|
Step |
What to Do |
|
Open the old folder |
Go to where the file used to be |
|
Start Time Machine |
Open it through Spotlight |
|
Browse older dates |
Use the arrows or timeline |
|
Select the item |
Choose the missing file or folder |
|
Restore |
Click Restore |
Restore a File or Folder
- Connect your Time Machine drive if needed.
- Open Finder.
- Go to the folder where the file used to be.
- Open Time Machine.
- Move back to a date when the file still existed.
- Select the file.
- Click Restore.
The file should return to its original folder.
If you don’t remember the exact name, search in Finder first. Then open Time Machine while those search results are visible.
That can help narrow down old backups by file name, type, or date.
Why a File May Be Missing From Time Machine
Time Machine only restores files it captured before they disappeared.
You may not find the file if:
- Time Machine wasn’t set up yet
- The file was created and deleted between backups
- The folder was excluded
- The backup drive isn’t connected
- An old backup was removed to free space
- The file was stored on a drive Time Machine didn’t back up
Time Machine usually keeps hourly backups for the past day, daily backups for the past month, and weekly backups for older periods. Old backups are removed when the backup drive fills up.
Read Also: How to Split Screen on Mac in 2026
Check Time Machine Local Snapshots
A local snapshot is a temporary Time Machine copy stored on the Mac itself.
This can be useful when your normal backup drive isn’t connected.
|
Snapshot Detail |
What It Means |
|
Created roughly every hour |
A recent copy may exist |
|
Usually kept for about 24 hours |
You need to act quickly |
|
Last successful backup may remain |
An older snapshot may still appear |
|
Stored on the Mac’s drive |
It won’t help if that drive fails |
|
Removed automatically |
Availability isn’t guaranteed |
Apple says Time Machine may create a startup-disk snapshot about once an hour. Those hourly copies are usually kept for around 24 hours.
Local snapshots work on APFS-formatted disks. Most modern Macs use APFS, but the feature still depends on Time Machine being set up.
To check:
- Open the folder where the file used to be.
- Start Time Machine.
- Browse the available dates.
- Select the file.
- Click Restore.
Time Machine may show local snapshots automatically when the external backup drive is unavailable.
Don’t rely on them as a long-term backup. macOS removes them when they get old or when the system needs storage space.
Recover Files From iCloud Drive
If the file was stored in iCloud Drive, you may have another chance.
Apple usually keeps supported deleted files for up to 30 days, unless you permanently remove them sooner.
|
Recovery Area |
Best For |
|
iCloud Drive > Recently Deleted |
Deleted iCloud Drive files |
|
Data Recovery > Restore Files |
Other supported recoverable files |
|
Photos > Recently Deleted |
Photos and videos |
|
Mac Trash |
iCloud Drive files still waiting in Trash |
Check Recently Deleted on iCloud
- Sign in to iCloud.com.
- Open iCloud Drive.
- Select Recently Deleted.
- Choose the file.
- Click Recover.
You can also recover several files at once.
Use iCloud Data Recovery
If the file doesn’t appear in Recently Deleted:
- Open Data Recovery on iCloud.com.
- Choose Restore Files.
- Select the files you want.
- Click Restore Files.
Recovered files normally return to their old folders.
Avoid moving or deleting other iCloud files while recovery is running. More changes can make the process harder to follow.
Emptying Trash Can Remove the iCloud Copy Too
This catches many people off guard.
iCloud Drive syncs changes across your devices. Delete a file on one device, and that deletion can appear everywhere.
If you permanently remove an iCloud Drive file from Recently Deleted or empty it from Mac Trash, Apple says you can’t recover it through the normal iCloud recovery tools.
That’s why iCloud Drive should not be your only backup. It is mainly a syncing service. Time Machine gives you a separate history of earlier copies.
Recover Deleted Photos in the Photos App
Photos deleted inside Apple Photos don’t always appear in normal Mac Trash.
They go to Recently Deleted inside the Photos app.
|
Action |
Result |
|
Delete a photo |
Moves it to Recently Deleted |
|
Remove from an album |
Usually keeps it in the main library |
|
Recover within 30 days |
Restores it to the library |
|
Delete from Recently Deleted |
Removes it permanently |
|
Wait past 30 days |
Photos deletes it automatically |
To recover a photo or video:
- Open Photos.
- Choose Recently Deleted under Utilities.
- Unlock the section if asked.
- Select the items.
- Click Recover.
If you removed a picture from a regular album, check the main library first. Removing an item from an album usually does not delete the original photo.
Apple also recommends backing up your Photos library, even when iCloud Photos is turned on. Syncing and backup are not the same thing.
Restore an Older Version of a Document
Sometimes the file isn’t missing. The problem is that the right content was overwritten.
Maybe you deleted several paragraphs, saved the file, and closed it. In that case, document version history may help.
|
Situation |
Best Option |
|
Text or data was overwritten |
Browse All Versions |
|
You want the old file back |
Restore |
|
You want both versions |
Restore a Copy |
|
The whole file is missing |
Use Trash or Time Machine |
Open the file in the app that created it. Then choose:
File > Revert To > Browse All Versions
Move through the timeline and find the version you need.
Click Restore to replace the current document.
To keep the current version as well, hold Option and choose Restore a Copy.
This feature works in apps that support macOS document versions. It won’t help if the entire file is gone.
What to Do After Emptying Trash
This is where recovery becomes much harder.
If the file isn’t in Trash, Time Machine, iCloud, Photos, a snapshot, or version history, look for another copy before assuming it’s gone for good.
|
Possible Copy |
Where to Check |
|
Sent attachment |
Mail, Messages, Slack, or Teams |
|
Cloud copy |
iCloud, Google Drive, Dropbox, or OneDrive |
|
Exported version |
Downloads, Desktop, or an external drive |
|
Shared file |
A coworker or collaborator’s account |
|
Older copy |
Another Mac, USB drive, or archive |
|
App-managed copy |
Recently Deleted or version history |
|
No copy found |
Consider professional help |
Check places people often forget:
- Old email attachments
- Chat uploads
- Shared folders
- USB drives
- External hard drives
- Another Mac
- A coworker’s copy
- Exported PDFs
- Cloud storage accounts
- Previous project folders
Terminal won’t restore a file that has already been permanently deleted.
Some online guides show Terminal commands that move files out of hidden Trash folders. That only works when the file still exists. It isn’t true recovery after Trash has been emptied.
For an irreplaceable file, stop making unnecessary changes to the affected drive. A professional recovery specialist may be worth considering, but no service can promise success.
Build a Better Recovery Setup
The easiest file to recover is the one you backed up before anything went wrong.
Use more than one layer.
|
Protection |
What to Do |
|
Trash warning |
Keep the warning before emptying Trash |
|
Automatic cleanup |
Turn it off if you often restore old files |
|
Time Machine |
Use a separate backup drive |
|
Local snapshots |
Keep Time Machine set up |
|
iCloud Drive |
Use it for syncing, not as your only backup |
|
Manual archive |
Save finished work somewhere separate |
Set up Time Machine here:
Apple menu > System Settings > General > Time Machine
Once it’s running, Time Machine can keep older copies of files and folders. It may also create local snapshots between external backups.
For important work, keep at least one copy outside the Mac’s internal drive. A snapshot stored on the same drive won’t protect you if that drive fails.
Final Thoughts
Start simple.
Search Finder. Try Command-Z. Open Trash. Those three steps solve a surprising number of cases.
If the file is truly gone, check Time Machine, local snapshots, iCloud, Photos, and document history.
|
File Situation |
Best Option |
|
Deleted seconds ago |
Command-Z |
|
Still in Trash |
Put Back |
|
Moved or renamed |
Finder or Spotlight |
|
Backed up earlier |
Time Machine |
|
Deleted recently on APFS |
Local snapshot |
|
Deleted from iCloud |
iCloud Recently Deleted |
|
Deleted from Photos |
Photos Recently Deleted |
|
Overwritten but still present |
Browse All Versions |
|
Permanently deleted with no copy |
No guaranteed built-in fix |
You can often recover deleted files on Mac without software when another copy still exists somewhere. That copy may be in Trash, a backup, a snapshot, iCloud, or an app’s recovery folder.
Once every copy is gone, macOS has little left to work with.
Set up Time Machine now. Keep the Trash warning on. And store important files in more than one place. That small habit can save you from a much bigger headache later.
Frequently Asked Questions
|
Question |
Quick Answer |
|
Can Time Machine restore one file? |
Yes |
|
Can local snapshots work without the external drive? |
Sometimes |
|
Can iCloud restore a file after Trash is emptied? |
Not through normal recovery tools |
|
Are local snapshots permanent? |
No |
|
Can version history restore a deleted file? |
Usually only if the file still exists |
|
Will turning on Time Machine now recover an old deletion? |
No |
Can I Restore One File Without Restoring the Whole Mac?
Yes. Open the old folder, enter Time Machine, select the file, and click Restore.
You don’t need to roll back the entire Mac.
Can I Use a Local Snapshot Without My Backup Drive?
Yes, if Time Machine was already set up and a local snapshot still exists.
These snapshots are temporary, so they may not always be available.
Why Don’t I See Any Local Snapshots?
Possible reasons include:
- Time Machine wasn’t set up
- The Mac drive doesn’t use APFS
- The snapshot expired
- macOS removed it to free storage
- The file was never included
Can iCloud Recover a File After I Empty Mac Trash?
Usually not. Apple says permanently deleted iCloud Drive files can’t be restored through standard iCloud recovery.
Check quickly before the 30-day window closes.
Will Turning On Time Machine Now Bring Back an Older File?
No. Time Machine can’t create a backup from the past.
It only protects files captured after you set it up.
Why Isn’t My Deleted Photo in Mac Trash?
Photos deleted through the Photos app go to Recently Deleted inside Photos.
They stay there for up to 30 days unless you remove them permanently.
Can Version History Recover a Completely Deleted Document?
Usually not.
Version history is designed for a file that still exists but has changed. For a missing file, try Trash, Time Machine, iCloud, or a snapshot.