
Jumping back and forth between two app windows gets frustrating fast.
You copy a figure from Safari, return to your document, lose your place, then repeat the whole process a few minutes later. It wastes time and breaks your focus.
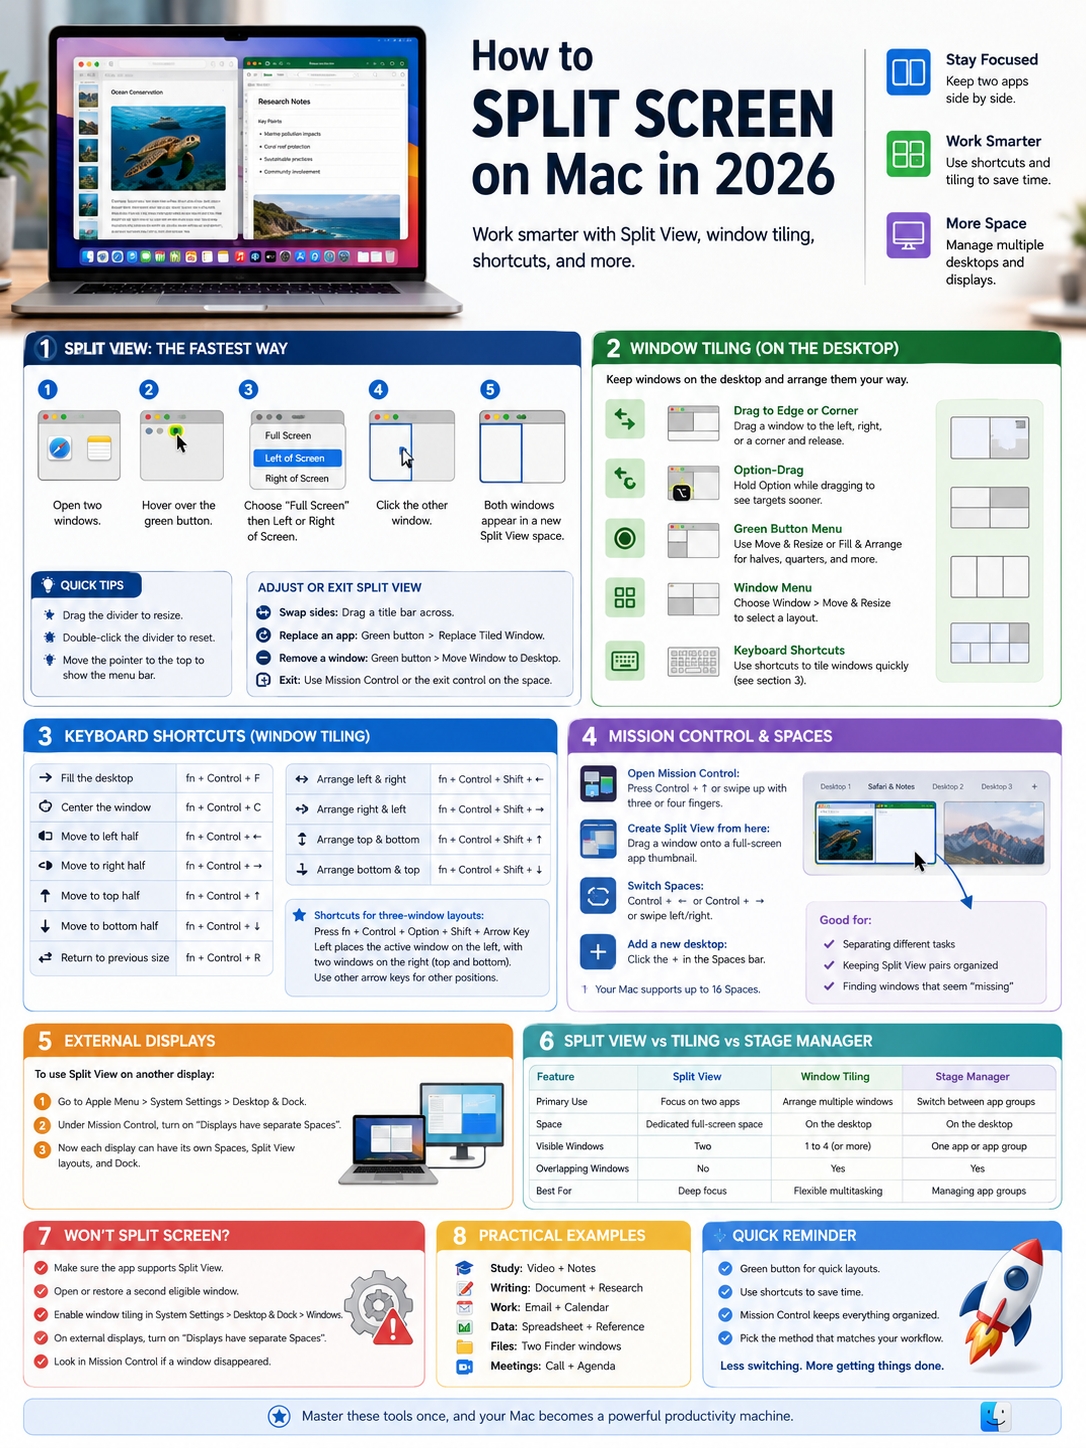
Learning how to split screen on Mac solves that problem. macOS can place two apps side by side in a full-screen workspace. It can also arrange two, three, or four windows across your regular desktop.
Those features sound similar, but they don’t work the same way.
Split View creates a dedicated full-screen space for two windows. Desktop window tiling keeps everything on your normal desktop, so the Dock, files, widgets, and other apps stay close by.
This guide covers both methods, along with keyboard shortcuts, Mission Control, external displays, Stage Manager, and common fixes.
The steps reflect macOS Tahoe 26, Apple’s current released Mac operating system as of July 17, 2026. Apple has also announced macOS 27 for fall 2026, so some menu labels may change later.
Split Screen on Mac: The Fastest Method
The green window button is the quickest place to start.
You’ll find it in the upper-left corner of most app windows, next to the red and yellow buttons.
Follow these steps:
- Open the two apps or windows you want to use.
- Move the pointer over the green button in the first window.
- Hold the pointer over Full Screen.
- Choose Left of Screen or Right of Screen.
- Click the second window on the empty side.
macOS places both windows inside a new Split View space.
|
Action |
What It Does |
|
Left of Screen |
Places the first window on the left |
|
Right of Screen |
Places the first window on the right |
|
Click the second window |
Completes the Split View pair |
|
Drag the middle divider |
Changes each window’s width |
|
Move Window to Desktop |
Removes one window from Split View |
This layout works best when you want two apps in front of you and nothing else getting in the way.
You might use Safari beside Notes, a spreadsheet beside a PDF, or Mail beside Calendar.
How to Split Screen on Mac With Split View
Open both windows before you start. That makes the setup much smoother.
Let’s say you want to work in Pages while keeping Safari open for research. Open both apps, then click the Pages window so it becomes active.
Move the pointer over the green button. Don’t click it straight away. A quick click may send the app into normal full-screen mode instead of showing the layout menu.
When the menu opens, move to Full Screen and choose either:
- Left of Screen
- Right of Screen
The first window slides into position. macOS then shows the other windows that can fill the remaining side.
Click the one you want.
The two windows now sit together in their own desktop space. The Dock and menu bar may disappear, but they haven’t gone anywhere. Move the pointer to the top of the display to reveal the menu bar. Move it to the Dock’s usual position to bring the Dock back.
|
Step |
What to Do |
What Happens |
|
1 |
Open two windows |
Both apps are ready |
|
2 |
Hover over the green button |
Layout controls appear |
|
3 |
Pick a side |
The first window moves into place |
|
4 |
Select another window |
Split View opens |
|
5 |
Start working |
Both apps stay visible |
Older versions of macOS may show slightly different wording, such as Tile Window to Left of Screen or Tile Window to Right of Screen.
The result is the same.
Resize, Swap, Replace, or Exit Split View
Split View doesn’t force both windows to stay the same size.
You can give one app more room by dragging the vertical divider between the windows. This is useful when one app needs most of the screen and the other only needs a narrow column.
For example, you might give your writing app 70 percent of the screen and leave 30 percent for research.
Move the pointer over the divider, then drag it left or right.
Double-click the divider to return the windows to their original proportions.
Some apps have a minimum width. If the divider stops moving, the app may simply be unable to shrink any further.
Swap the Windows
Move the pointer to the top of the screen to reveal the title bars.
Grab one window by its title bar and drag it to the other side. The windows switch places.
Replace One App
You don’t have to close Split View just to bring in another app.
Click the window you want to replace, then:
- Hover over the green button.
- Choose Replace Tiled Window.
- Select another open window.
The new app takes the old app’s place.
Leave Split View
Hover over the green button and choose Move Window to Desktop.
That window returns to the normal desktop. The other app may stay full screen in its own space.
Open Mission Control if you can’t find it.
|
Adjustment |
How to Do It |
|
Make one window wider |
Drag the centre divider |
|
Restore the original sizes |
Double-click the divider |
|
Switch left and right |
Drag a title bar across |
|
Bring in another app |
Choose Replace Tiled Window |
|
Remove one app |
Choose Move Window to Desktop |
|
Keep one app full screen |
Choose Make Window Full Screen |
Use Desktop Window Tiling Instead
Split View isn’t always the best option.
It creates a separate full-screen workspace and hides much of the normal desktop. That’s great for focus, but it can feel restrictive when you need files, widgets, the Dock, or more than two apps.
Desktop window tiling gives you more freedom.
It can arrange windows into halves, quarters, and multi-window layouts without leaving the regular desktop.
Apple gives you several ways to tile windows:
- Drag a window to an edge or corner.
- Hold Option while dragging.
- Use the green window button.
- Open the Window menu.
- Use a keyboard shortcut.
Read Also: How to Reset SMC and NVRAM on a Mac
Drag a Window to an Edge
Click and hold the window’s title bar.
Drag it toward the left or right edge of the screen. A highlighted area appears to show where the window will land.
Release the window.
It snaps into place.
You can also drag a window toward a corner to place it in one quarter of the desktop. Dragging it toward the menu bar can make it fill the desktop.
Hold Option While Dragging
Hold the Option key while moving the window.
The placement target appears sooner, so you don’t have to push the window as far toward the edge.
This small change makes window tiling feel much quicker once you get used to it.
|
Tiling Method |
Best Use |
Opens Full Screen? |
|
Drag to an edge |
Fast mouse or trackpad placement |
No |
|
Option-drag |
Faster target detection |
No |
|
Green button |
Visual layout choices |
Optional |
|
Window menu |
Precise menu control |
Optional |
|
Keyboard shortcut |
Frequent window movement |
No |
Use the Green Button for Halves, Quarters, and More
The green button does much more than switch an app to full screen.
Hover over it and you should see three groups of controls:
- Move & Resize
- Fill & Arrange
- Full Screen
Options under Move & Resize place the current window in a half or quarter of the desktop.
Fill & Arrange can organise several open windows at once.
Full Screen includes standard full-screen mode and the two Split View positions.
Hold the Option key while the menu is open to reveal extra layouts.
Depending on how many windows you have open, macOS may offer:
- Two equal windows side by side
- Two windows stacked vertically
- Four windows in equal quarters
- One large window with two smaller windows
- A centred window
- One window filling the desktop
|
Layout |
Good For |
|
Left and right halves |
Writing beside research |
|
Top and bottom halves |
Watching a lesson while taking notes |
|
Four quarters |
Monitoring several dashboards |
|
One half and two quarters |
One main app with two supporting apps |
|
Centred window |
Focused work without full screen |
|
Fill desktop |
Maximum space with normal desktop behaviour |
You can reach many of the same controls through the menu bar.
Click the window, then choose:
Window > Move & Resize
From there, pick a layout under Halves, Quarters, or Arrange.
Mac Window Tiling Keyboard Shortcuts
Keyboard shortcuts are faster once you use them regularly.
Click the window you want to move, then press the matching key combination.
|
Window Action |
Keyboard Shortcut |
|
Fill the desktop |
Fn-Control-F |
|
Centre the window |
Fn-Control-C |
|
Move to the left half |
Fn-Control-Left Arrow |
|
Move to the right half |
Fn-Control-Right Arrow |
|
Move to the top half |
Fn-Control-Up Arrow |
|
Move to the bottom half |
Fn-Control-Down Arrow |
|
Return to the previous size |
Fn-Control-R |
|
Arrange left and right |
Fn-Control-Shift-Left Arrow |
|
Arrange right and left |
Fn-Control-Shift-Right Arrow |
|
Arrange top and bottom |
Fn-Control-Shift-Up Arrow |
|
Arrange bottom and top |
Fn-Control-Shift-Down Arrow |
The Fn key may show a globe symbol on some Apple keyboards.
macOS also includes shortcuts for three-window layouts.
For example, Fn-Control-Option-Shift-Left Arrow places the active window on the left half of the desktop. Two other windows move into the upper-right and lower-right corners.
Similar shortcuts use the other arrow keys.
One point often causes confusion: these shortcuts control desktop window tiling. They don’t start full-screen Split View.
Apple doesn’t provide a default shortcut for the Left of Screen or Right of Screen Split View commands.
|
Feature |
Default Shortcut? |
|
Tile left or right on the desktop |
Yes |
|
Tile top or bottom |
Yes |
|
Arrange two desktop windows |
Yes |
|
Arrange three desktop windows |
Yes |
|
Enter full-screen Split View |
No |
|
Move directly into a corner |
No default shortcut |
That’s why pressing a tiling shortcut keeps you on the desktop instead of opening a full-screen workspace.
Manage Split View With Mission Control and Spaces
Mission Control gives you a bird’s-eye view of your Mac.
It shows open windows, desktops, full-screen apps, and Split View pairs.
Press Control-Up Arrow to open it.
You can also swipe upward with three or four fingers on a trackpad, depending on your gesture settings.
The Spaces bar appears at the top of the screen. Your regular desktops, full-screen apps, and Split View groups appear there as thumbnails.
Create Split View From Mission Control
You can pair a window with an app that is already full screen.
- Open Mission Control.
- Find the full-screen app in the Spaces bar.
- Drag another window onto its thumbnail.
- Click the new Split View space.
You can also drag one app thumbnail onto another in the Spaces bar.
Move Between Spaces
Use any of these methods:
- Press Control-Left Arrow.
- Press Control-Right Arrow.
- Swipe left or right with three or four fingers on a trackpad.
- Swipe with two fingers on a Magic Mouse.
- Open Mission Control and click a space.
macOS supports up to 16 spaces.
|
Mission Control Task |
Method |
|
Open Mission Control |
Control-Up Arrow |
|
Move to the next space |
Control-Right Arrow |
|
Move to the previous space |
Control-Left Arrow |
|
Create another desktop |
Click the plus button |
|
Pair with a full-screen app |
Drag a window onto its thumbnail |
|
Find a missing app |
Check the Spaces bar |
Spaces become especially useful when one desktop feels too crowded.
You might keep writing tools in one space, communication apps in another, and a Split View research setup in a third.
Use Split View on an External Monitor
Split View also works with external displays.
You need to turn on one important setting first.
Go to:
Apple Menu > System Settings > Desktop & Dock > Mission Control
Turn on Displays have separate Spaces.
This allows each display to manage its own desktops, full-screen apps, and Split View spaces.
It also lets the Dock appear on each display.
You can then build a different layout on every screen.
For example:
- Keep Safari and Notes in Split View on your MacBook.
- Tile Mail and Calendar on an external monitor.
- Leave a video call open on another display.
- Run a creative app full screen on the largest monitor.
|
Display Setting |
Recommended Choice |
|
Displays have separate Spaces |
On |
|
Display mode |
Extended desktop |
|
Mirroring |
Use only when both screens should match |
|
Desktop tiling |
Turn on for easier placement |
|
Stage Manager |
Optional |
Your Mac’s chip and model determine how many external displays it can support. That hardware limit is separate from Split View.
Split View vs Window Tiling vs Stage Manager
macOS now offers several window-management tools, but each one fits a different style of work.
Split View
Split View places two windows in a dedicated full-screen space.
Use it when you want to focus on two apps without seeing desktop clutter.
Window Tiling
Window tiling keeps your apps on the regular desktop.
It works better when you need more than two windows or want easy access to files, widgets, and the Dock.
Stage Manager
Stage Manager puts the current app or app group in the centre of the screen. Recently used apps stay at the side.
You can resize, overlap, group, and separate windows.
|
Feature |
Split View |
Window Tiling |
Stage Manager |
|
Main purpose |
Focus on two apps |
Arrange several windows |
Switch between app groups |
|
Dedicated full-screen space |
Yes |
No |
No |
|
Supports overlapping windows |
No |
Yes |
Yes |
|
Desktop files stay accessible |
Limited |
Yes |
Configurable |
|
Typical visible windows |
Two |
One to four |
One app or app group |
|
Built-in placement shortcuts |
No direct shortcut |
Yes |
Not layout-focused |
For most day-to-day work, desktop tiling feels the most flexible.
Split View works better when you need uninterrupted focus. Stage Manager is useful when you jump between several groups of related apps.
Why Split Screen Isn’t Working on Your Mac
When split screen on Mac stops working, the cause is usually simple.
You may be using an unsupported window, missing a second eligible app, or dealing with a disabled setting.
The App Doesn’t Support Split View
Apple says many apps support Split View, not all apps.
Some small utilities, games, dialog boxes, fixed-size panels, and specialist apps may not appear as options.
Try the feature with a normal Safari, Finder, Notes, Mail, or Pages window. If that works, the original app is likely the problem.
No Second Window Appears
Make sure the second app has an open, visible window.
A menu bar app or background utility doesn’t count. A minimised window may also need to be restored from the Dock.
Dragging to the Edge Does Nothing
Open:
System Settings > Desktop & Dock
Scroll to the Windows section and check these options:
- Drag windows to left or right edge of screen to tile
- Drag windows to menu bar to fill screen
- Hold Option key while dragging windows to tile
- Tiled windows have margins
You can turn each one on or off separately.
Split View Doesn’t Work on a Second Display
Turn on Displays have separate Spaces under Mission Control settings.
A Window Seems to Have Disappeared
It may still be open in another full-screen space.
Press Control-Up Arrow and check the Spaces bar.
|
Problem |
Likely Cause |
Fix |
|
No Split View option |
Unsupported window |
Try another resizable app |
|
No second app appears |
No eligible window is open |
Open or restore another window |
|
Edge dragging fails |
Tiling is disabled |
Turn on window tiling settings |
|
External display fails |
Separate Spaces is off |
Enable Displays have separate Spaces |
|
A window looks missing |
It remains in another space |
Open Mission Control |
|
Shortcut moves the wrong app |
Another window is active |
Click the correct window first |
Restarting the app or updating macOS can also fix temporary interface glitches.
Practical Split-Screen Layouts
The best layout is the one that reduces switching without making everything too small.
On a 13-inch or 14-inch MacBook, two windows usually work well. Four quarter-sized windows often feel cramped, especially when apps have large sidebars or toolbars.
A larger external monitor gives you more room to experiment.
You might keep one main app on half the screen and place two supporting windows in the opposite corners.
|
Task |
Recommended Layout |
|
Writing an article |
Editor beside browser |
|
Taking an online class |
Video beside Notes |
|
Comparing documents |
Two windows in Split View |
|
Entering data |
Spreadsheet beside source file |
|
Organising folders |
Two Finder windows |
|
Coding |
Code editor beside documentation |
|
Joining a meeting |
Video call beside agenda |
|
Researching a topic |
Large browser with two smaller reference apps |
Before changing the whole layout, try hiding an app’s sidebar or toolbar. That often creates enough room to work comfortably.
Final Thoughts
The easiest way to split screen on Mac is still the green window button.
Hover over it, choose a side under Full Screen, then select the second app.
That’s all you need for a clean two-window workspace.
Desktop window tiling gives you more flexibility. It keeps you on the normal desktop, supports more layouts, and works with built-in keyboard shortcuts.
Mission Control helps when you have several desktops or full-screen spaces. Stage Manager works well when you prefer switching between organised app groups.
|
What You Want to Do |
Best Tool |
|
Focus on two apps |
Split View |
|
Keep two windows on the desktop |
Window tiling |
|
Arrange three or four windows |
Fill & Arrange |
|
Move windows with shortcuts |
Tiling shortcuts |
|
Manage several workspaces |
Mission Control and Spaces |
|
Switch between app groups |
Stage Manager |
|
Use different monitor layouts |
Displays have separate Spaces |
Once you understand the difference between Split View and desktop tiling, managing windows becomes much easier.
You spend less time dragging borders and hunting for apps. More importantly, you stay focused on the work in front of you.
Frequently Asked Questions
|
Question |
Quick Answer |
|
Is there a direct Split View shortcut? |
No default shortcut |
|
Can the menu bar stay visible? |
Yes |
|
Can tile gaps be removed? |
Yes |
|
Does Split View work on another display? |
Yes |
|
Can one Split View app be replaced? |
Yes |
Can I Keep the Menu Bar Visible in Split View?
Yes.
Open the menu bar settings and change Automatically hide and show the menu bar to Never.
When the menu bar is hidden, move the pointer to the top of the screen to reveal it.
Can I Remove the Gaps Around Tiled Windows?
Yes.
Open System Settings > Desktop & Dock, scroll to the Windows section, and turn off Tiled windows have margins.
This removes the space around desktop tiles. It doesn’t remove the divider between two full-screen Split View apps.
Can I Use Two Windows From the Same App?
Sometimes.
It depends on how the app handles windows. Apps that open separate documents are more likely to work than apps built around one fixed main window.
Open both windows first and check whether the second one appears as an option.
Why Does One App Stay Full Screen After I Remove the Other?
That’s normal.
When you remove one window from Split View, the other app may stay full screen in the same space.
Press Control-Up Arrow to open Mission Control, then find the app in the Spaces bar.
Can I Split the Screen Into Four Sections?
Yes, but not with full-screen Split View.
Use desktop window tiling instead. Choose a four-quarter layout from Fill & Arrange or Window > Move & Resize.
Does Split View Work With Stage Manager?
They are separate tools.
Split View creates a fixed two-window full-screen space. Stage Manager organises apps into flexible groups.
Use Split View for a steady side-by-side setup. Use Stage Manager when you regularly switch between different groups of apps.