We have all been there. You are tidying up your phone, swiping through old grocery lists or work drafts, and suddenly you realize a vital piece of information is gone. Maybe it was a password hint, a creative idea, or a sentimental letter. The panic that sets in is real, but you do not have to worry just yet. Your iPhone actually has several hidden safety nets designed to catch your data before it disappears forever.
In this guide, we will walk you through every possible step to recover deleted iphone notes so you can get back to your day without the stress of lost data.
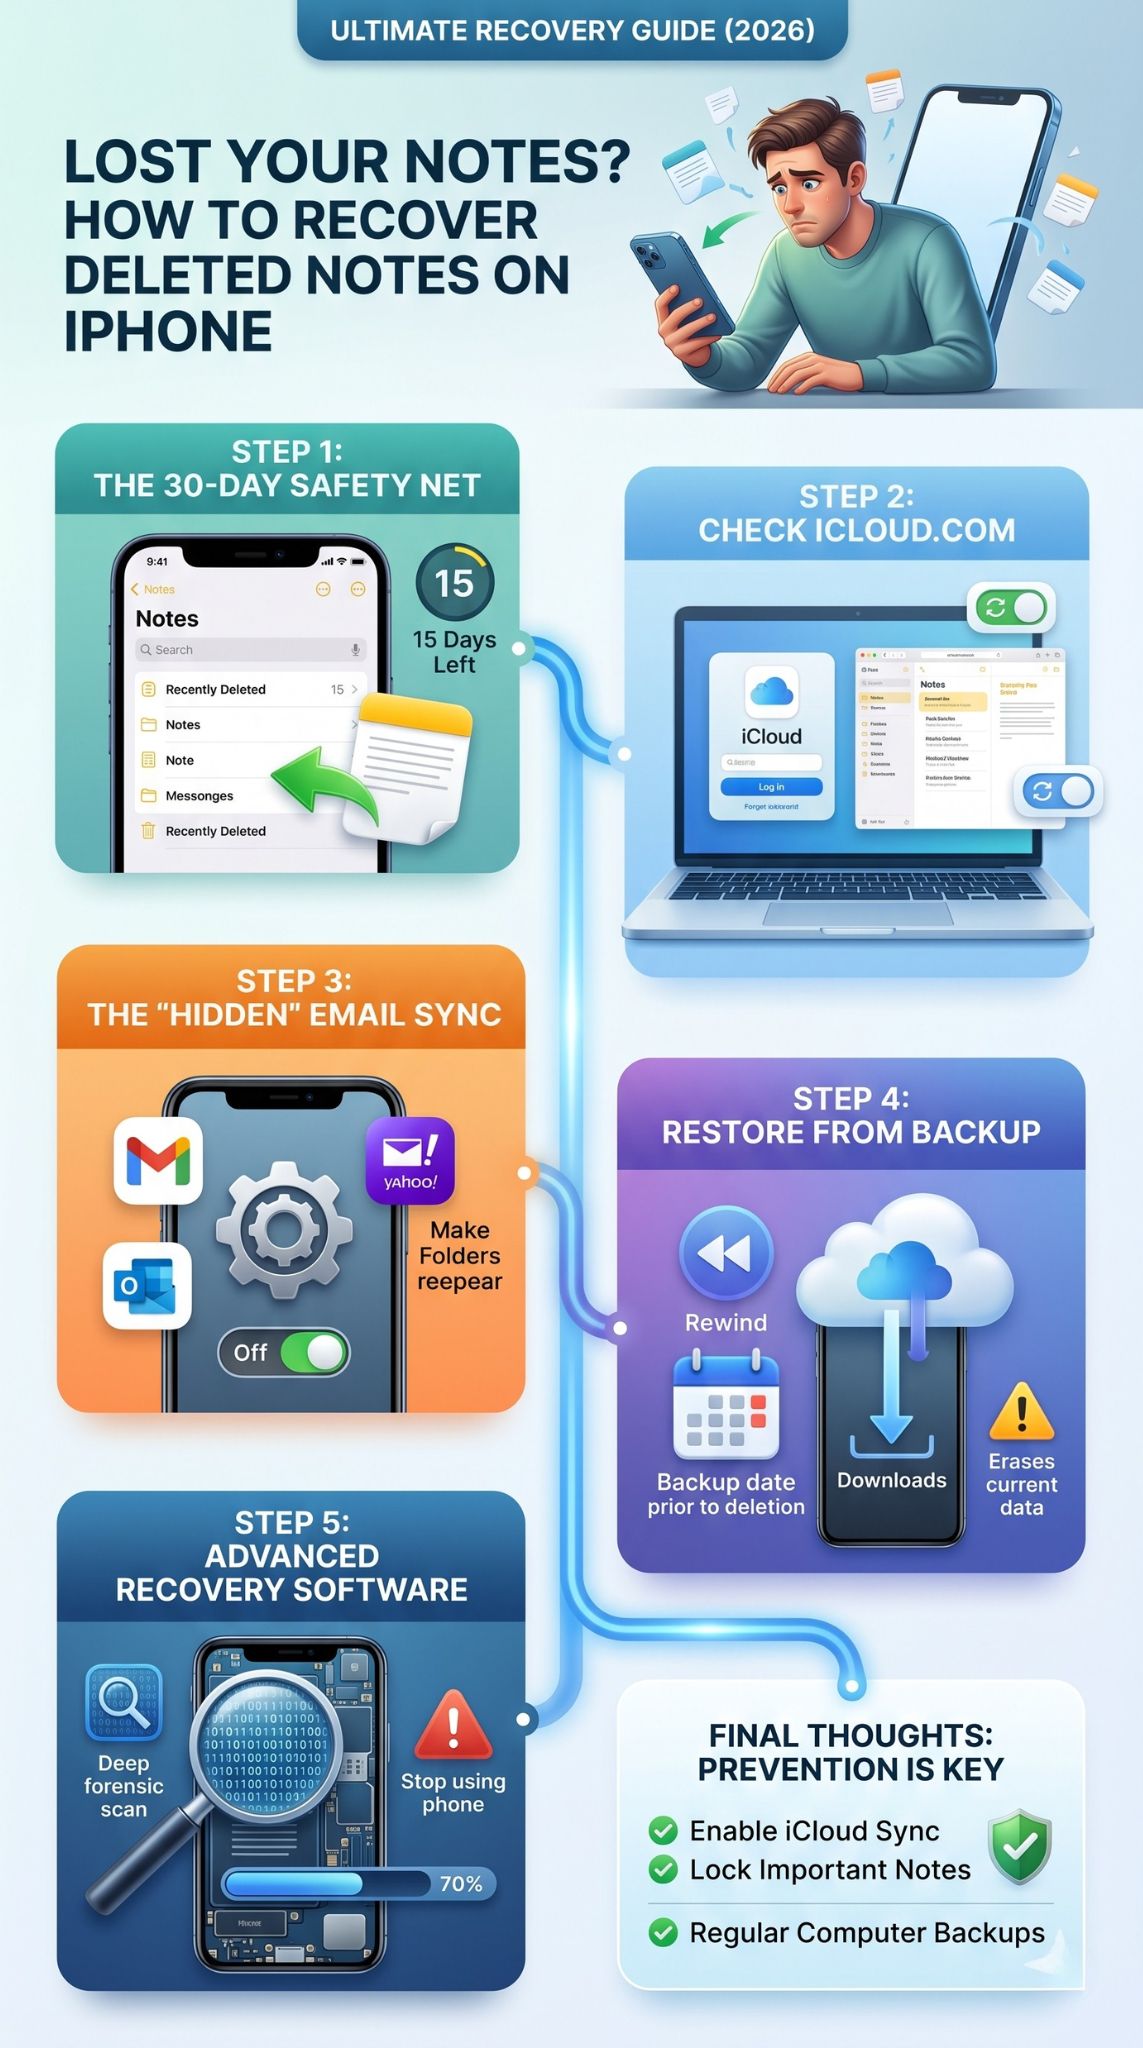
Checking the Recently Deleted Folder First
The most common reason people lose notes is a simple accidental swipe. Apple knows this happens frequently, so they built a “trash can” right into the Notes app itself. This folder acts as a temporary holding cell for anything you have discarded in the last thirty days. It is the quickest and easiest way to fix a mistake without needing a computer or a cloud backup. You should always make this your first stop because it requires the least amount of technical effort and has the highest success rate for recent mishaps.
How the Recently Deleted Folder Works
When you delete a note, iOS does not actually erase the data from your storage immediately. Instead, it moves the file to a specific folder and starts a thirty-day countdown. After those thirty days are up, the system automatically purges the file to save space on your device. This means if you act quickly, your note is exactly where you left it, just in a different folder.
Steps to Restore Your Missing Notes
To get your notes back, open the Notes app and tap the back arrow in the top-left corner until you see your list of folders. Look for the one labeled Recently Deleted. Once you tap into it, you will see all your discarded notes. Tap Edit, select the notes you need, and then tap Move. Choose a permanent folder like On My iPhone or iCloud to bring them back to your active list.
What if the Folder is Missing?
If you do not see the Recently Deleted folder, it usually means one of two things. Either you have not deleted any notes in the last month, or the notes you are looking for were deleted more than thirty days ago. In some cases, if you use a third-party email account to sync notes, that specific account might not support a trash folder. If this is the case, we will need to explore other recovery methods like cloud syncing or backups.
|
Recovery Feature |
Details |
|
Time Limit |
30 Days |
|
Success Rate |
Very High |
|
Difficulty |
Easy (In-app) |
|
Requirements |
iOS 9 or later |
|
Data Type |
Text, Images, Attachments |
Recovering iPhone Notes Using iCloud Sync
If the note is not in your trash folder, the next step is to check your cloud settings. Many users do not realize that their notes are constantly syncing between their iPhone, iPad, and Mac. Sometimes a note might “disappear” from your phone due to a syncing glitch, even though it still exists on Apple’s servers. By logging into the web version of iCloud, you can see the master list of everything Apple has saved for your account. This bypasses any software bugs currently affecting your physical device.
Accessing Notes via iCloud.com
Using a web browser is a great way to verify what data is actually safe. Navigate to the official iCloud website and sign in with your Apple ID. Once you are in, click on the Notes icon. This version of the app looks very similar to the one on your phone. Check the folders here to see if your missing note is visible. If it is, you know the data is safe and you just need to fix the sync settings on your iPhone.
Fixing Syncing Glitches
If you find the note on iCloud.com but not on your phone, try toggling your settings. Go to your iPhone Settings, tap your name at the top, and select iCloud. Find the Notes toggle, turn it off, and then turn it back on. This often forces the phone to re-download everything from the cloud. It is a simple “reset” for your data that does not involve deleting anything permanently.
Checking the Recently Deleted Folder Online
The web version of iCloud also has its own Recently Deleted folder. Sometimes, if a note was deleted on a different device (like a Mac), it might show up in the web trash even if the phone has already cleared its local cache. It is worth taking five minutes to browse through these web folders just to be certain you haven’t missed anything.
|
iCloud Recovery Factor |
Description |
|
Device Required |
Computer or Tablet Browser |
|
Connection |
Requires Internet |
|
Sync Status |
Real-time |
|
Security |
Requires Apple ID 2FA |
|
Benefit |
Bypasses local device glitches |
Finding Notes in Linked Email Accounts
A very common source of confusion is when notes are stored in an email account rather than iCloud. If you have ever added a Gmail, Yahoo, or Outlook account to your iPhone, the system likely asked if you wanted to sync notes. If you said yes, your notes are not being saved to Apple’s servers at all. They are actually being stored as “hidden” emails within your inbox. This is a frequent reason why people think they need to recover deleted iphone notes when the notes are actually just hiding in a different account.
How to Check Account Sync Settings
Go to the Settings app on your iPhone and scroll down to Mail, then tap Accounts. Look through each account listed there (like Gmail or Work Email). Tap on each one and check if the Notes toggle is turned green. If it is off, turning it back on might make an entire folder of “lost” notes suddenly reappear in your Notes app. This happens often after a software update or if you recently changed your email password.
Searching Your Email Folders Manually
If the sync is on but you still don’t see the notes, log into your email provider’s website (like Gmail.com). In the search bar, type “label:notes” or simply search for a folder named Notes. Many email providers treat synced notes as a specific category of messages. You might find your missing text sitting right there in your archive. You can then copy and paste that text back into a fresh note on your iPhone.
Read Also: How to Transfer Photos from iPhone to Mac Without Cable
Moving Email Notes to iCloud
Once you find these notes, it is a good idea to move them to your iCloud account. This makes them easier to manage and ensures they are backed up by Apple’s standard recovery tools. To do this, simply open the note in the email folder, tap the share icon, and select Move to Folder. Choose an iCloud destination to keep everything in one centralized, safe place.
|
Email Provider |
Folder Name |
Sync Method |
|
Gmail |
Notes / All Mail |
IMAP Sync |
|
Outlook |
Notes |
Exchange |
|
Yahoo |
Notes |
IMAP Sync |
|
AOL |
Notes |
IMAP Sync |
Restoring Notes from an iCloud Backup
If you have tried the trash folder and the email accounts and still have nothing, it is time for a deeper dive. This method involves using a full device backup. This is a “time machine” approach where you revert your entire iPhone back to a previous date. While this is a very effective way to recover deleted iphone notes, it is a bit more time-consuming because it requires you to erase your phone and set it up again from scratch.
Verifying Your Backup Date
Before you wipe your phone, you must check when your last backup happened. Go to Settings > [Your Name] > iCloud > iCloud Backup. Look at the timestamp for the “Last successful backup.” If that date is from before you deleted the note, you are in luck. If the backup happened after the deletion, this method will not work because the backup will simply record the fact that the note is already gone.
The Restoration Process
To start the recovery, you have to go to Settings > General > Transfer or Reset iPhone and choose Erase All Content and Settings. Once the phone restarts, follow the “Hello” screen prompts. When you get to the Apps & Data page, select Restore from iCloud Backup. Sign in and pick the specific backup date you identified earlier. Your phone will then spend some time downloading your old data, including those missing notes.
Saving the Recovered Data
Once the restoration is finished, your notes should be back. However, remember that any photos or messages you received between the backup date and today will be missing. The best trick is to quickly copy the text of the recovered note, email it to yourself or save it to a different cloud service, and then restore your phone back to its most recent state. This way, you get your note back without losing your recent photos.
|
Backup Aspect |
Details |
|
Data Loss Risk |
Reverts phone to old date |
|
Time Required |
30 to 60 Minutes |
|
Reliability |
Very High (if backup exists) |
|
Storage |
Uses iCloud space |
|
Cost |
Free (up to 5GB) |
Using Finder or iTunes for Local Recovery
For users who do not like using the cloud or have limited storage, local backups on a computer are the gold standard. Whether you use a Mac with Finder or a Windows PC with iTunes, these backups are often more complete than iCloud versions. If you are the type of person who plugs their phone into a laptop once a week, your missing notes are almost certainly sitting on your hard drive waiting to be rescued.
Connecting to a Mac or PC
Plug your iPhone into your computer using a high-quality lightning or USB-C cable. On a Mac running modern software, open Finder and click on your iPhone’s name in the sidebar. On Windows or older Macs, open the iTunes app. You might need to tap Trust This Computer on your iPhone screen to allow the connection to go through. This is a basic security step to ensure your data stays private.
Restoring from a Local Archive
Under the General tab in Finder or the Summary tab in iTunes, you will see a button that says Restore Backup. Click this and a list of available backups will appear. Choose the one that predates your mistake. The computer will then push that saved image of your phone back onto the device. This process is usually faster than an iCloud restore because it does not rely on your internet download speed.
Benefits of Local Backups
Local backups are great because they often include data that iCloud might skip to save space. They are also much more secure for sensitive information since the data never leaves your physical house. If you manage to recover deleted iphone notes this way, make sure to immediately sync them to the cloud afterward so you have a digital backup for the future.
|
Method |
Best For |
Requirement |
|
Finder (Mac) |
Newer Mac Users |
USB Cable |
|
iTunes (Windows) |
PC Users |
iTunes App |
|
Encrypted Backup |
Password Recovery |
Known Password |
|
Speed |
Large Data Sets |
Wired Connection |
Advanced Third-Party Recovery Tools
Sometimes, official Apple methods just don’t cut it. Maybe you didn’t have a backup, or maybe your trash folder was emptied prematurely. In these dire situations, specialized data recovery software can act as a digital forensic tool. These programs are designed to scan the “raw” storage of your iPhone to find fragments of files that have been deleted but not yet overwritten by new data.
How Data Recovery Software Works
When you delete a file, your iPhone doesn’t actually turn the 1s and 0s into 0s. It just tells the system, “this space is now empty, feel free to write over it.” Until the phone actually needs that space for a new photo or app, your old note is still there—it’s just invisible. Third-party tools like Dr.Fone, PhoneRescue, or Tenorshare UltData specialize in finding these invisible bits of data and piecing them back together.
Choosing a Reliable Tool
You should be very careful when choosing software. The internet is full of “free” tools that are actually malware or that charge you $100 just to see a preview of your file. Stick to well-known brands that have been around for years. Most reputable tools will offer a free trial that lets you see if the note is even recoverable before you have to pay a dime. If the software cannot find the note during the scan, do not buy the full version, as it won’t be able to magically find it later.
Risks and Considerations
Using these tools is generally safe, but they are not 100% guaranteed. If you have been using your phone heavily since the deletion, there is a high chance the old note has already been overwritten. To increase your chances, put your phone in Airplane Mode and stop using it until you can run the scan. This prevents the phone from downloading new data that might land on top of your lost note.
|
Software Name |
Key Feature |
Platform |
|
Dr.Fone |
Comprehensive Toolkit |
Win/Mac |
|
PhoneRescue |
High Recovery Rate |
Win/Mac |
|
UltData |
Deep Scan Mode |
Win/Mac |
|
Enigma Recovery |
Simple Interface |
Win/Mac |
Why Do iPhone Notes Disappear?
Understanding the root cause of why notes go missing can help you prevent it from ever happening again. Most of the time, it is not a “ghost in the machine” but a specific setting or action that triggered the loss. By identifying these triggers, you can set up a more robust system for your digital life. Notes are a core part of how we function, so keeping them stable should be a top priority for any iPhone user.
Accidental Deletion and Human Error
We have all been in a rush and swiped the wrong way. The Notes app has a very sensitive gesture system. If you swipe left on a note in the list view, the delete button appears. A second accidental tap can send that note to the trash. Furthermore, if you are editing a note and accidentally select all text and hit backspace, the note might still exist but appear empty. Always check the “undo” gesture (shaking your phone) if you make a mistake while typing.
Syncing and Account Issues
As mentioned earlier, many notes are tied to email accounts. If you delete a Gmail account from your phone because you are using a different app, all the notes associated with that Gmail account will disappear from your phone too. They aren’t “deleted,” they are just “unlinked.” Similarly, if you run out of iCloud storage, your phone might stop syncing new notes, making them appear missing when you check your iPad or Mac.
Software Updates and Glitches
While rare, major iOS updates (like moving to iOS 19 or 20) can sometimes cause data to temporarily hide. During an update, the phone re-indexes all its files. If this process gets interrupted, your notes might not show up immediately. Usually, waiting a few hours for the phone to finish its background tasks or simply restarting the device will bring everything back to normal.
|
Common Cause |
Quick Fix |
|
Accidental Swipe |
Check Recently Deleted |
|
Email Account Removal |
Re-add account in Settings |
|
iCloud Storage Full |
Clear space or upgrade |
|
Software Bug |
Force restart iPhone |
How to Prevent Future Note Loss
The best way to recover deleted iphone notes is to never have to recover them in the first place. With a few simple habit changes, you can make your data virtually indestructible. Modern iPhones give you plenty of tools to stay organized and safe, but you have to know how to turn them on.
Use iCloud as Your Primary Source
Avoid saving notes to the “On My iPhone” folder. While it feels more private, it means your notes only exist on that one physical piece of glass and metal. If you drop your phone in a lake, those notes are gone. Always use the iCloud folder so your data lives in the cloud, where it is backed up and accessible from any device you own.
Lock Your Sensitive Notes
If you have notes with sensitive information, use the “Lock Note” feature. This requires FaceID or a password to even view the note. An added benefit of locking a note is that it makes it much harder to delete by accident. The system will often give you an extra warning before it lets you trash a protected file. It’s a small extra step that provides a lot of peace of mind.
Regular Manual Backups
Even with iCloud, it is smart to occasionally export your most important notes. You can “Print” a note to a PDF and save it in a different cloud service like Google Drive or Dropbox. Or, simply copy the text of your most vital thoughts and paste them into a master document once a month. Diversifying where you keep your info is the only way to be 100% safe.
|
Prevention Habit |
Benefit |
|
Locking Notes |
Prevents accidental edits |
|
iCloud Sync |
Access from anywhere |
|
PDF Export |
Hard copy backup |
|
Storage Checks |
Ensures sync continues |
Final Thoughts
Losing data is one of the most frustrating parts of modern life, but the tools available today are incredibly resilient. Whether you found your file in the trash folder or had to go through the process to recover deleted iphone notes via a full system restore, the important thing is that a solution exists. The key is to act quickly and stay calm. Most “lost” data is simply hidden or moved to a temporary folder. By following the steps in this guide, you can confidently manage your digital notes and keep your thoughts safe for years to come. Remember to check your sync settings today so you never have to go through this stress again.
FAQs
Can I recover notes if I don’t have an iCloud backup?
Yes, you can still check the Recently Deleted folder within the Notes app, which stores items for 30 days regardless of your backup settings. You should also check other accounts like Gmail or Yahoo in your Mail settings, as your notes might be syncing there instead of iCloud.
Is there a way to recover a note I just overwrote with new text?
If you are still inside the note, try shaking your phone to trigger the “Undo” command. If you have already closed the note, the changes are usually saved instantly. In this case, your only hope is if you have an older backup of the phone from before the changes were made.
Why did my notes disappear after an iOS update?
This is often a syncing issue. Go to Settings > [Your Name] > iCloud and make sure Notes is still toggled on. If it is, try signing out of your Apple ID and signing back in to force the phone to re-sync its data from the server.
Can Apple recover my permanently deleted notes for me?
Unfortunately, no. For privacy and security reasons, Apple does not have access to your encrypted notes. Once they are purged from the Recently Deleted folder and if no backups exist, even Apple’s engineers cannot retrieve them.
How do I know if my notes are saved in Gmail or iCloud?
Open the Notes app and tap the back arrow until you see the “Folders” screen. The headings will tell you exactly where each folder is hosted. You might see sections labeled “iCloud,” “Gmail,” “On My iPhone,” or “Outlook.”