Tangled cables are a headache of the past. If you find yourself hunting for a lightning cord every time you want to edit a photo, you are working too hard. The Apple ecosystem is designed to move data through the air with zero friction. Whether you want to move a single selfie or an entire library of vacation shots, learning how to handle an iphone photos to mac wireless transfer will change your daily workflow.
Moving files wirelessly is not just about convenience; it is about speed and maintaining the original quality of your media. Many users worry that sending photos over Wi-Fi might compress them or strip away the metadata. This guide will walk you through the most reliable, high-quality methods available in 2026 to ensure your images stay crisp and your desktop stays organized.
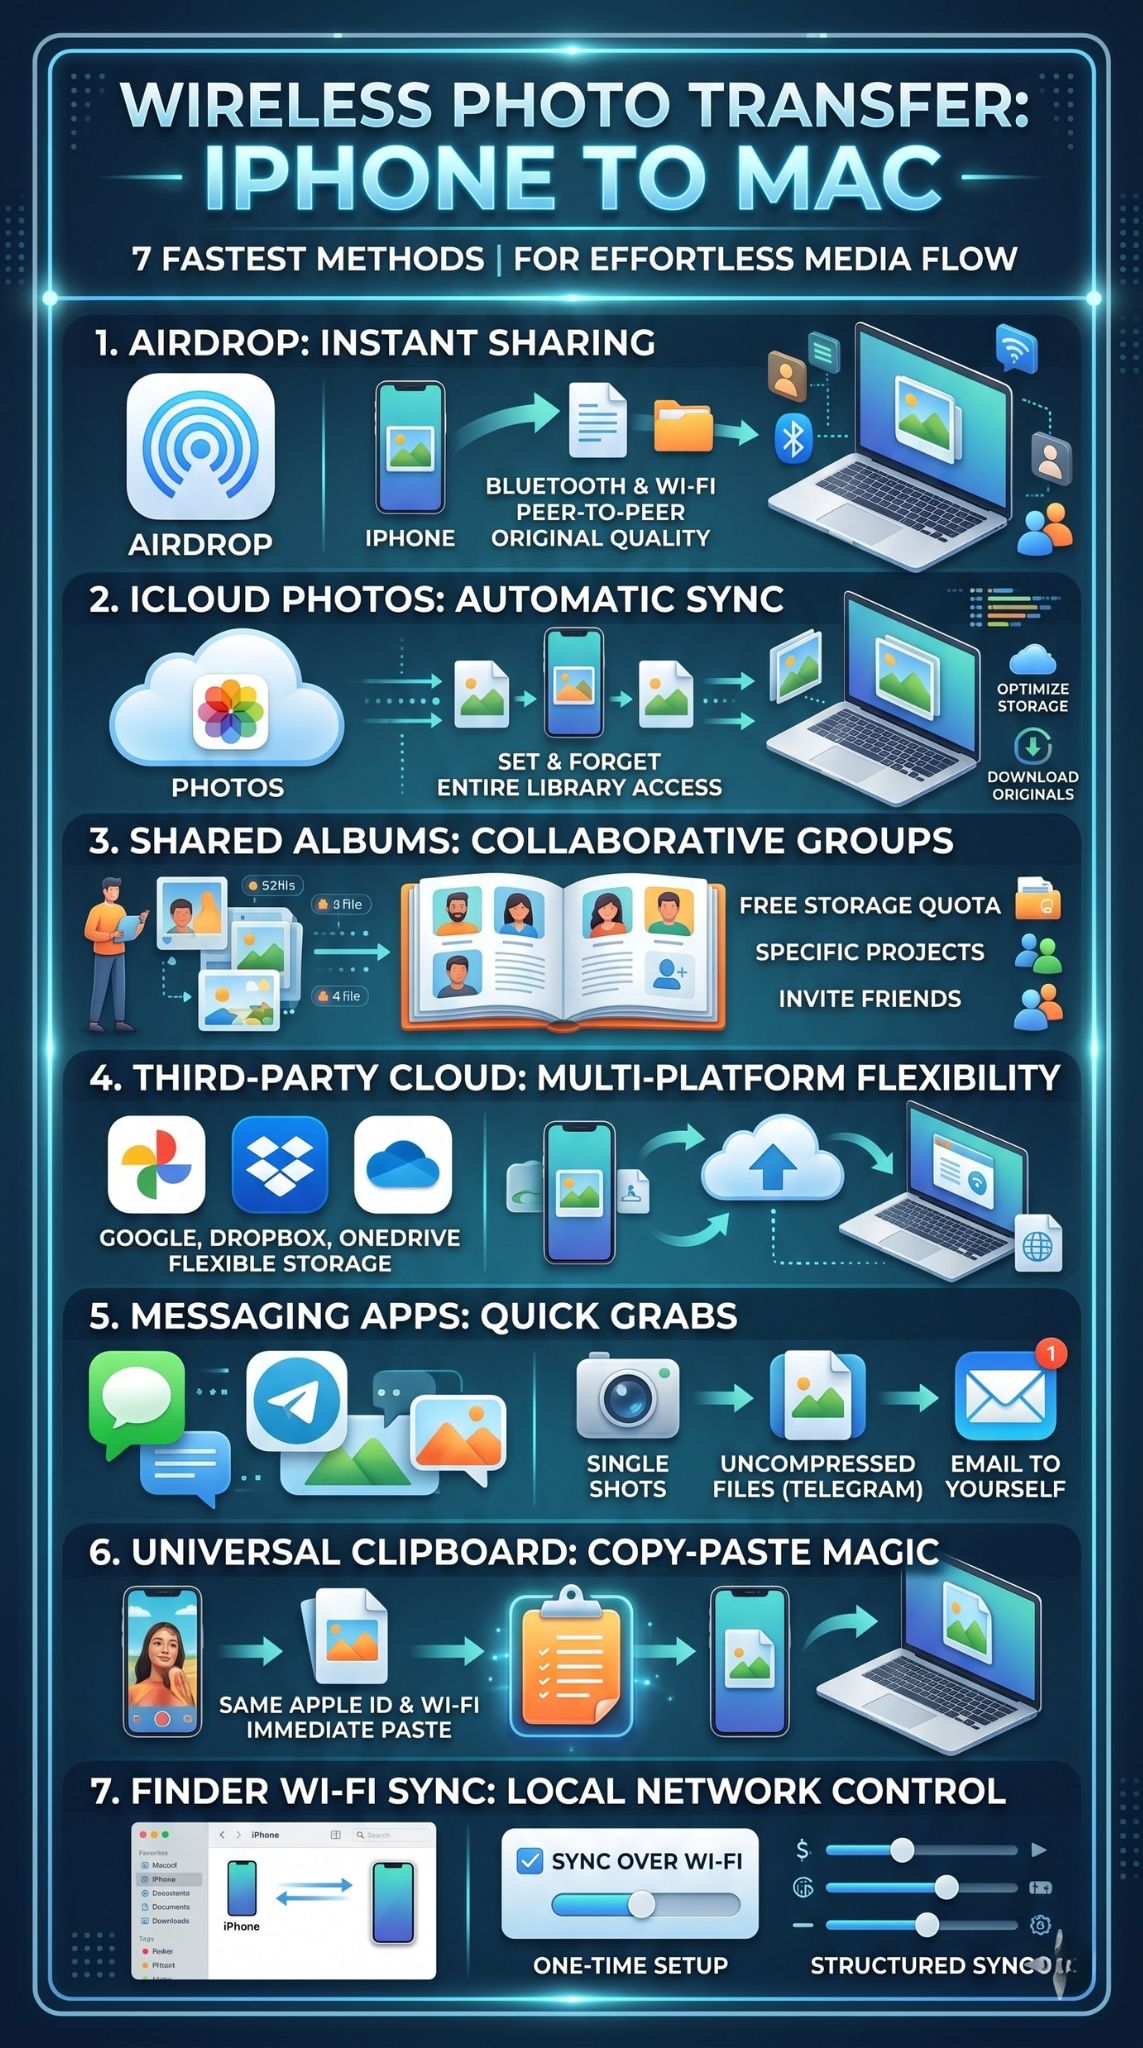
1. Using AirDrop for Instant Media Sharing
AirDrop is the most popular way to move files between Apple devices because it does not require an internet connection. It uses a combination of Bluetooth to find your Mac and point-to-point Wi-Fi to send the data quickly. This makes it perfect for when you are on the go or in a place with spotty internet.
Quick Comparison of AirDrop Features
|
Feature |
Detail |
|
Connection Type |
Bluetooth & Peer-to-Peer Wi-Fi |
|
Max File Size |
No limit (restricted by Mac storage) |
|
Quality |
Original (No compression) |
|
Ideal Use Case |
1 to 50 photos at a time |
How to Enable AirDrop on Your Mac
To start, open Finder and click on AirDrop in the left-hand sidebar. At the bottom of the window, you will see a setting that says Allow me to be discovered by. Set this to Everyone for the smoothest experience, even if you only plan to send files to yourself.
Sending Photos from Your iPhone
Open the Photos app on your iPhone and select the images you want to move. Tap the Share icon, which looks like a square with an upward arrow. Tap the AirDrop icon and select your Mac from the list of available devices. Your photos will appear in the Downloads folder on your Mac almost instantly.
Troubleshooting AirDrop Visibility
If your Mac does not appear, ensure that both devices have Wi-Fi and Bluetooth toggled on. Sometimes, having a Personal Hotspot active on the iPhone can block the AirDrop connection. Simply turn off the hotspot and try the transfer again to resolve the issue.
Read Also: How to Unsend iMessages on iPhone in 2026
2. iCloud Photos for Automatic Library Syncing
If you prefer a hands-off approach, iCloud Photos is the best way to handle your iphone photos to mac wireless needs. Once you turn this on, every photo you take is automatically uploaded to the cloud and appears in the Photos app on your Mac. It eliminates the need for manual transfers entirely.
iCloud Storage Tiers and Pricing
|
Plan Capacity |
Monthly Price (USD) |
Best For |
|
5 GB |
Free |
Occasional users |
|
50 GB |
$0.99 |
Casual photographers |
|
200 GB |
$2.99 |
Families and heavy users |
|
2 TB |
$9.99 |
Professional creators |
Setting Up iCloud on iOS
Go to your Settings app, tap your name, and select iCloud. From there, tap on Photos and toggle on the switch for Sync this iPhone. Make sure you are connected to Wi-Fi, especially if you have a large library, as the initial upload can take a few hours.
Enabling iCloud on macOS
Open the Photos app on your Mac. In the top menu bar, click Photos and then Settings. Navigate to the iCloud tab and check the box for iCloud Photos. You can also choose Download Originals if you want the high-resolution files stored locally on your Mac’s hard drive.
The Benefit of Optimize Storage
If your Mac is running low on space, select the Optimize Mac Storage option. This keeps the full-sized versions in the cloud and stores smaller, space-saving versions on your computer. When you need to edit or print a photo, the Mac will download the full version automatically.
Shared Albums are a hidden gem for wireless transfers because they do not count against your iCloud storage limit. While they do slightly compress very large files, they are an excellent way to organize photos for a specific project and see them appear on your Mac without any extra effort.
|
Feature |
Shared Albums |
iCloud Photos |
|
Storage Usage |
Does not count against quota |
Uses iCloud storage |
|
Compression |
Light compression applied |
Full original quality |
|
Capacity |
Up to 5,000 items per album |
Limited only by storage plan |
|
Collaboration |
Invite others to add photos |
Personal use only |
On your iPhone, select the photos you want to move. Tap Share and then choose Add to Shared Album. You can name the album something like Mac Transfer and hit post. You do not even need to invite anyone else; the album will just exist in your own cloud.
On your Mac, open the Photos app and look at the left-hand sidebar under the Shared section. Your new album will appear there. You can then drag the photos from that album directly onto your desktop or into a folder for use in other applications.
Limits to Keep in Mind
Apple allows you to have up to 200 shared albums. While this is plenty for most people, keep in mind that videos in Shared Albums are limited to fifteen minutes in length. If you are moving long 4K clips, you might want to stick with AirDrop or iCloud Photos instead.
4. Best Practices for iPhone Photos to Mac Wireless Transfers
When you are trying to manage an iphone photos to mac wireless workflow, efficiency is everything. There are several settings and habits that can make your transfers much faster. Understanding how file formats like HEIC affect your transfer speed can help you decide which method to use for different situations.
Wireless Transfer Performance Data
|
Method |
Average Speed (1GB of Photos) |
Stability |
|
AirDrop |
2 – 3 Minutes |
High |
|
iCloud Sync |
5 – 10 Minutes (Dependent on ISP) |
Very High |
|
Google Photos |
6 – 12 Minutes |
High |
|
Telegram/Mail |
4 – 5 Minutes |
Medium |
Managing HEIC vs JPEG Formats
Modern iPhones take photos in the High Efficiency Image Format (HEIC). While this saves space, some Mac apps might prefer JPEGs. If you want your wireless transfers to automatically convert to JPEG, go to Settings > Photos on your iPhone and select Automatic under the Transfer to Mac or PC section.
The Power of Universal Clipboard
If you only need one photo, you can use the Universal Clipboard. Copy a photo on your iPhone by long-pressing it and selecting Copy. Then, go to your Mac and press Command + V. As long as both devices are on the same Wi-Fi and signed into the same iCloud, the photo will paste right there.
Ensuring Network Security
Wireless transfers are generally secure, but you should avoid using public Wi-Fi at coffee shops for large iCloud syncs. Use a secure home network or a mobile hotspot to ensure your personal data is encrypted during the transit from your phone to the Mac.
5. Third-Party Cloud Services Like Google Photos
Many people prefer using Google Photos or Dropbox because they work across different operating systems. If you use a Mac for work but an Android tablet at home, these services offer a more flexible way to handle an iphone photos to mac wireless strategy than Apple’s native tools.
Top Third-Party Cloud Alternatives
|
Service |
Free Storage |
Standout Feature |
|
Google Photos |
15 GB (Shared with Gmail) |
Best search and AI grouping |
|
Dropbox |
2 GB |
Professional file versioning |
|
OneDrive |
5 GB |
Integration with Microsoft 365 |
|
WeTransfer |
2 GB per transfer |
No account required for quick sends |
Using Google Photos for Mac
Install the Google Photos app on your iPhone and turn on Backup. Once the upload finishes, you can simply open a web browser on your Mac, go to photos.google.com, and download the images you need. It is a reliable workaround if AirDrop is acting up.
Dropbox Camera Uploads
The Dropbox app has a feature called Camera Uploads. When you open the app on your phone, it automatically finds new photos and puts them into a folder named Camera Uploads in your Dropbox account. Since you likely have Dropbox installed on your Mac, those files will appear in your Finder automatically.
Why Choose Third-Party?
The main reason to go this route is the search functionality. Google’s ability to find a photo by typing “dog” or “beach” is often superior to the native Apple search. If you have tens of thousands of photos, finding the one you want to move is much faster in the Google ecosystem.
6. Using Finder Syncing Over Wi-Fi
You might think that the Finder sidebar is only for when your phone is plugged in via USB. However, Apple allows you to sync your iPhone with your Mac over your local Wi-Fi network. This gives you the control of a wired sync with the freedom of a wireless connection.
Wi-Fi Syncing Requirements
|
Requirement |
Status |
|
Operating System |
macOS Catalina or later |
|
Network |
Both devices on the same Wi-Fi |
|
Initial Setup |
Requires one-time cable connection |
|
Power Source |
Better stability if iPhone is charging |
How to Enable Wi-Fi Syncing
Connect your iPhone to your Mac with a cable just once. Open Finder and select your iPhone in the sidebar. Under the General tab, scroll down and check the box that says Show this iPhone when on Wi-Fi. Click Apply, and you can now unplug the cable forever.
Managing Photos in Finder
Now, whenever your iPhone is nearby and on the same network, it will appear in the Finder sidebar. You can click on the Photos tab and choose exactly which albums or folders you want to sync to your Mac. This is the most structured way to handle large media migrations.
When to Use This Method
This is best for people who want to keep their Mac’s Photo library separate from their iPhone’s library. If you don’t want every single screenshot and meme syncing to your Mac via iCloud, use Finder Wi-Fi syncing to manually pick the important albums.
7. Messaging Apps for Quick File Grabs
Sometimes you just need to move one specific photo for a social media post or an email. In these cases, using a messaging app is often the fastest iphone photos to mac wireless shortcut. It avoids the setup time of iCloud or the proximity requirements of AirDrop.
Messaging App Comparison
|
App |
Best For |
Compression Level |
|
Telegram |
Large files and documents |
None (if sent as file) |
|
|
Quick casual shots |
High (reduces quality) |
|
iMessage |
Same-user transfers |
Low (mostly original) |
|
Slack |
Professional assets |
Low |
The Telegram “Saved Messages” Hack
Telegram has a feature called Saved Messages. It is essentially a private chat with yourself. If you send a photo there from your iPhone, you can immediately open Telegram on your Mac and download it. If you send it as a File rather than a Photo, it maintains 100% of the original quality.
iMessage to Yourself
You can send an iMessage to your own Apple ID email or phone number. The message will pop up on your Mac’s Messages app. From there, you can just drag the image out of the chat bubble and onto your desktop. It is a simple, effective trick for single-image transfers.
Emailing Your Photos
While it feels old-fashioned, emailing a photo to yourself is still a foolproof method. Most email providers allow up to 25MB per email, which is enough for about five high-quality photos. It is a great backup plan if your Wi-Fi is restricted and blocking other transfer services.
Final Thoughts
Mastering the iphone photos to mac wireless workflow is all about choosing the right tool for the job. If you want everything to happen in the background without thinking about it, iCloud is your best friend. For quick, high-speed transfers of a few files, nothing beats the simplicity of AirDrop.
The Apple ecosystem has evolved to the point where cables are an optional accessory rather than a necessity. By using a combination of these seven methods, you can ensure that your memories are backed up, your professional assets are ready for editing, and your workspace remains free of cluttered cords. Experiment with these wireless options today and find the one that fits your creative rhythm best.
Frequently Asked Questions (FAQs)
Can I transfer photos wirelessly if I am not on the same Wi-Fi?
Yes, you can use iCloud Photos or third-party cloud services like Google Photos. These methods use the internet to move files, so as long as your iPhone has a data connection and your Mac has internet access, the transfer will work.
Does transferring photos wirelessly drain my iPhone battery?
Moving a large volume of photos (thousands at once) via Wi-Fi or iCloud can consume a significant amount of battery. It is always a good idea to have your iPhone plugged into a charger if you are doing a massive library sync.
Is there a limit to how many photos I can AirDrop at once?
There is no hard limit set by Apple, but the connection can become unstable if you try to send more than 100 items at a time. For larger batches, the Finder Wi-Fi sync or iCloud is much more reliable.
Why are my photos arriving as HEIC files instead of JPEGs?
HEIC is the default format for iOS. If you need JPEGs on your Mac, you can change the settings in your iPhone’s Photos menu to convert them during transfer, or use the Preview app on your Mac to export them as JPEGs after they arrive.
Can I use these wireless methods for videos too?
Absolutely. All these methods support video files. However, keep in mind that 4K videos are very large. For the fastest results with video, AirDrop is usually the best choice because it uses a direct device-to-device connection.