
Taking a screenshot sounds easy until the menu closes, the wrong monitor appears, or a private email address ends up in the image.
Most people only use Snipping Tool to drag a box around part of the screen. That works, but the app can do far more. It can record part of your display, pull text from an image, cover detected phone numbers and email addresses, add annotations, and save captures automatically.
A few practical windows snipping tool tips can make those jobs faster and cleaner.
The exact features you see will depend on your Windows version, Snipping Tool update, and hardware. Options such as Perfect Screenshot and Color Picker require a Copilot+ PC. Other features may appear gradually through Microsoft Store updates.
Here’s how to get more from the tool without making the process complicated.
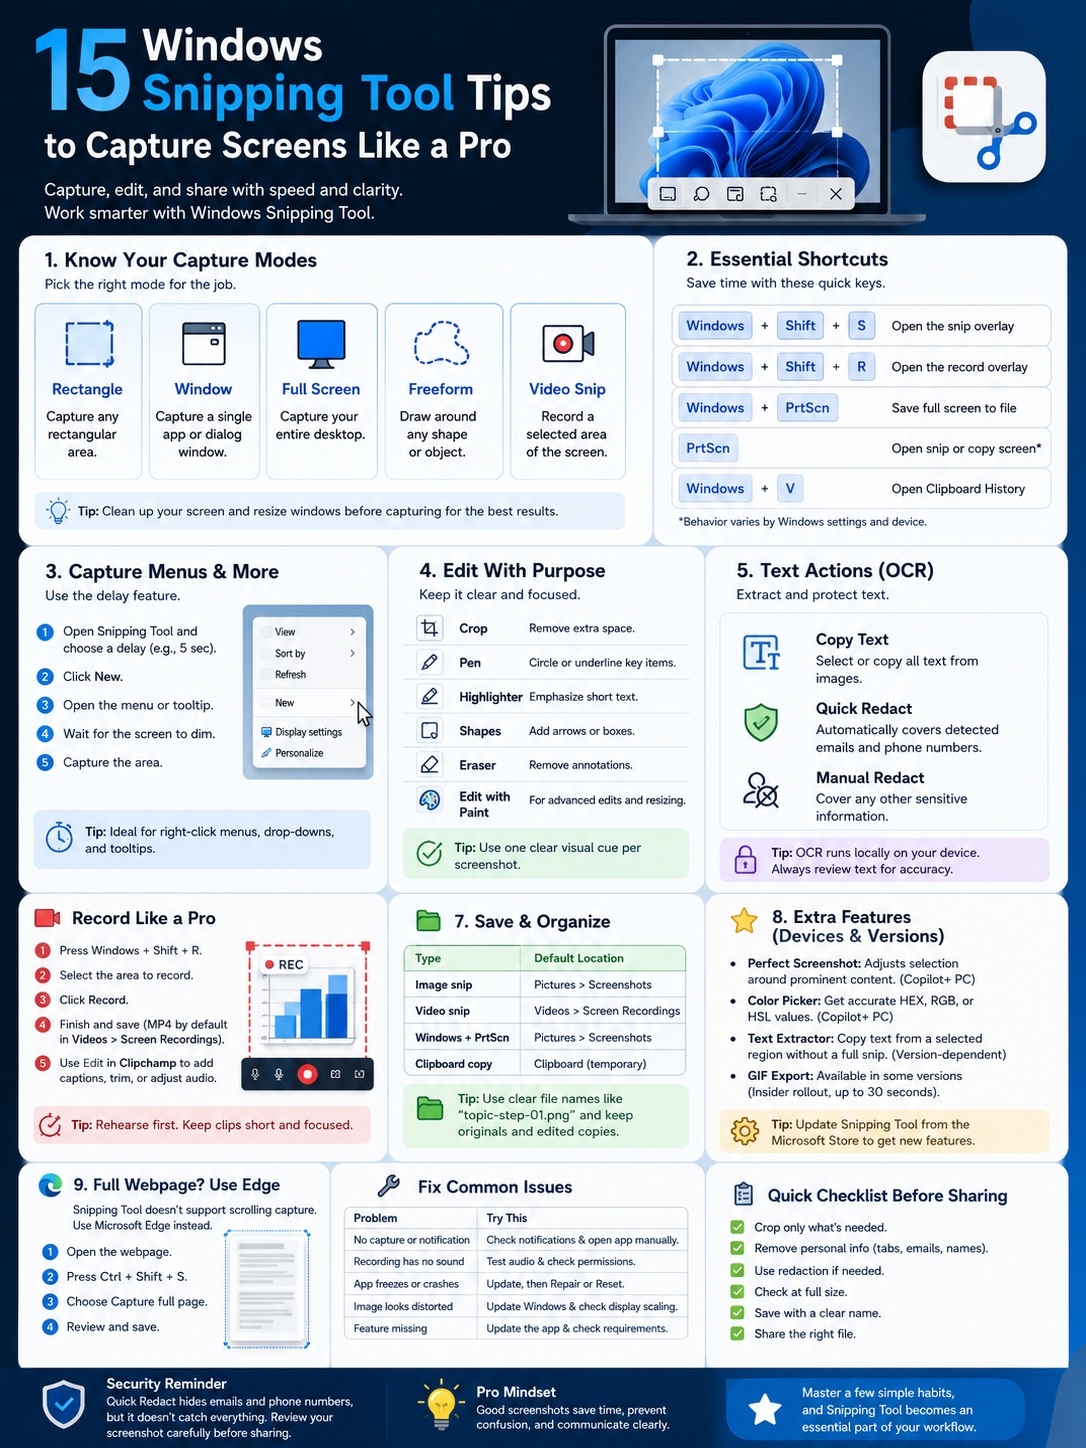
Choose the Right Snipping Mode
Snipping Tool gives you four main screenshot modes. It also includes a separate video option for screen recording.
|
Capture Mode |
What It Captures |
Best Use |
|
Rectangle |
A box-shaped area you select |
Messages, settings, charts, and forms |
|
Window |
One open application or dialog box |
Tutorials and support guides |
|
Full Screen |
Everything shown across your desktop |
Complete desktop layouts |
|
Freeform |
An area you draw by hand |
Irregular objects or quick references |
|
Video Snip |
A selected rectangular area |
Short demonstrations and troubleshooting clips |
Use Rectangle Mode for Most Screenshots
Rectangle mode is the everyday choice. It lets you capture only the part of the screen that matters.
It works well for:
- Error messages
- Settings panels
- Online forms
- Charts
- Parts of webpages
- Social media posts
- Software controls
Avoid cropping too tightly. Readers still need enough context to understand where the item appears.
For example, a screenshot of a toggle makes more sense when the page heading remains visible above it.
Use Window Mode for Cleaner Results
Window mode captures one application or dialog box with neat edges. You do not have to drag a perfect rectangle around it.
This is often the better choice for:
- Product guides
- Training documents
- Customer-support tickets
- Presentations
- Software tutorials
Resize the app before taking the shot. A smaller, balanced window usually looks better than one stretched across a large monitor.
Think Twice Before Using Full Screen
Full Screen mode captures everything visible on the desktop.
On a multi-monitor setup, that can include content from more than one display. The result may be extremely wide and could reveal messages, filenames, dashboards, or open browser tabs.
Use Rectangle or Window mode when you only need one application.
Learn the Main Snipping Tool Shortcuts
Keyboard shortcuts save more time than any advanced feature.
|
Shortcut |
What It Does |
|
Windows + Shift + S |
Opens the screenshot capture bar |
|
Windows + Shift + R |
Opens the screen-recording bar |
|
Windows + PrtScn |
Saves a full-screen screenshot |
|
PrtScn |
Opens capture or copies the screen, depending on settings |
|
Windows + V |
Opens Clipboard History |
Use Windows + Shift + S for Everyday Captures
Press Windows + Shift + S when you want to capture a selected area, one window, a freeform shape, or the full screen.
The screen dims and a small toolbar appears. Choose a mode, make the selection, and Windows copies the result to the clipboard.
A notification may also appear. Click it to open the image in Snipping Tool for cropping, markup, redaction, or saving.
This is the shortcut most people should learn first.
Use Windows + PrtScn When You Need a File Immediately
Press Windows + PrtScn to capture the full desktop and save it straight to:
Pictures > Screenshots
There is no need to paste the image into another app first.
On some laptops, Print Screen shares a key with another command. You may need to hold Fn while pressing it.
Do Not Expect PrtScn to Behave the Same Everywhere
The plain PrtScn key can behave differently from one PC to another.
It may:
- Open the Snipping Tool overlay
- Copy the full screen to the clipboard
- Require the Fn key
- Trigger software supplied by the laptop maker
Keyboard settings and Windows versions can change the result.
Use Windows + Shift + S when you want a reliable selection tool. Use Windows + PrtScn when you want a full-screen file.
Windows Snipping Tool Tips for Faster Work
The fastest screenshot is usually the one you prepare properly before taking it.
|
Habit |
Why It Helps |
|
Clean the screen first |
Cuts down on cropping and redaction |
|
Repeat the previous mode |
Speeds up batches of similar screenshots |
|
Use a delay |
Keeps temporary menus open |
|
Pin Snipping Tool |
Makes editing tools easier to reach |
|
Turn on Clipboard History |
Keeps recent copied items available |
Clean Up the Screen First
Before you capture anything:
- Close unrelated browser tabs
- Dismiss notifications
- Hide personal bookmarks
- Resize the window
- Move the pointer away from important text
- Check the taskbar
- Remove private filenames from view
This takes a few seconds and often saves several minutes of editing.
It also reduces the chance of sharing something private by accident.
Use the Shortcuts Inside Snipping Tool
Snipping Tool has several built-in keyboard controls.
|
Shortcut |
Action |
|
Alt + M |
Choose a snipping mode |
|
Alt + N |
Start a new snip using the last mode |
|
Alt + D |
Set a delay |
|
Ctrl + C |
Copy the current capture |
|
Ctrl + S |
Save the current capture |
|
Shift + Arrow Keys |
Move through available snip types |
Alt + N is especially useful when you need a batch of screenshots in the same shape.
Pin the App to the Taskbar
Search for Snipping Tool, right-click it, and choose Pin to taskbar.
The keyboard shortcut is still faster for a basic capture. The pinned app is useful when you need delays, recording controls, recent images, settings, or editing tools.
Use Clipboard History for Temporary Storage
Press Windows + V to open Clipboard History.
Once enabled, it stores several recent copied items instead of keeping only the latest one. This helps when you are moving several screenshots into a report, email, or article.
Treat it as temporary storage. Save important captures as files.
Capture Menus and Tooltips Before They Disappear
Drop-down menus, right-click panels, and tooltips often close the moment you click somewhere else.
The delay option gives you time to set up the screen.
|
Delay Setting |
Best For |
|
No delay |
Normal static content |
|
Short delay |
Drop-down menus and tooltips |
|
Longer delay |
Multi-step menus and complex screens |
Set a Timed Capture
Open Snipping Tool and choose a delay. Five seconds usually gives you enough time.
Then:
- Select the capture mode.
- Click New.
- Open the menu you need.
- Move the pointer out of the way.
- Wait for the screen to dim.
- Capture the area.
This works well for context menus, profile menus, hidden settings, and hover-based controls.
Read Also: How to Roll Back a Windows Update Safely
Show Enough of the Parent App
Do not capture only the floating menu. Keep enough of the surrounding application to show where the menu came from.
A little context helps the reader follow the instruction without guessing.
Edit Screenshots Without Making Them Busy
Snipping Tool includes cropping, pens, highlighters, shapes, emojis, an eraser, undo, redo, and text tools.
|
Editing Tool |
Best Use |
Mistake to Avoid |
|
Crop |
Remove empty or unrelated areas |
Cutting away useful context |
|
Pen |
Circle or underline one item |
Drawing over the label |
|
Highlighter |
Emphasize a short phrase |
Highlighting most of the screen |
|
Shapes |
Add boxes, arrows, or lines |
Using too many marks |
|
Eraser |
Remove added annotations |
Expecting it to erase the original image |
|
Edit With Paint |
Resize or make deeper changes |
Overworking a simple capture |
Use One Clear Annotation
A screenshot rarely needs three arrows, two boxes, and a circle.
One clean box or arrow usually does the job.
Place the mark beside the control when possible. Do not cover the text the reader needs to see.
Crop Without Losing Context
Cropping improves focus, but an overly tight crop can make the image confusing.
Keep:
- The page heading
- The setting name
- The control being discussed
- A small amount of surrounding space
Remove unrelated options, empty areas, and personal information.
Open the Image in Paint for Bigger Changes
Choose Edit with Paint when you need:
- Exact resizing
- Rotation
- Added text
- More color controls
- Layered visual elements
- Broader image edits
Keep an untouched copy when the screenshot may be needed as evidence or documentation.
Copy Text From a Screenshot
Text Actions is one of the most useful windows snipping tool tips for people who work with error messages, addresses, instructions, or text trapped inside images.
|
Text Action |
What It Does |
|
Select and copy |
Copies chosen words from the image |
|
Copy all text |
Copies every word Snipping Tool detects |
|
Quick Redact |
Covers detected emails and phone numbers |
|
Manual redaction |
Covers text you select yourself |
Take a screenshot, open Text Actions, and select the words you need.
Snipping Tool uses optical character recognition, better known as OCR, to identify text. Microsoft says this recognition process runs locally on the device.
Check the Text Before Using It
OCR is helpful, but it can make mistakes.
It may confuse:
- O and 0
- I, l, and 1
- Small letters
- Decorative fonts
- Low-contrast text
- Blurred characters
- Command-line symbols
- Parts of web addresses
Always compare the copied text with the screenshot when accuracy matters.
This is especially important for:
- Terminal commands
- Account numbers
- Legal wording
- Payment details
- Product keys
- Technical settings
Clean Up Text After Using Copy All
Copy All Text may include button labels, timestamps, menus, and other words you do not need.
Paste the result into a plain-text editor first. Remove the extra content before adding it to an article, email, or report.
Redact Private Details Before Sharing
Quick Redact can cover detected email addresses and phone numbers. You can also select other text and redact it manually.
|
Information |
Likely to Be Detected Automatically? |
|
Email addresses |
Yes |
|
Phone numbers |
Yes |
|
Personal names |
Not guaranteed |
|
Account numbers |
Not guaranteed |
|
Street addresses |
Not guaranteed |
|
Profile pictures |
No |
|
Browser-tab titles |
No |
|
Notifications |
No |
Do Not Treat Quick Redact as a Full Privacy Check
Quick Redact is useful, but it does not catch everything.
It may hide an email address while leaving the person’s name, company, account number, address, or profile photo visible.
Check these areas before sharing:
- Browser tabs
- Bookmarks
- Taskbar previews
- Notifications
- File paths
- Account names
- Profile photos
- Order numbers
- Ticket numbers
- Document titles
The safest approach is to capture the smallest possible area first. Use redaction as an extra layer, not the only one.
Use Proper Redaction Tools for Sensitive Records
Snipping Tool is fine for everyday screenshots. It may not be suitable for medical, legal, financial, or regulated records.
For sensitive documents, use the approved redaction process required by your workplace or industry.
Always inspect the final image at full size before sending it.
Record Part of the Screen
Press Windows + Shift + R to open the recording bar.
Draw a rectangle around the area you want to record, then start the capture. Windows saves recordings as MP4 files in:
Videos > Screen Recordings
|
Recording Habit |
Why It Matters |
|
Record one app or panel |
Keeps the clip focused |
|
Rehearse first |
Reduces mistakes |
|
Make a test clip |
Checks framing and sound |
|
Keep it short |
Makes instructions easier to follow |
|
Edit in Clipchamp |
Adds captions and further polish |
Record Only the Area That Matters
Avoid recording the whole desktop unless you really need it.
A large recording can expose open tabs, messages, files, and other private content. It also makes the main action harder to see.
Resize the application first. Then select a recording area with a little space around it so menus are not cut off.
Practice Before You Record
Run through the steps once before making the real clip.
Know which buttons you will click and what should appear next. A short, direct demonstration feels far more useful than a long video filled with hesitation.
Test the Audio
Audio controls can vary by Snipping Tool version and Windows build.
Make a five-second test before recording anything important. Check:
- Microphone level
- System sound
- Background noise
- Volume balance
- Whether the correct microphone is selected
Use Clipchamp for Captions and Editing
Snipping Tool can send a recording to Clipchamp for further editing.
You can use Clipchamp to:
- Add captions
- Adjust volume
- Trim the clip
- Separate audio
- Add titles
- Remove unnecessary pauses
Automatic captions can misread names and technical terms, so review them before publishing.
Do Not Assume GIF Export Is Available
Microsoft began testing GIF export through staged Windows Insider releases. It may not appear on every Windows 11 PC.
Check the toolbar after recording. When the option is missing, update Snipping Tool through Microsoft Store or use another editor.
MP4 remains the better choice for longer clips, sound, and sharper detail.
Save and Organize Your Captures
Current Snipping Tool versions can automatically save screenshots.
|
Capture Type |
Default Location |
|
Image snip |
Pictures > Screenshots |
|
Video snip |
Videos > Screen Recordings |
|
Windows + PrtScn capture |
Pictures > Screenshots |
|
Clipboard capture |
Clipboard until replaced or cleared |
You can change autosave behavior and folder settings from the Snipping Tool settings menu.
Use Filenames That Make Sense
Names such as Screenshot 2026-07-12 112345.png tell you very little later.
Use a simple pattern:
topic-action-step
Examples:
- snipping-tool-delay-step-01.png
- windows-text-actions-redacted.png
- printer-error-before-fix.png
- audio-settings-recording.mp4
Add the date when the timing matters:
payment-error-2026-07-12.png
Keep the Original and Edited Versions
Use clear suffixes:
- -original
- -cropped
- -annotated
- -redacted
- -final
This keeps the untouched capture safe and makes corrections easier.
Know Which Features Need a Copilot+ PC
Not every Snipping Tool feature works on every Windows 11 computer.
|
Feature |
What It Does |
Requirement |
|
Perfect Screenshot |
Adjusts the selection around prominent content |
Copilot+ PC |
|
Color Picker |
Reads a color shown on the screen |
Copilot+ PC |
|
Rectangle Capture |
Selects an area manually |
Standard Windows 11 PC |
|
Text Actions |
Copies and redacts text |
Supported current app version |
Use Perfect Screenshot as a Starting Point
Perfect Screenshot can tighten the selection around a clear object, card, window, or panel.
It may save time, but inspect the edges. Automatic framing can include something you do not need or remove something important.
Copy Screen Colors With Color Picker
Color Picker can display values such as:
- HEX
- RGB
- HSL
This helps designers, developers, publishers, and presentation teams match colors shown on the screen.
Remember that display settings can affect what you see. HDR, Night Light, color profiles, and image compression may change the appearance.
Use official brand values when exact color accuracy matters.
Capture a Full Webpage in Microsoft Edge
Snipping Tool does not include a standard scrolling screenshot mode.
When you need an entire webpage, including content below the visible screen, use Microsoft Edge.
|
Task |
Best Tool |
|
Capture part of the screen |
Snipping Tool |
|
Capture one application |
Snipping Tool |
|
Capture the full desktop |
Snipping Tool |
|
Record a screen region |
Snipping Tool |
|
Capture an entire webpage |
Microsoft Edge |
|
Edit a recording |
Clipchamp |
In Edge:
- Open the webpage.
- Press Ctrl + Shift + S.
- Choose Capture full page.
- Review the image.
- Save it.
Let the page finish loading first. Close cookie banners and pop-ups. Sticky headers, animations, and lazy-loaded images can affect the final capture.
Fix Common Snipping Tool Problems
Most issues come from app updates, notification settings, keyboard options, or damaged app files.
|
Problem |
First Thing to Try |
Next Step |
|
Screen dims but nothing happens |
Drag to select an area |
Open Snipping Tool manually |
|
No notification appears |
Check notification settings |
Open the Screenshots folder |
|
PrtScn acts differently |
Use Windows + Shift + S |
Check keyboard settings |
|
Recording has no sound |
Make a test recording |
Check permissions and audio controls |
|
App freezes |
Update it in Microsoft Store |
Repair or reset the app |
|
Image looks distorted |
Install Windows updates |
Check display scaling |
|
A feature is missing |
Update Snipping Tool |
Check hardware requirements |
Update the App
Open Microsoft Store, go to Library, and check for updates.
Snipping Tool features often arrive through app updates instead of major Windows upgrades. Rollouts may also happen in stages, so two PCs can show different controls even when both are current.
Repair or Reset Snipping Tool
Go to:
Settings > Apps > Installed apps > Snipping Tool > Advanced options
Try Repair first. This attempts to fix the app without clearing its data.
Use Reset only when Repair does not help.
Check Multi-Monitor Scaling
Screenshots can look stretched or misaligned when connected monitors use different scaling settings.
Keep Windows updated, especially when you use two or more displays. Microsoft has released fixes for Snipping Tool problems linked to mixed display scaling.
Look in the Default Folders
When the notification disappears, check:
Pictures > Screenshots
For video clips, check:
Videos > Screen Recordings
You can also open Snipping Tool itself. The latest capture may still be available there.
Final Thoughts
The best windows snipping tool tips are not complicated.
Use Windows + Shift + S for precise screenshots. Use Windows + Shift + R for screen recordings. Pick Window mode when you want clean application borders. Use Delay for menus that vanish. Turn to Text Actions when you need to copy or hide words. Use Microsoft Edge for a full-page website capture.
The final check matters just as much as the capture.
Look at the browser tabs, taskbar, notifications, usernames, filenames, and surrounding text. Automatic redaction helps, but it cannot replace a careful review.
A useful screenshot shows the right detail, enough context, and nothing private. Once these habits become routine, Snipping Tool turns into a dependable tool for tutorials, publishing, troubleshooting, and everyday work.
Frequently Asked Questions
|
Question |
Quick Answer |
|
Can Snipping Tool take scrolling screenshots? |
Not through its standard capture modes |
|
Can it copy text from an image? |
Yes, through Text Actions |
|
Does OCR run locally? |
Microsoft says Text Actions runs locally |
|
Can it record the screen? |
Yes, on supported Windows 11 versions |
|
Where are screenshots saved? |
Pictures > Screenshots by default |
|
Where are recordings saved? |
Videos > Screen Recordings by default |
|
Does Quick Redact hide everything private? |
No |
|
Why is Perfect Screenshot missing? |
It requires a Copilot+ PC |
Can Snipping Tool Capture the Mouse Pointer?
The standard screenshot workflow does not offer a dependable option for including the pointer in a still image.
Use screen recording when the cursor movement matters. You can also add a pointer marker later in Paint or another image editor.
Can It Capture a Right-Click Menu?
Yes. Use the delay control.
Set the timer, start the capture, open the right-click menu, and wait for the screen to dim.
Can It Record System Audio and a Microphone?
Current Windows 11 versions can support audio during screen recording, but the exact controls depend on the installed Snipping Tool version and permissions.
Always make a short test first.
Why Does Windows + Shift + S Dim the Screen but Show Nothing?
The dim screen means capture mode is active.
Drag over an area or choose another mode from the toolbar. When you finish, the image should copy to the clipboard.
When no preview appears:
- Open Snipping Tool manually
- Check the Screenshots folder
- Review notification settings
- Update the app
- Restart the PC
Does Quick Redact Permanently Remove the Text?
Quick Redact covers detected text in the exported image.
Inspect the final file at full size before sharing it. For formal redaction, use a tool designed for secure document redaction.
Can It Capture More Than One Monitor?
Yes. A full-screen capture may include the desktop space across all connected displays.
That can create a very wide image and reveal content from another screen. Rectangle or Window mode is usually the safer option.
Does Windows 10 Have the Same Features?
No. Windows 10 includes an older Snipping Tool experience with fewer features.
Do not assume that Windows 11 tools such as modern video recording, current Text Actions, and Copilot+ options will appear on Windows 10.
Microsoft ended regular Windows 10 support on October 14, 2025. Eligible users may have access to Extended Security Updates.