
Running out of iCloud storage doesn’t mean your iPhone has to go without a backup. You can backup iPhone without iCloud by saving a complete local copy on a Mac or Windows computer.
Apple gives you three official options. Newer Macs use Finder. Windows computers use the Apple Devices app. Older Macs and some Windows setups still rely on iTunes.
A local backup comes in handy before an iOS update, phone repair, trade-in, or upgrade. It also keeps the backup on hardware you control instead of uploading everything to cloud storage.
There’s one catch: you have to manage it yourself. Your computer needs enough free space, and you must remember to create fresh backups. This guide walks through the full process, including encryption, verification, restoration, and common problems.
Why Back Up an iPhone Without iCloud?
iCloud is convenient, but it isn’t the only sensible option.
A local backup may suit you better when your free iCloud storage is full, your internet connection is slow, or you simply prefer keeping personal data offline. It also saves you from paying for a larger iCloud plan just to protect your phone.
Apple says a computer backup stores almost all your device data and settings. It’s designed to rebuild the iPhone after a reset, replacement, or repair.
Still, a local backup isn’t automatic in the same way iCloud Backup can be. You need access to the computer, enough disk space, and a regular routine.
|
Reason |
Main Benefit |
Possible Drawback |
|
iCloud storage is full |
Uses space on your computer |
Your computer needs free storage |
|
Internet is slow |
A cable transfer is often faster |
You need physical access to the computer |
|
You prefer local storage |
Your backup stays on your hardware |
You must secure the computer |
|
You’re preparing for repair |
Creates a restorable copy |
The backup must finish before handover |
|
You’re moving to a new iPhone |
Transfers settings and app data |
Some content may need to download again |
What Does a Computer Backup Actually Save?
A computer backup saves much more than a simple photo copy, but it doesn’t contain every item on the phone.
Apple says a local backup can include app data, device settings, messages, Home Screen layout, and other information stored locally. However, it leaves out some content that can be downloaded, synced, or re-created elsewhere.
Items that normally aren’t included include:
- App Store and iTunes Store content
- Media synced from a Mac or PC
- Apple Pay information and settings
- Face ID and Touch ID data
- The iPhone passcode
- Apple Mail data
- Offline maps
- Some data already syncing through iCloud
The exact contents also depend on whether you encrypt the backup.
|
Data Type |
Standard Backup |
Encrypted Backup |
|
Device settings |
Yes |
Yes |
|
App data |
Yes |
Yes |
|
Home Screen layout |
Yes |
Yes |
|
Saved passwords |
Limited or no |
Yes |
|
Health and Activity data |
No |
Yes |
|
Wi-Fi settings |
Limited or no |
Yes |
|
Website history |
No |
Yes |
|
Face ID and Touch ID data |
No |
No |
|
Apple Pay information |
No |
No |
|
Media synced from a computer |
No |
No |
This is why encryption matters. A standard backup may look complete, but it can leave out some of the information people expect to recover.
What You Need Before You Start
You don’t need much, but a few checks can prevent failed or incomplete backups.
First, make sure you’re using the right software:
- Finder on macOS Catalina 10.15 or later
- Apple Devices on a current Windows computer
- iTunes on macOS Mojave or earlier, or on Windows when Apple Devices isn’t available
You’ll also need a USB cable that supports data transfer. Some cheap cables only charge the phone and won’t create a reliable connection.
Unlock the iPhone before connecting it. You may also see a Trust This Computer message. Tap Trust and enter the device passcode.
Finally, check your computer’s storage. A heavily used iPhone can create a large backup, especially when it contains messages, app data, photos, and downloaded files.
|
Requirement |
What to Check |
|
Mac or Windows PC |
Install current system updates |
|
Backup software |
Use Finder, Apple Devices, or iTunes |
|
USB cable |
Confirm it supports data transfer |
|
iPhone access |
Know the device passcode |
|
Computer storage |
Leave enough free space |
|
Computer security |
Use a password-protected account |
|
Encryption password |
Save it somewhere secure |
Restart both the iPhone and computer if either device has been unstable. That simple step fixes more connection problems than people expect.
How to Backup iPhone Without iCloud on a Mac
On macOS Catalina or later, Finder handles local iPhone backups. The process is straightforward and doesn’t require an iCloud storage plan.
Step 1: Connect the iPhone
Connect the iPhone to the Mac with a USB cable.
Unlock the phone. Tap Trust if the trust prompt appears, then enter your iPhone passcode.
Step 2: Open Finder
Open a Finder window.
Look under Locations in the left sidebar and select your iPhone. If it doesn’t appear, reconnect the cable or try another USB port.
Step 3: Choose the Local Backup Option
Open the General tab.
Select:
Back up all of the data on your iPhone to this Mac
This tells Finder to create a computer backup instead of relying only on iCloud.
Step 4: Turn On Encryption
Select Encrypt local backup.
Create a password and save it in a secure password manager. Don’t assume you’ll remember it months later.
Apple cannot recover this password for you, and an old encrypted backup is useless without it.
Step 5: Start the Backup
Click Back Up Now.
Keep the iPhone connected until the process finishes. The first backup may take longer because Finder has to copy a larger amount of data.
|
Finder Setting |
Recommended Choice |
|
Backup location |
This Mac |
|
Backup scope |
All iPhone data |
|
Encryption |
Turn it on |
|
Start command |
Back Up Now |
|
Completion check |
Confirm the latest date and time |
|
Safe removal |
Eject the iPhone after completion |
Once the backup finishes, check the latest backup date displayed in Finder. Don’t disconnect the phone just because the progress bar disappears. Make sure Finder shows a recent completion time.
Read Also: How to Set Up Emergency SOS on iPhone
How to Back Up an iPhone Without iCloud on Windows
Windows users should normally use the Apple Devices app. Apple now treats it as the main Windows tool for backing up, restoring, and managing an iPhone.
Step 1: Open Apple Devices
Install or open the Apple Devices app on your PC.
Connect the iPhone with a USB cable. Unlock it and tap Trust if prompted.
Step 2: Select the iPhone
Your iPhone should appear in the Apple Devices sidebar.
Select it, then open the General section.
Step 3: Choose a Computer Backup
Select the option that saves the iPhone’s data to the computer.
Turn on Encrypt local backup if you want saved passwords, Health data, Wi-Fi settings, and other protected information included.
Step 4: Create the Backup
Set a strong encryption password and store it safely.
Click Back Up Now and leave the phone connected until the process finishes.
|
Windows Setup |
Tool to Use |
Backup Area |
|
Current Windows PC |
Apple Devices |
General |
|
PC without Apple Devices |
iTunes |
Summary |
|
First connection |
USB cable |
Device sidebar or device icon |
|
More complete backup |
Encrypt local backup |
Password required |
|
Completion check |
Latest backup date |
Verify after the process ends |
Using iTunes as a Fallback
Some Windows users may still have iTunes instead of Apple Devices.
In iTunes:
- Connect and unlock the iPhone.
- Click the small device icon near the top of the window.
- Open Summary.
- Choose the computer backup option.
- Turn on Encrypt local backup.
- Click Back Up Now.
The wording may look slightly different depending on the iTunes version, but the basic process remains the same.
Why an Encrypted Backup Is Usually the Better Choice
Encryption isn’t just about stopping someone from opening the backup folder. It also changes what Apple includes in the backup.
An encrypted local backup can save:
- Account passwords
- Saved Wi-Fi settings
- Health and Activity information
- Website history
- Call history
- Other protected app and device data
A standard, unencrypted backup may leave those items out.
The encryption password is separate from your iPhone passcode and Apple Account password. This is where people often get caught. They create a password during setup, forget it, and discover the problem only when they need to restore the phone.
Use a unique password and save it in a trusted password manager. Don’t write it on a loose note or store it in an unprotected text file.
|
Encryption Question |
Answer |
|
Is local backup encryption automatic? |
No |
|
Does it include saved passwords? |
Yes |
|
Does it include Health data? |
Yes |
|
Does it save Face ID or Touch ID data? |
No |
|
Can a new password unlock an old backup? |
No |
|
Where should the password be stored? |
In a secure password manager |
You can reset the encrypted backup setting and create a new password later. However, that won’t unlock backups created with the forgotten password.
How to Check Whether the Backup Worked
Never assume a backup succeeded just because the phone stayed connected for a while.
After the process ends, check the latest backup date and time in Finder, Apple Devices, or iTunes. An encrypted backup should also show a lock symbol.
On a Mac or Windows PC, you can usually open the device’s General page and select Manage Backups. From there, you can view existing backups, delete old ones, or preserve a specific copy.
Archiving a backup is useful before:
- Installing beta software
- Updating to a major iOS release
- Resetting the iPhone
- Testing major system changes
- Sending the phone for repair
A normal new backup may update the previous backup. An archived copy stays separate.
|
Task |
Where to Do It |
|
Confirm the backup completed |
Check the latest date and time |
|
Confirm encryption |
Look for the lock symbol |
|
View stored backups |
General > Manage Backups |
|
Keep an older snapshot |
Archive the backup |
|
Remove an old backup |
Delete it from Manage Backups |
|
Open its storage location |
Show in Finder or File Explorer |
Where iPhone Backups Are Stored
On a Mac, Apple lists the backup folder as:
~/Library/Application Support/MobileSync/Backup/
On Windows, the folder depends on how Apple Devices or iTunes was installed.
For Apple Devices or the Microsoft Store version of iTunes, press Windows + R and enter:
%USERPROFILE%
Older desktop versions of iTunes may use:
%AppData%
Avoid manually renaming, moving, or editing files inside the backup folder. The folders aren’t arranged for normal browsing, and changing them can make the backup unusable.
How to Restore an iPhone From a Computer Backup
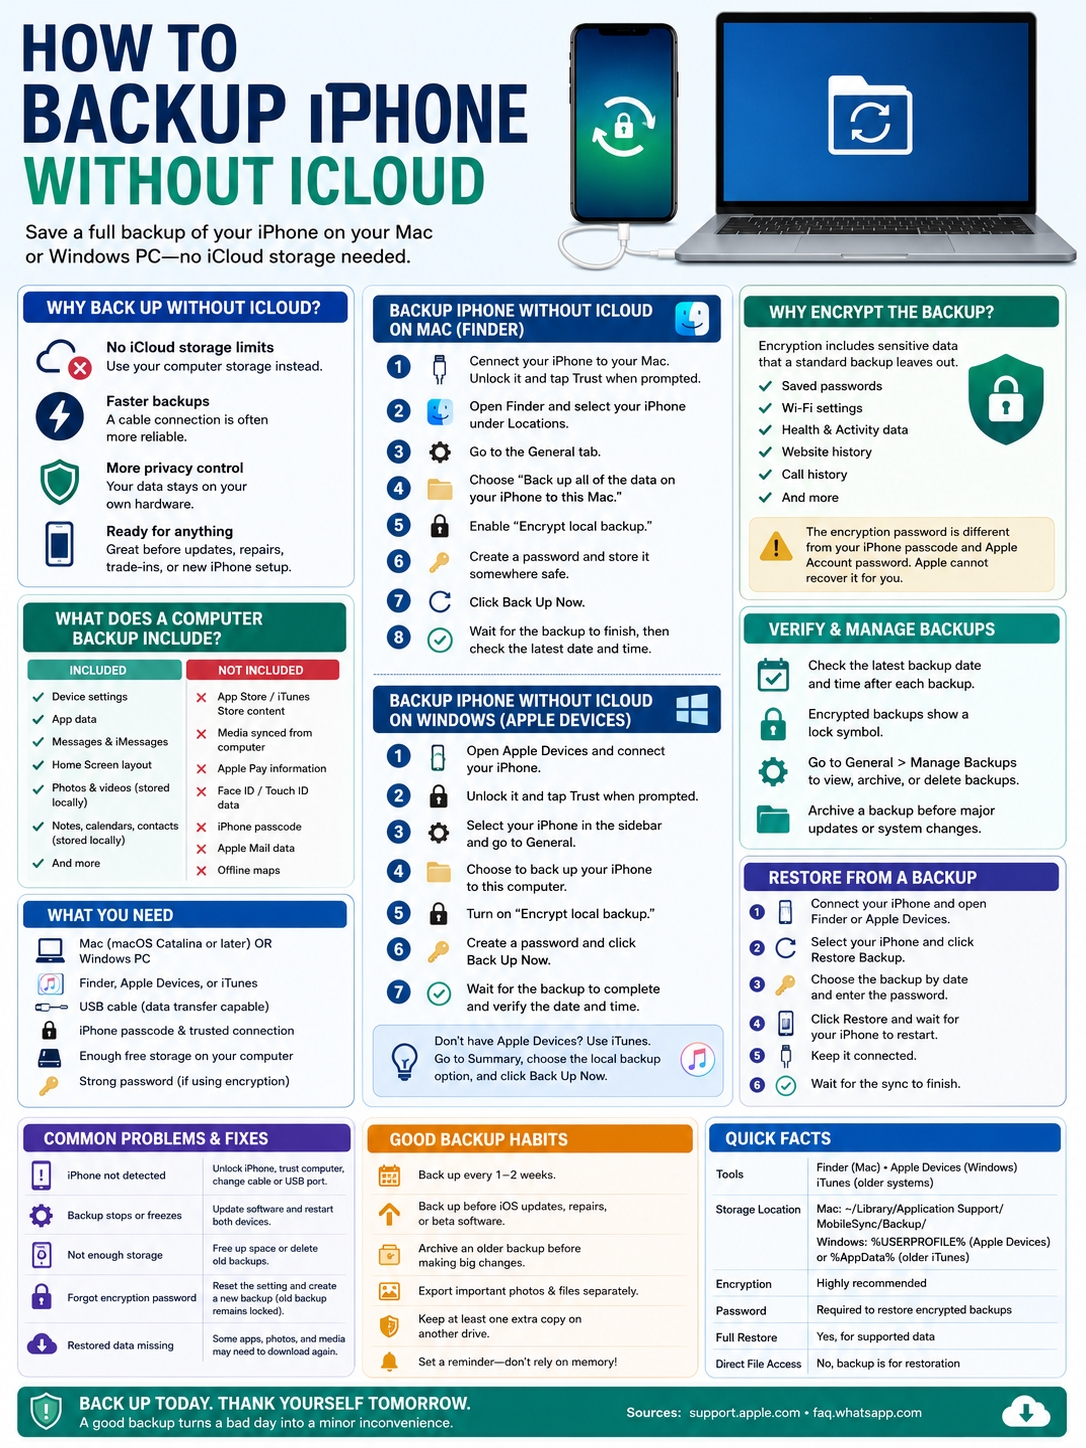
A backup only proves its value when you can restore it.
You may need this process after buying a new iPhone, resetting the current phone, replacing a damaged device, or getting it back from repair.
Restore With Finder or Apple Devices
- Open Finder on Mac or Apple Devices on Windows.
- Connect the iPhone.
- Unlock it and trust the computer if asked.
- Select the iPhone.
- Click Restore Backup.
- Choose the correct backup by date and device name.
- Enter the encryption password.
- Click Restore.
- Keep the iPhone connected after it restarts.
- Wait until the final sync finishes.
|
Restore Step |
What to Check |
|
Backup selection |
Confirm the date and device name |
|
Encrypted backup |
Enter the exact password |
|
Software warning |
Update iOS when required |
|
Device restart |
Keep the cable connected |
|
Final sync |
Wait until it finishes |
|
Missing apps or media |
Allow downloads to continue |
The iPhone may ask for a software update before it can use the backup. This usually happens when the backup was created on a newer iOS version than the one installed on the phone.
After restoration, some apps, photos, music, and purchased content may continue downloading. The phone can look usable before that background process has finished.
A Full Backup Isn’t the Same as Copying Photos
This distinction causes plenty of confusion.
A full iPhone backup is a structured recovery package. Finder, Apple Devices, or iTunes uses it to rebuild the phone. You can’t normally open the backup folder and browse through messages, contacts, photos, and app files like ordinary documents.
A photo import does something different. It creates normal image and video files that you can open, edit, move, or save on another drive.
For better protection, use both methods:
- Create an encrypted computer backup.
- Import important photos and videos separately.
- Export critical documents from the Files app.
- Save important project files from their original apps.
- Keep a second copy on another drive.
|
Method |
Main Purpose |
Can It Restore the Whole iPhone? |
|
Finder or Apple Devices backup |
Rebuild the device |
Yes, for supported data |
|
Photo import |
Save photos and videos |
No |
|
Files app export |
Save selected documents |
No |
|
App-specific export |
Preserve projects or records |
Usually no |
|
Second external drive |
Protect another copy |
No |
The safest setup doesn’t rely on one giant backup file. Important photos, work files, and personal documents deserve their own accessible copies.
Common iPhone Backup Problems and How to Fix Them
Most backup failures come down to connection problems, outdated software, limited storage, or forgotten passwords.
The iPhone Doesn’t Appear
Start with the basics:
- Unlock the iPhone.
- Reconnect the cable.
- Tap Trust when prompted.
- Try another USB port.
- Avoid an unstable USB hub.
- Test another data-capable cable.
- Restart the iPhone and computer.
A cable can charge the phone perfectly and still fail to transfer data.
The Backup Stops or Freezes
Update macOS, Windows, Apple Devices, iTunes, and iOS.
Restart both devices, then try again with a direct USB connection. Close unnecessary apps if the computer is low on memory or running slowly.
The Computer Has No Free Space
Delete unneeded files or remove old iPhone backups through Manage Backups.
Don’t delete backup folders blindly from Finder or File Explorer unless you know exactly which backup they contain.
You Forgot the Encryption Password
You may be able to reset the encrypted backup setting and create a new password for future backups.
However, you still won’t be able to open older backups created with the forgotten password.
|
Problem |
Practical Fix |
|
iPhone isn’t detected |
Unlock, trust, reconnect, or change the cable |
|
Backup stops midway |
Update software and restart both devices |
|
Computer storage is full |
Free space or delete old backups |
|
Encryption password is lost |
Reset the setting and create a new backup |
|
Backup needs newer iOS |
Update the iPhone |
|
Restored content seems missing |
Wait for syncing and downloads to finish |
Create a Backup Routine You’ll Actually Follow
The best backup schedule is the one you won’t ignore.
For most people, a weekly or biweekly computer backup is enough. Back up more often if you use the phone for business, original photography, interviews, client files, or other work that would be difficult to replace.
You should also create a fresh backup:
- Before a major iOS update
- Before installing beta software
- Before handing the phone in for repair
- Before a factory reset
- Before trading in or selling the device
- Before moving to a new iPhone
- After taking important photos or videos
You can set up Wi-Fi syncing after the first cable connection. Finder and Apple Devices can then recognize the iPhone when both devices are on the same network.
Still, a cable remains the more reliable choice for the first backup and for troubleshooting.
|
Timing |
Recommended Action |
|
Every week or two |
Run an encrypted local backup |
|
Before an iOS update |
Create and verify a fresh backup |
|
Before repair |
Back up and export critical files |
|
Before beta software |
Archive a stable backup |
|
After important events |
Copy photos and videos separately |
|
Every few months |
Remove old, unnecessary backups |
Set a calendar reminder if needed. A manual backup is easy to postpone, especially when the phone seems to be working perfectly.
Final Thoughts
You don’t need to pay for extra iCloud storage to protect your iPhone.
Finder on Mac and Apple Devices on Windows give you a reliable way to create a full local backup. iTunes still works on older systems where the newer tools aren’t available.
Turn on encryption. Save the password somewhere secure. Check the backup date after every session. Then copy irreplaceable photos and documents separately.
That last step matters. A full device backup is great for recovery, but direct copies give you faster access to the files you care about most.
Once you make it a habit to backup iPhone without iCloud, updates, repairs, resets, and phone upgrades become far less stressful.
|
Final Check |
Recommended Choice |
|
Main Mac tool |
Finder |
|
Main Windows tool |
Apple Devices |
|
Older fallback |
iTunes |
|
Backup encryption |
Turn it on |
|
Password storage |
Use a password manager |
|
Verification |
Check the date, time, and lock symbol |
|
Extra protection |
Save key files separately |
Frequently Asked Questions
Can I Back Up an iPhone Directly to a USB Flash Drive?
Apple’s standard full-device backup process runs through Finder, Apple Devices, or iTunes on a computer.
You can copy photos, videos, and selected files to a USB drive. However, that USB drive won’t contain the same restorable device backup created by Apple’s computer tools.
Can I Back Up an iPhone Without iCloud or a Computer?
You can save selected files to external storage or another online service, but Apple’s official full-device backup options are iCloud Backup and computer backup.
Copying a few photos or documents isn’t the same as saving a complete recovery package.
Does a Computer Backup Include WhatsApp Chats?
Don’t assume every messaging app handles backup data in the same way.
WhatsApp has its own transfer and chat-backup methods. On iPhone, its cloud chat backup uses iCloud. WhatsApp also supports direct chat transfer between compatible phones.
Complete the app’s own transfer process before erasing or trading in the old iPhone.
Can I Open the Backup and Read Individual Messages?
Not through Apple’s normal tools.
The backup is built for device restoration, not for casual browsing. Finder and Apple Devices can manage the backup, but they don’t display its contents like ordinary folders.
Will a New Backup Delete the Old One?
A normal backup may update the existing backup for that device.
Use Manage Backups and archive a copy when you need to preserve a specific version before an update, repair, or system change.
Can One Computer Store Backups From Several iPhones?
Yes. One Mac or PC can hold backups from multiple iPhones, as long as the computer has enough storage.
Check the device name and backup date carefully before restoring.
|
FAQ Topic |
Main Point |
|
USB flash drive |
Useful for files, not the standard full backup |
|
No computer or iCloud |
Only selected data can be copied |
|
WhatsApp chats |
Use WhatsApp’s own transfer tools |
|
Browsing backup contents |
Apple designs backups for restoration |
|
Keeping old versions |
Archive important backups |
|
Several iPhones |
Supported if storage allows |