
Setting a custom ringtone on an iPhone used to be more trouble than it was worth. Old guides often send you to a computer, ask you to convert audio files, rename extensions, and sync everything through iTunes.
You can skip all of that now.
If you’re looking for a custom ringtone iphone no itunes method, Apple’s GarageBand app lets you handle the whole job on your iPhone. You can use a compatible audio file, an eligible song from your Music library, a Voice Memo, or something you’ve recorded yourself.
There are a few limits to know first. GarageBand exports ringtones up to 30 seconds long. Music-library tracks must be downloaded to your phone and can’t be protected. You’ll also need a version of iOS that supports the current GarageBand release.
Once those pieces are in place, the setup is much simpler than the old iTunes method.
Can You Set a Custom iPhone Ringtone Without iTunes?
Yes. You can make and install a custom ringtone directly on your iPhone with GarageBand. A Mac, Windows PC, and desktop iTunes aren’t required.
GarageBand lets you import the audio, cut out the part you want, export it as a ringtone, and decide where to use it.
|
Question |
Answer |
|
Do you need desktop iTunes? |
No |
|
Do you need a computer? |
No |
|
Which Apple app can create the ringtone? |
GarageBand |
|
Maximum GarageBand ringtone length |
30 seconds |
|
Can you use your own audio? |
Yes |
|
Can you assign it to one contact? |
Yes |
|
Can you use protected songs? |
No |
There’s one detail worth clearing up. Apple still has an iTunes Store app on the iPhone where you can buy ready-made tones. That’s not the same as using desktop iTunes to sync a ringtone.
If you want to make a ringtone from your own audio, GarageBand is the useful option.
What You Need Before Making a Custom Ringtone
A little preparation saves a lot of frustration here.
First, make sure GarageBand works on your iPhone. At the time of verification in August 2026, Apple’s U.S. App Store listing shows GarageBand as free, roughly 1.9 GB in size, and requiring iOS 26.0 or later. Those requirements can change, so check the App Store if you’re reading this later.
Next, get your audio ready.
|
What You Need |
What to Check |
|
GarageBand |
Install a version compatible with your iPhone |
|
iOS |
Check the current App Store requirement |
|
Free storage |
GarageBand itself takes considerable space |
|
Audio file |
Keep it in Files, iCloud Drive, or Music |
|
Music track |
It must be downloaded and unprotected |
|
Ringtone clip |
Keep it at 30 seconds or less |
GarageBand can import common formats including MP3, AAC, WAV, and AIFF. It can also pull compatible files from the Files app and iCloud Drive.
That makes an audio file in Files one of the easiest starting points.
Don’t Assume Every Apple Music Song Will Work
This trips up a lot of people.
A song appearing in the Music app doesn’t mean GarageBand can automatically turn it into a ringtone.
Apple requires Music-library tracks to be stored locally on the iPhone and unprotected. If a song appears dimmed when you browse for it in GarageBand, it may not be downloaded, or the file may be protected.
Streaming access alone isn’t enough.
Read Also: How to Transfer Data from Android to iPhone in 2026
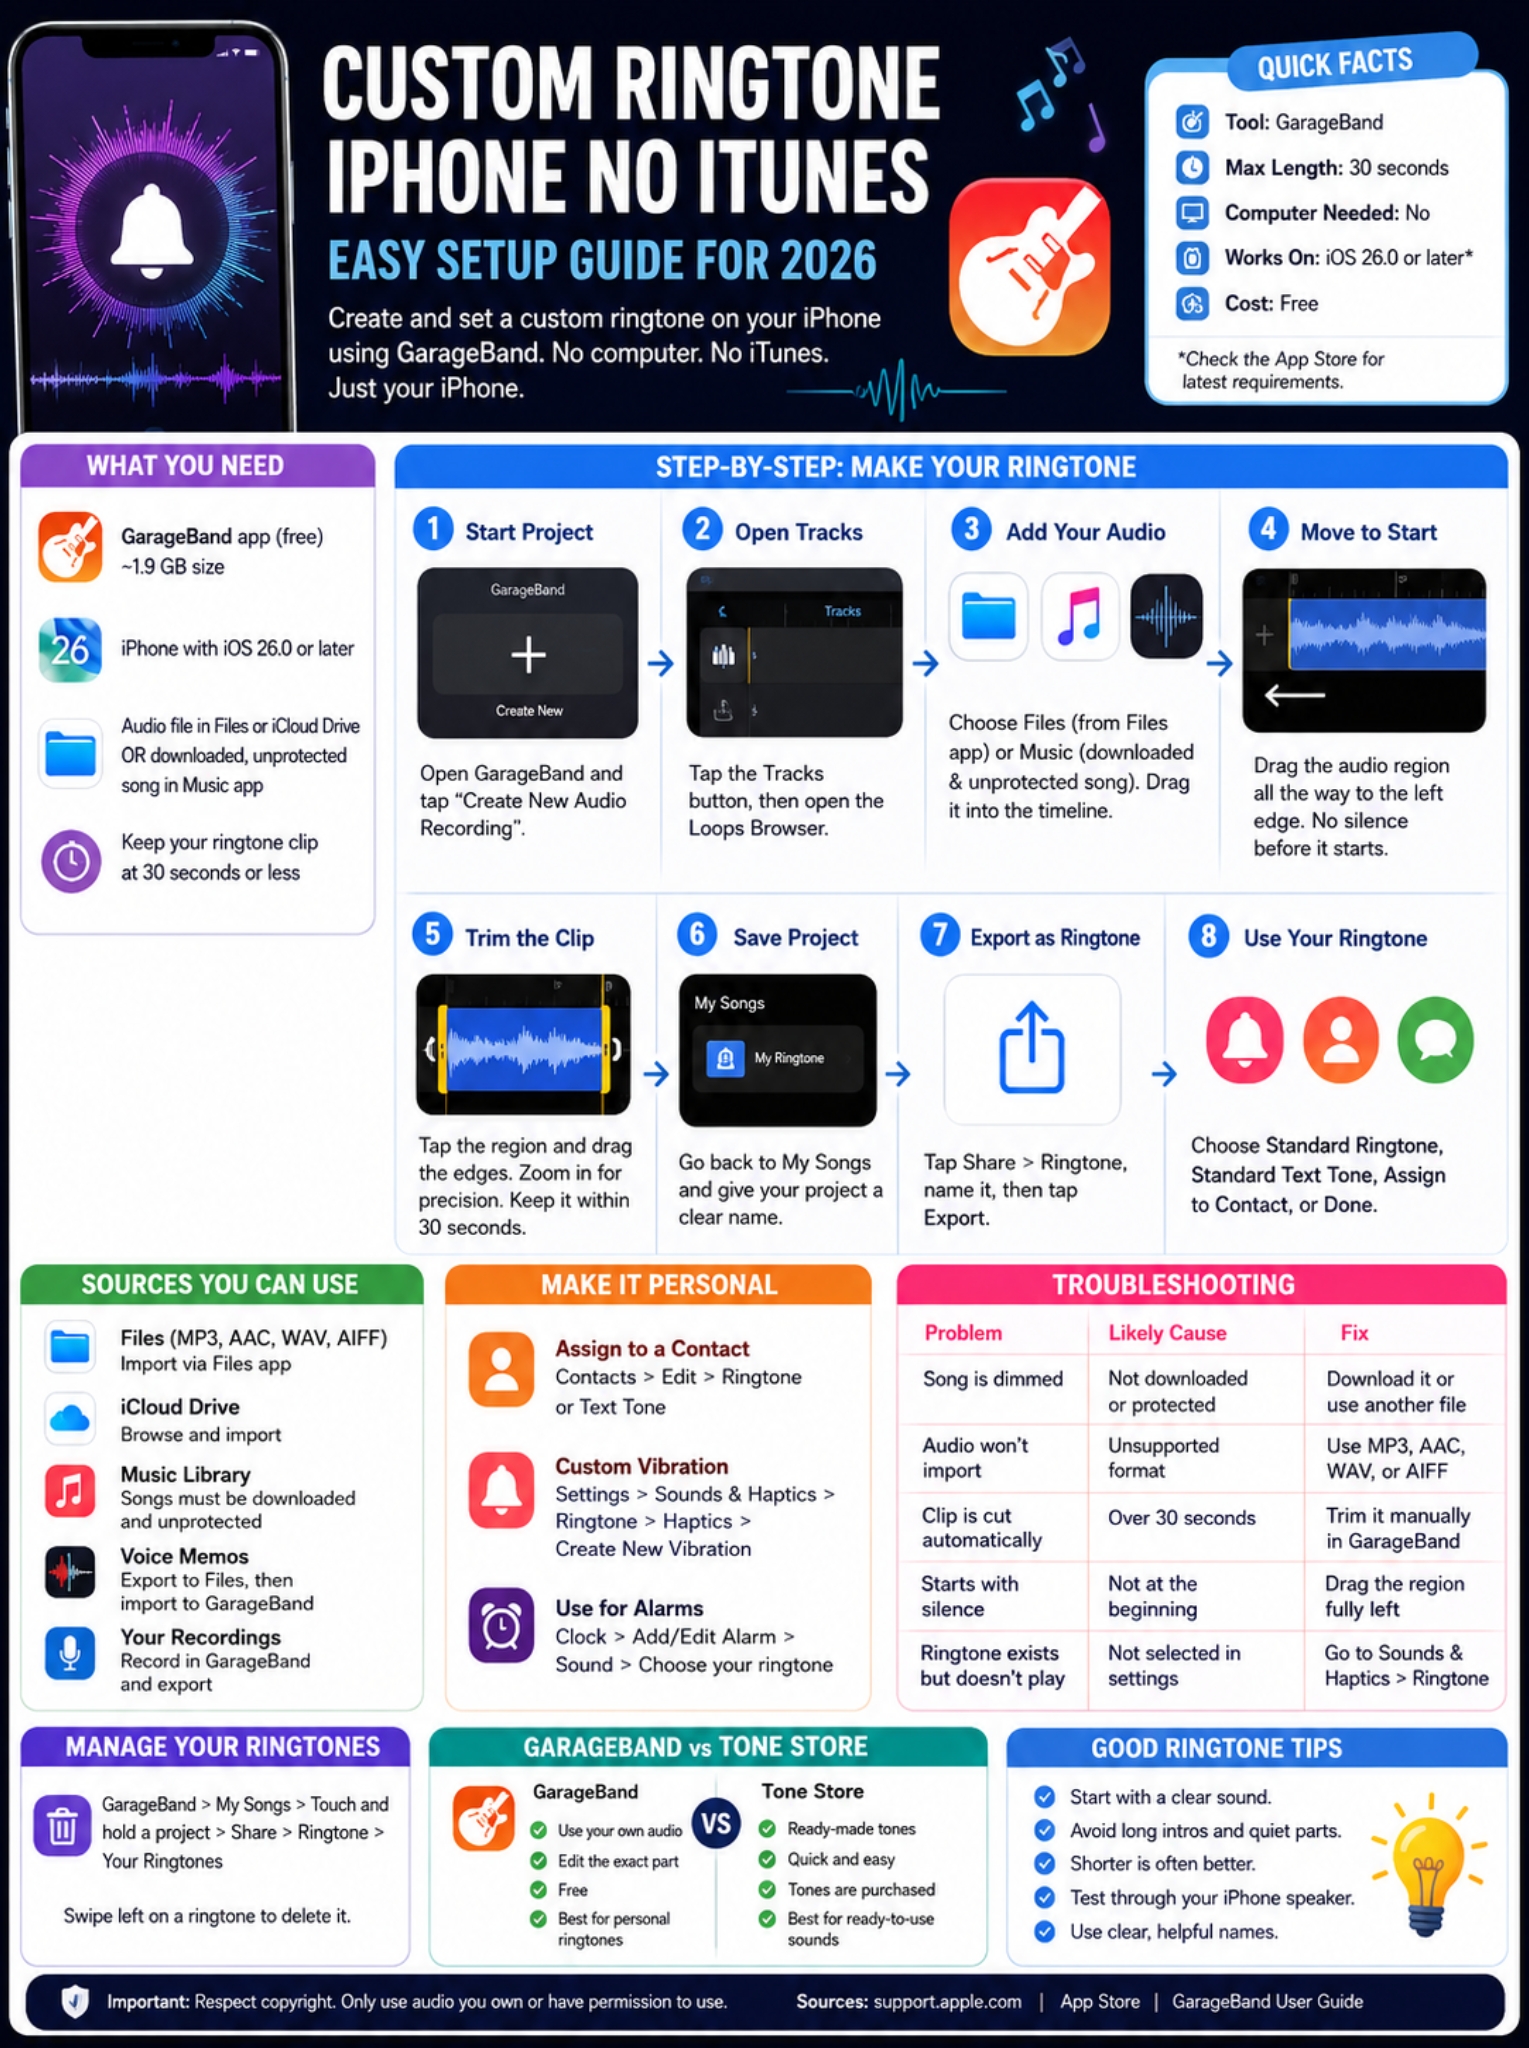
Custom Ringtone iPhone No iTunes: Step-by-Step Method
For the easiest custom ringtone iphone no itunes setup, use GarageBand directly on the phone.
The workflow looks longer on paper than it feels in practice.
|
Step |
What You’ll Do |
|
1 |
Start a GarageBand audio project |
|
2 |
Open Tracks view |
|
3 |
Find your audio |
|
4 |
Drag it into the timeline |
|
5 |
Trim the ringtone |
|
6 |
Save the project |
|
7 |
Export it |
|
8 |
Set it as your ringtone |
Step 1: Start a New GarageBand Project
If GarageBand is already installed, touch and hold its icon on the Home Screen.
Choose Create New Audio Recording.
GarageBand will open an audio project. You don’t actually need to record anything. You’re just using the project as a place to edit the ringtone.
Step 2: Open Tracks View
Tap the Tracks button near the top of the screen.
Next, open the Loops Browser.
This is where GarageBand lets you browse audio from Files or your Music library.
Step 3: Add Your Audio
If your sound is stored in Files:
- Tap Files.
- Choose Browse items from the Files app.
- Find your audio file.
- Touch and hold it.
- Drag it into Tracks view.
If you’re using a Music-library song:
- Open the Loops Browser.
- Tap Music.
- Find the song.
- Make sure it isn’t dimmed.
- Drag it into the project.
If the song is unavailable, download it to your iPhone first. If it’s protected, you’ll need another source.
Step 4: Move the Audio to the Start
Once the clip appears in GarageBand, drag it all the way to the left edge of the timeline.
Don’t overlook this step.
If there’s empty space before the audio, your ringtone may begin with silence. That’s the sort of small annoyance you notice every time the phone rings.
Step 5: Trim the Best Part
Tap the audio region. Drag either edge until you’ve isolated the part you want.
You can press and hold near an edge to zoom in for more precise trimming.
GarageBand lets you export up to 30 seconds as a ringtone. That doesn’t mean your ringtone needs to be exactly 30 seconds. A shorter clip often works better.
A strong ringtone usually:
- starts almost immediately;
- has a recognizable sound in the first few seconds;
- avoids a long intro or fade-in;
- stays loud enough to hear in a busy room;
- ends without an awkward cut.
Don’t choose a section simply because it’s your favorite part of the song. Choose the part that works best as an alert.
Step 6: Save the Project
When the edit sounds right, return to My Songs.
GarageBand saves the project there.
Give it a clear name while you’re at it. Work Call, Classic Bell, or Guitar Ringtone will be much easier to recognize later than a collection of files called My Song.
Step 7: Export It as a Ringtone
From My Songs:
- Tap More.
- Tap Select.
- Choose your project.
- Tap Share.
- Select Ringtone.
- Give the ringtone a name.
- Tap Export.
If the project is longer than 30 seconds, GarageBand can shorten it for you.
It’s usually better to trim it yourself. Automatic shortening may cut the audio at a place you wouldn’t have chosen.
Step 8: Decide Where to Use It
After GarageBand finishes exporting, tap Use sound as.
You’ll see several choices:
- Standard Ringtone
- Standard Text Tone
- Assign to Contact
- Done
Choose Done if you want to save the ringtone without changing your current settings.
That’s it. No desktop syncing, cable connection, or iTunes conversion process.
How to Make a Ringtone From Files, Music, or Voice Memos
You don’t need a commercial song to make a good ringtone. In many cases, your own audio is easier because there are no protection restrictions to deal with.
|
Audio Source |
Will It Work? |
What You Need |
|
MP3 file |
Yes |
Import through Files |
|
WAV file |
Yes |
Import through Files |
|
AIFF file |
Yes |
Import through Files |
|
AAC file |
Yes |
Import through Files |
|
iCloud Drive file |
Yes |
Browse through Files |
|
Music-library song |
Sometimes |
Downloaded and unprotected |
|
Voice Memo |
Yes |
Save it to Files first |
|
Protected Music track |
No |
Use another source |
Use an MP3 or Other Audio File
If you’ve already got an MP3, WAV, AAC, or AIFF file, save it somewhere you can reach from the Files app.
Then go to:
GarageBand > Tracks > Loops Browser > Files > Browse items from the Files app
Drag the file into the timeline, trim it, and export it.
This route works well for:
- original music;
- sound effects;
- spoken recordings;
- short instrument clips;
- legally downloaded audio.
Keep copyright in mind. A downloadable audio file isn’t automatically free to redistribute or use commercially.
Turn a Voice Memo Into a Ringtone
Voice Memos is an easy option when you want something more personal.
You might use:
- a family member’s voice;
- your child’s laugh;
- a pet sound;
- a short spoken phrase;
- your own music or instrument recording.
First, save the recording from Voice Memos to Files.
Then:
- Open GarageBand.
- Start an audio project.
- Open the Loops Browser.
- Choose Files.
- Import the recording.
- Trim it.
- Export it as a ringtone.
Voice Memos normally exports standard recordings as .m4a, which makes the file easy to move through Apple’s own apps.
How to Give One Contact a Different Ringtone
You don’t have to use your new ringtone for everyone.
A custom ringtone becomes much more useful when you give specific people their own sound. You can tell who’s calling before you even look at the phone.
|
What You Want to Change |
Where to Find It |
|
Default ringtone |
Settings > Sounds & Haptics |
|
Ringtone for one person |
Contacts > Contact > Edit > Ringtone |
|
Text tone for one person |
Contacts > Contact > Edit > Text Tone |
|
Custom vibration |
Sounds & Haptics > Ringtone > Haptics |
To assign a ringtone to one person:
- Open Contacts.
- Choose the contact.
- Tap Edit.
- Tap Ringtone.
- Select your custom sound.
This is especially handy for family, close friends, or important work contacts.
You can do the same with text tones.
Can You Use a Custom Ringtone as an Alarm?
Yes.
Apple’s Clock app lets you choose a ringtone or song as the sound for a regular alarm.
|
Alarm Option |
Supported? |
|
Ringtone |
Yes |
|
Song |
Yes |
|
Vibration |
Yes |
|
Works when Silent mode is on |
Yes, for regular alarms |
|
Works during Do Not Disturb |
Yes, for regular alarms |
To use your ringtone as an alarm:
- Open Clock.
- Tap Alarms.
- Create a new alarm or edit one.
- Tap Sound.
- Choose your ringtone.
- Save the alarm.
This gives a custom ringtone a second use beyond incoming calls.
Why Your Custom Ringtone Isn’t Working
When something goes wrong, the cause is usually pretty ordinary.
It’s often the wrong audio format, a protected song, a clip that’s too long, or a ringtone that was exported but never selected.
|
Problem |
Likely Cause |
What to Do |
|
Song is greyed out |
Protected or not downloaded |
Download it or use another file |
|
Audio won’t import |
Unsupported format |
Try MP3, AAC, WAV, or AIFF |
|
GarageBand shortens the clip |
It’s over 30 seconds |
Trim it yourself |
|
Ringtone starts with silence |
Audio isn’t at the start |
Drag it fully left |
|
GarageBand won’t install |
iOS isn’t compatible |
Check current requirements |
|
Ringtone exists but doesn’t ring |
It isn’t selected |
Choose it in Sounds & Haptics |
The Song Is Greyed Out
If GarageBand shows the song dimmed, check whether it’s downloaded to your iPhone.
If downloading doesn’t solve it, protection may be the reason. GarageBand can’t use protected songs for ringtone creation.
At that point, switching to a compatible file in Files is usually easier than fighting with the Music library.
The Audio File Won’t Import
Check the format first.
GarageBand supports several common audio formats, including MP3, AAC, WAV, and AIFF.
If your file uses a less common format, you’ll need to convert it before importing it.
GarageBand Keeps Cutting the Audio
That’s normally the 30-second ringtone limit kicking in.
Instead of letting GarageBand decide where to shorten the clip, return to Tracks view and make the cut yourself.
A clean 18-second ringtone is better than a messy 30-second one.
The Ringtone Starts With Silence
Look at the left side of the GarageBand timeline.
If there’s a gap before your audio, drag the region all the way to the beginning.
It’s a tiny fix, but it makes a noticeable difference.
The Ringtone Exported but Doesn’t Play
Go to:
Settings > Sounds & Haptics > Ringtone
Select your custom tone.
Also check the Ringtone and Alerts volume. Exporting a ringtone doesn’t necessarily make it your active ringtone unless you chose that option during export.
How to Delete a Custom Ringtone You No Longer Want
It’s easy to end up with several almost-identical ringtones after experimenting with different edits.
GarageBand lets you clean those up.
|
Task |
Where to Do It |
|
Open ringtone management |
GarageBand ringtone export screen |
|
View custom exports |
Your Ringtones |
|
Remove one |
Swipe left > Delete |
To delete an exported GarageBand ringtone:
- Open GarageBand.
- Go to My Songs.
- Touch and hold a project.
- Tap Share.
- Choose Ringtone.
- Open Your Ringtones.
- Swipe left on the ringtone.
- Tap Delete.
Deleting the ringtone doesn’t mean you have to delete the original GarageBand project.
GarageBand vs Tone Store: Which One Makes More Sense?
Both options let you change your ringtone without desktop iTunes, but they solve different problems.
|
Feature |
GarageBand |
Tone Store |
|
Use your own audio |
Yes |
No |
|
Choose the exact clip |
Yes |
No |
|
Use your own recording |
Yes |
No |
|
Needs a computer |
No |
No |
|
Cost |
GarageBand is free |
Tones are purchased |
|
Best for |
Personal ringtones |
Ready-made sounds |
Use GarageBand when you want a ringtone that’s actually yours.
Use Apple’s Tone Store when you don’t care about editing and just want to buy a ready-made sound quickly.
Apple also allows eligible previously purchased tones to be downloaded again through ringtone settings. Tone availability can vary by region.
Simple Ways to Make a Better Ringtone
Getting a file to work is one thing. Making a ringtone you can live with every day is another.
|
Tip |
Why It Helps |
|
Skip slow intros |
You’ll hear the useful part sooner |
|
Start with a clear sound |
Easier to recognize |
|
Don’t force 30 seconds |
Shorter can be better |
|
Avoid very quiet sections |
Easier to hear in public |
|
Test through the phone speaker |
Headphones can be misleading |
|
Use clear ringtone names |
Easier to manage later |
One common mistake is choosing a section that sounds great as music but poorly as a ringtone.
A 10-second instrumental build might be enjoyable through headphones. When your phone is buried in a bag, it’s not very useful.
Pick a section that gets your attention fast.
It’s also worth testing the ringtone through the iPhone’s own speaker. Bass-heavy tracks and quiet recordings can sound much weaker there than they do through earbuds.
Final Thoughts
Making a custom ringtone iphone no itunes is much easier than the old computer-based method suggests.
GarageBand handles almost everything directly on the iPhone. Bring in a compatible audio file, an eligible downloaded Music track, or your own recording. Trim the useful part. Keep it within the 30-second GarageBand limit. Export it, then choose whether it should be your main ringtone, a text tone, or a ringtone for one person.
The main things to remember are simple:
- Keep the clip at 30 seconds or less.
- Move the audio to the start of the GarageBand timeline.
- Use downloaded, unprotected Music tracks.
- MP3, AAC, WAV, and AIFF files are practical choices.
- You can assign custom tones to individual contacts.
- You can also use ringtones for text alerts and regular alarms.
- GarageBand lets you delete exported tones when you no longer want them.
The first ringtone may take a few minutes while you learn where everything is. After that, the process becomes routine.
And that’s the real improvement over the old iTunes method: you can do the whole thing where the ringtone will actually live—right on your iPhone.
FAQs About Custom iPhone Ringtones Without iTunes
Can I turn an MP3 into an iPhone ringtone?
Yes. GarageBand can import MP3 files. Save the MP3 in Files, import it into GarageBand, trim it to the section you want, and export it as a ringtone.
Does an iPhone ringtone have to be exactly 30 seconds?
No.
Thirty seconds is GarageBand’s maximum ringtone export length. Your ringtone can be shorter, and shorter clips often work better.
Can I make a custom vibration too?
Yes.
Go to Settings > Sounds & Haptics, open the relevant ringtone or alert settings, and choose the haptic options. Apple also lets you create your own vibration pattern.
Can I use my custom ringtone as a text tone?
Yes.
When GarageBand finishes exporting the ringtone, choose Standard Text Tone instead of Standard Ringtone.
Can I use my custom ringtone for an alarm?
Yes. Regular Clock alarms can use a ringtone as their sound.
Do I need an Apple Music subscription?
No.
You can make a ringtone from compatible files in Files, your own GarageBand recordings, or a Voice Memo. An Apple Music subscription isn’t required.