Capturing your screen is a simple task, but grabbing the sound along with it often confuses people. Knowing how to record iphone screen audio is a required skill for smartphone users today. Whether you use an older device or the latest model running the newest iOS updates in 2026, capturing exactly what happens on your screen along with clear sound solves a lot of problems. You might want to build a quick tutorial for a family member, save a funny moment from a game, or document a software bug to send to tech support.
While Apple gave us a native screen recording tool several years ago, the audio settings remain hidden out of sight. The default setup leaves many users with silent videos, which is incredibly frustrating when you just spent ten minutes explaining a process on camera. This guide covers everything you need to understand about grabbing system sounds, your voice, and both at the same time. We will walk through the basic setup, explore advanced troubleshooting steps, and look at external tools so you always get the perfect clip.
Why You Might Need to Record iPhone Screen Audio
Visuals only tell half the story. When you capture a moving image on your screen, audio provides the missing context that makes the video useful. A completely silent video requires the viewer to guess what is happening or read a separate text explanation. Capturing both at the same time saves you effort and gives your audience a better experience. As an AI, I see users frequently ask for ways to clarify their digital communication, and video with sound is the most effective method available. Here are the most common situations where this skill comes in handy.
Creating Tutorials and Step-by-Step Guides
Explaining a complex phone setting over a text message is a nightmare. You type out endless steps, and the other person still taps the wrong button. Recording your screen while talking through the steps fixes this instantly. You can narrate where to tap, what to swipe, and what the next menu looks like. This method is perfect for helping older relatives use new applications, training remote workers on company software, or building how-to content for your social media channels.
Saving Gameplay Highlights and Streams
Mobile gaming dominates the entertainment industry. Sharing your best gameplay clips is how communities interact. When you grab footage of a gaming session, you absolutely need the in-game music and sound effects to keep the energy high. If you activate your microphone, you can also record your live reactions and commentary. This is the exact workflow you need if you plan to upload your matches to YouTube or share them with your guild on Discord.
Reporting Software Bugs and Glitches
Tech support teams have a rough job trying to replicate bugs based on vague user descriptions. A video that shows the exact glitch while you explain what went wrong is a lifesaver. You can describe what you expected the app to do versus what it actually did, all while demonstrating the crash in real time. This single file provides undeniable proof of the issue and cuts down on endless back-and-forth emails with developers.
|
Common Use Case |
Primary Benefit |
Audio Type Needed |
|
Software Tutorials |
Eliminates confusion and saves time |
Microphone Voiceover |
|
Gaming Highlights |
Captures the atmosphere and reactions |
Internal Audio + Microphone |
|
Bug Reporting |
Provides clear proof for tech support |
Internal Audio + Microphone |
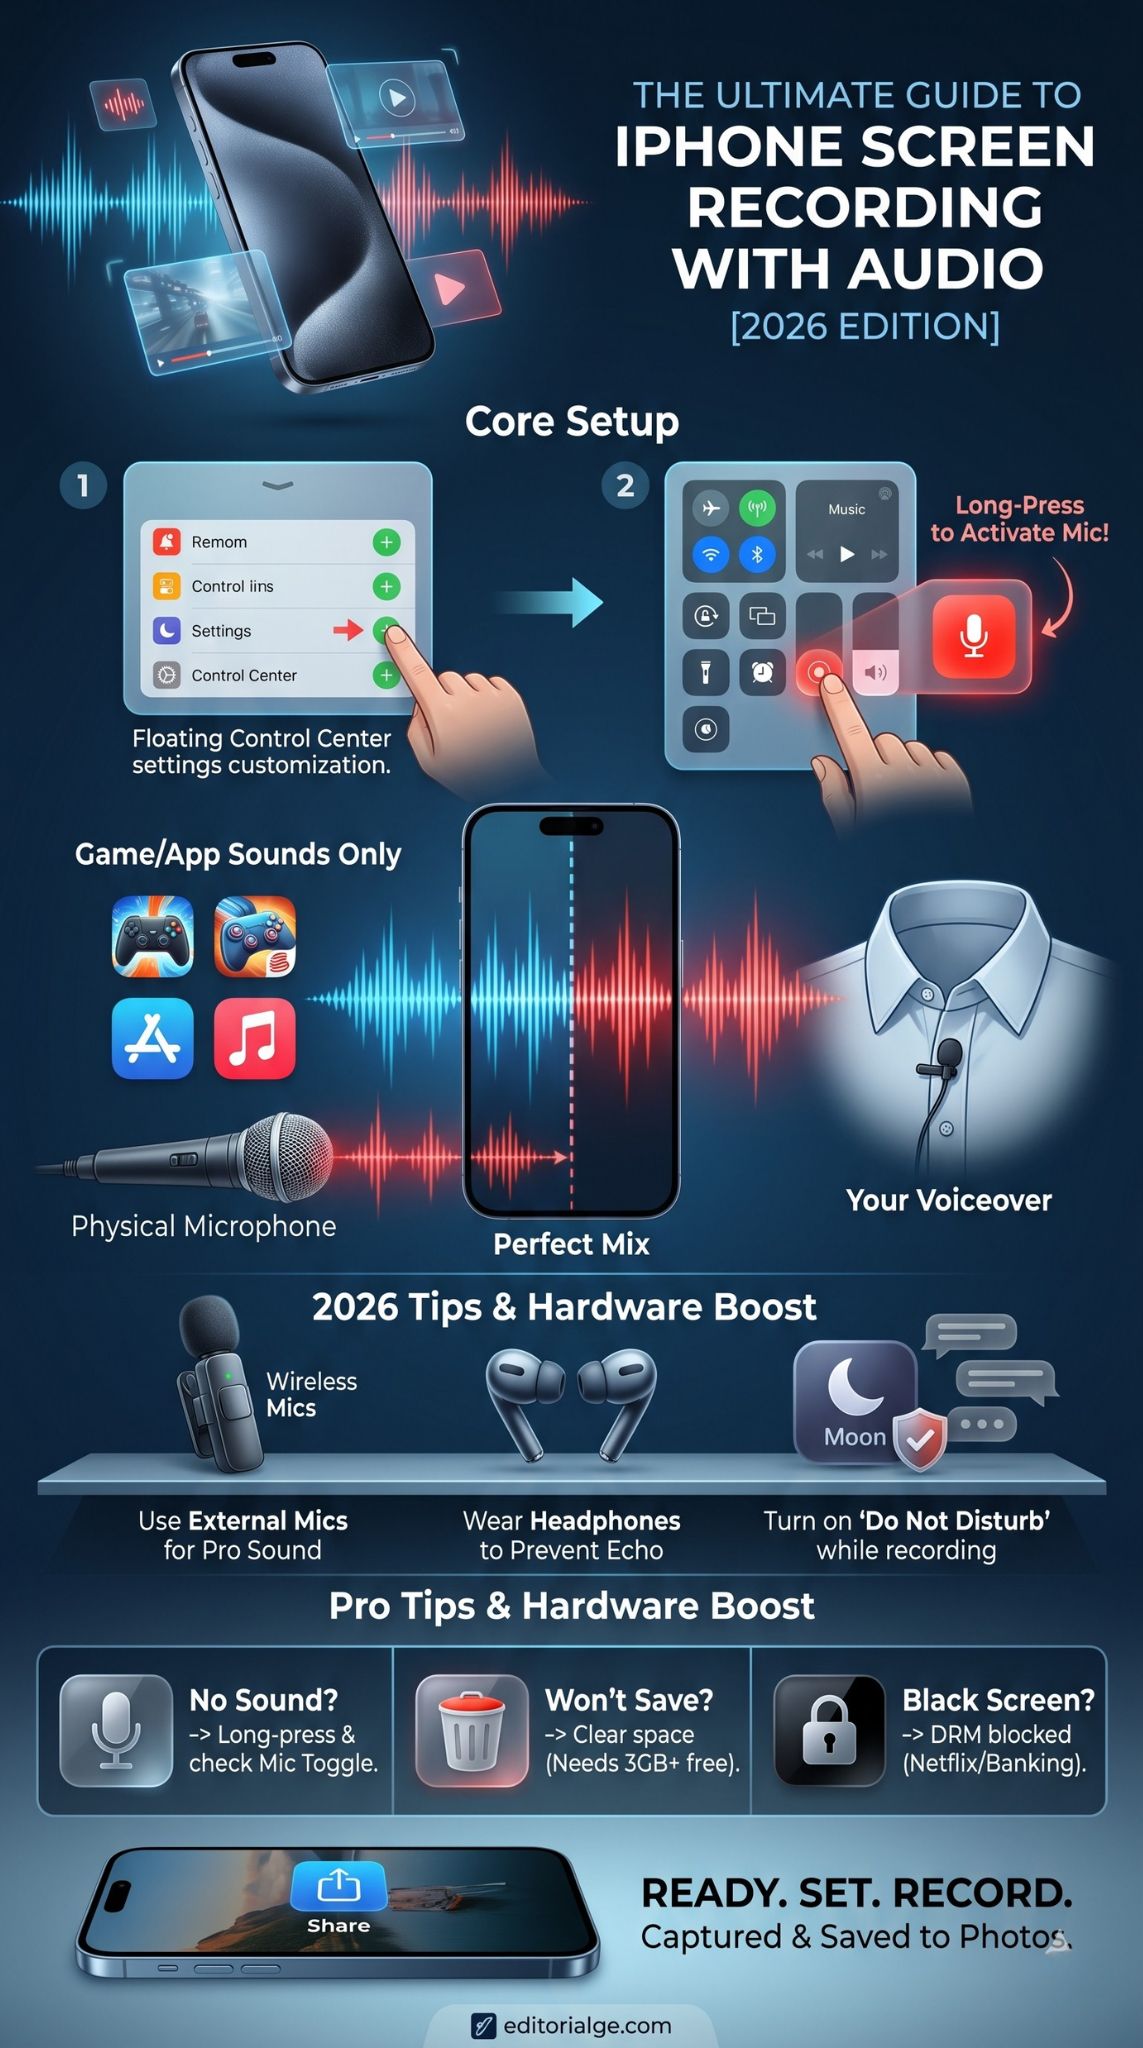
How to Enable Screen Recording in Control Center
You cannot record anything until you put the recording button in an easy-to-reach place. Apple hides this feature on fresh iOS installations to keep menus clean. You have to add it to your Control Center manually. The Control Center is the quick-settings menu you see when you swipe down from the top-right corner of your screen on newer models, or swipe up from the bottom on older devices with a physical home button. You only have to go through this setup process one time.
Step-by-Step Guide to Customizing Control Center
First, unlock your phone and open the Settings app. Scroll down a bit and tap on the Control Center menu. Inside, you will see two distinct sections. The top list contains the controls that are already active in your menu. The bottom list holds all the extra tools you can add.
Scroll through that bottom list until you spot the option called Screen Recording. It features an icon that looks like a solid dot inside a hollow circle. Tap the green plus sign next to it. Screen Recording will immediately jump to the top list. If you want to change its position, tap and hold the three horizontal lines next to it and drag it up or down. This changes exactly where the button sits when you swipe your menu open later.
|
Setup Phase |
Action Required |
Result |
|
Step 1 |
Open Settings app |
Access device configurations |
|
Step 2 |
Tap Control Center |
Access menu layouts |
|
Step 3 |
Tap green plus near Screen Recording |
Adds the tool to your quick menu |
|
Step 4 |
Drag horizontal lines |
Rearranges the button position |
How to Record iPhone Screen with Audio
Now that the button is right where you need it, you can start making videos. Understanding how your phone processes sound is the key to getting this right. The operating system separates audio into two distinct categories. The first is internal audio, which includes the noises generated by the apps themselves, like game soundtracks or notification dings. The second is microphone audio, which is the ambient sound in your room and your speaking voice. You have to tell the phone which ones to listen to.
Capturing Internal System Audio Only
Sometimes you just want to show off an app and let its natural sounds play without picking up the dog barking in your background. The process here is very straightforward. Swipe to open your Control Center and tap the Screen Recording button once. You will notice a three-second countdown start right on the button. When it turns red, the recording is live.
You can swipe the menu away and use your phone normally. The device will capture the screen and the internal app sounds perfectly. When you finish your task, tap the red clock or the Dynamic Island at the very top of your screen. A prompt will ask if you want to stop. Tap Stop, and the file will save.
Read Also: How to Set Custom Ringtone on iPhone Without iTunes
Capturing Voice and Internal Audio Together
If you want to record iphone screen audio that includes both the app noises and your personal voiceover, you must activate the microphone. This is the single step that trips up most users because Apple keeps the microphone turned off by default for privacy reasons. You have to manually override this setting.
Turning on the Microphone
Open your Control Center again. Instead of tapping the Screen Recording button quickly, press your finger on it and hold it down for about one second. A brand new menu will pop up in the middle of your screen. Look at the bottom of this new panel, and you will see a microphone icon. It usually says Microphone Off right below it.
Tap that icon. It will turn red, and the text will switch to Microphone On. Next, tap the Start Recording text in that same menu. The three-second countdown will start. Now your device is capturing the visuals, the internal sounds, and your voice all at once. Be aware that iOS remembers this choice. The next time you tap the record button quickly, the microphone will stay on until you go back into this hidden menu and turn it off.
|
Audio Source |
Recording Result |
Best Used For |
|
Microphone Off |
Captures only app sounds |
Silent walkthroughs and clean gameplay |
|
Microphone On |
Captures app sounds and your voice |
Vlog style content and vocal tutorials |
|
Phone on Silent |
Mutes app sounds, keeps voice |
Voice-only narrations over apps |
Where Are Your Screen Recordings Saved?
The moment you tap stop, a small notification banner drops down from the top of your display. It tells you that your video file has been processed and saved. Apple routes every single screen capture directly into your default Photos app. They do not go into a special hidden folder in your Files app unless you use a third-party tool.
To view your new video, simply open the Photos app. You will see it sitting as the most recent item in your main library. If you do this often and want to find older clips, tap on the Albums tab at the bottom. Scroll all the way down to the Media Types section and select Screen Recordings. iOS automatically filters all your screen captures into this specific album, separating them from your regular camera videos and family photos.
|
Storage Location |
How to Access |
Why It Helps |
|
Main Photos Library |
Open Photos app, look at recent |
Quick access to your newest capture |
|
Screen Recordings Album |
Photos app > Albums > Media Types |
Finds old tutorials mixed in with photos |
|
iCloud Drive |
Photos app > Sync to Cloud |
Lets you edit the video on your Mac later |
Connecting External Microphones for Better Sound
The microphones built into newer iPhones are highly advanced, but they still have physical limitations. They sit right where your hands grip the phone, which means they pick up every tap, swipe, and finger shuffle. They also pick up room echo easily. If you want to make professional content, upgrading your hardware is the smartest move you can make.
Lightning vs USB-C Microphones
The type of microphone you buy depends entirely on which iPhone model you own. In 2026, the market is split. Older devices still use the Apple Lightning port, while everything from the iPhone 15 onward uses the universal USB-C standard. Small lavalier microphones that plug straight into the bottom port are fantastic. As soon as you plug one in, the phone automatically bypasses the internal microphone and routes all your voice audio through the external device. This gives you a crisp, clear voiceover without capturing the sound of your thumbs hitting the glass.
Wireless Audio Setups
If you hate dealing with cables, wireless lapel systems are the modern standard. Brands like Rode, DJI, and Hollyland make tiny wireless receivers that plug right into your phone’s charging port. You clip the actual microphone to your shirt and walk around freely. This lets you place the phone on a desk stand, swipe through an app, and talk naturally without being hunched over the device. Just do a quick test recording first. Wireless Bluetooth connections can sometimes introduce a tiny fraction of an audio delay, and you want to ensure your voice matches your screen actions.
|
Microphone Type |
Connection Method |
Best Use Case |
|
Built-in Mic |
None |
Quick, informal clips sent to friends |
|
Wired Lavalier |
USB-C or Lightning |
Stationary desk tutorials |
|
Wireless Lapel |
Receiver plugged into port |
Presentations where you move around |
Third-Party Apps for Screen Recording on iPhone
The native Apple tool is perfect for basic tasks, but it lacks advanced features. You cannot draw on the screen while recording, you cannot frame your shots, and you cannot stream directly to a live audience. When you outgrow the native tool, third-party applications from the App Store fill the gaps.
When to Use Third-Party Tools Over Built-In Features
You need a third-party solution when your workflow becomes complex. If you want to record your screen but also have your face appear in a small circular bubble in the corner, the native tool cannot do that. If you are a professional educator who needs to broadcast your phone screen into a live webinar using software like OBS or StreamYard, you need bridging tools. Third-party apps handle these heavy demands by managing multiple video and audio feeds simultaneously.
Best Screen Recording Apps in 2026
The App Store has hundreds of options, but a few stand out for their reliability and feature sets.
Loom is a massive favorite for remote workers. You can record your screen and your face at the same time, and the moment you hit stop, the app generates a shareable web link. You do not have to wait for massive video files to upload to an email.
Record It is highly recommended for people who want to add face-cam reactions after the fact. You capture your gameplay normally. Then, you open the app, play the video back, and use your front camera to record your reactions. The app merges the two files for you.
For professional live streaming, routing your iPhone into a Mac using QuickTime Player and sharing that window into StreamYard is the industry standard. It gives you flawless audio control, allows you to add custom graphic overlays, and lets you bring multiple guest speakers onto the screen next to your mobile presentation.
|
App Name |
Standout Feature |
Ideal User |
|
Loom |
Instant link sharing |
Corporate remote workers |
|
Record It |
Post-recording face cam addition |
Gamers and YouTube reactors |
|
StreamYard (via Mac) |
Live broadcasting and overlays |
Professional webinar hosts |
Troubleshooting Common iPhone Screen Recording Issues
Technology fails sometimes, even when you follow the instructions perfectly. Dealing with a corrupted or silent file is a headache. Here are the most common ways users struggle to record iphone screen audio and exactly how to fix them in seconds.
No Sound in the Final Screen Recording
Finding out your ten-minute tutorial is totally silent is the worst feeling. The first thing you must check is the hidden menu in the Control Center. Press and hold the record button and verify the microphone icon is actually red. If it is red and you still have no sound, check the physical mute switch or the Action button on the side of your phone. If your device is set to silent mode, iOS sometimes suppresses internal app noises entirely to respect that setting. Finally, check your volume buttons. If your media volume was at zero while you were playing a game, the recording will capture zero volume.
Screen Recording Fails to Save to Photos
Sometimes you record a long session, tap the red stop button, and nothing happens. The notification never drops down, and the video never appears in your gallery. This almost always means your phone is out of hard drive space. High-resolution screens generate massive video files. If you run out of room mid-recording, iOS simply discards the file because it has nowhere to put it. Go to Settings, tap General, and tap iPhone Storage. Always ensure you have at least three to five gigabytes of free space before you start a long capture.
App Restrictions, Copyright, and DRM Blocks
You might try to record a video, but when you watch it back, the screen is entirely black and the sound is muted. Your phone is not broken. This is a deliberate security measure called Digital Rights Management. Apps that handle sensitive data, like banking or password managers, block the video feed to protect you. Streaming platforms like Netflix, Apple Music, and Hulu block the screen and audio to prevent users from pirating movies and songs. There is no setting you can toggle to bypass this. If an app blocks recording, you simply cannot record it.
Audio Desync and Echo Problems
If you capture gameplay with your microphone turned on, you might hear a terrible echo in your final video. This happens because the game music plays out of your phone speakers, hits the wall, and bounces directly into your microphone a split second later. The easiest way to cure this is to wear basic headphones. When the game audio plays straight into your ears, the phone speakers stay silent. Your microphone will only pick up your voice, resulting in a perfectly clean, professional audio track.
|
Common Problem |
Root Cause |
Quick Fix |
|
Entirely silent video |
Mic turned off or phone muted |
Long-press control center, toggle mic |
|
Video disappears |
Phone storage is completely full |
Delete old apps/photos to free space |
|
Black screen playback |
DRM copyright protection |
Do not attempt to record Netflix or banking apps |
|
Strange audio echo |
Mic picking up speaker noise |
Wear wired or Bluetooth earbuds |
Tips for Creating High-Quality Screen Recordings
Taking one minute to prepare your device before you hit the record button transforms a messy video into a polished presentation. These simple habits make your videos easier to watch and save you time editing later.
Managing Notifications During Recording
Nothing ruins a great tutorial faster than a private text message from a friend dropping down from the top of the screen. Not only is it distracting, but it compromises your privacy if you plan to upload the video. Before you start recording, swipe down and turn on Do Not Disturb. Better yet, create a custom Focus mode specifically for screen recording. You can set this mode to hide all notification badges, silence every incoming call, and block all text messages until you turn it off.
Balancing Microphone and Internal Audio
When you use the native Apple tool with the microphone turned on, the system tries to mix your voice and the app sounds automatically. However, if a game is naturally very loud, it will completely drown out your talking. Since you cannot fix the audio mix after the video is saved, you have to do it beforehand. Lower the physical media volume on your phone to about thirty percent. Do a quick five-second test recording, speak a few words, and watch it back. Adjust the phone volume up or down until your voice clearly sits above the background noise.
Managing Storage Space
As noted earlier, these video files get huge very quickly. Make it a strict habit to trim the fat off your videos the moment you finish them. Open the video in your Photos app and tap the Edit button. Grab the yellow sliders on the timeline and drag them inward to cut out the awkward beginning and end where you are swiping through menus. Save it as a new video clip, and immediately delete the original raw file. This keeps your phone storage healthy and your photo gallery organized.
|
Quality Tip |
Action to Take |
End Benefit |
|
Block Distractions |
Activate Do Not Disturb focus |
Keeps private texts off your public video |
|
Balance Audio |
Lower device media volume |
Ensures your voice is heard over the app |
|
Save Space |
Trim clips in Photos app |
Prevents storage full errors |
Final Thoughts
Figuring out how to record iphone screen audio only takes a few minutes of learning, but it pays off endlessly. Once you know where the hidden microphone button lives in the Control Center, you take complete control over your content. Always remember to run a short five-second test clip before you commit to a long recording session to ensure your volume levels are balanced and your earbuds are working. By utilizing Focus modes to block embarrassing notifications and keeping your storage space clean, you can effortlessly create clean, high-quality videos that help your audience understand exactly what you are trying to show them.
|
Key Takeaway |
Actionable Advice |
|
Enable the hidden mic |
Long-press the record button in Control Center to turn the microphone red. |
|
Stop audio echoes |
Plug in earbuds so the microphone only hears your voice, not the phone speakers. |
|
Protect your privacy |
Always turn on Do Not Disturb before starting a screen capture session. |
|
Overcome native limits |
Use Mac bridging or third-party apps for live streaming and face-cam overlays. |
Frequently Asked Questions (FAQs)
Can I record an iPhone screen and my face at the same time?
The native iOS tool does not support dual-camera capture. If you want a picture-in-picture effect where your face sits in the corner of your screen recording, you need to use a third-party application from the App Store. Apps like Loom or Record It are built specifically to handle this front-facing camera workflow.
Why does my iPhone randomly record voice messages?
This is a common issue tied to the Messages app. iOS has a feature called Raise to Listen, which automatically starts recording an audio message if it detects you lifting the phone to your ear while a text thread is open. The sensors often get confused when you put the phone in your pocket or pick it up quickly. You can disable this by going to Settings, tapping Messages, and toggling off Raise to Listen.
Does screen recording capture phone calls?
No, it does not. Due to strict wiretapping and privacy laws around the world, Apple physically disables the microphone input for screen recordings the moment an active cellular or FaceTime audio call connects. You cannot use this feature to stealthily record phone conversations.
You cannot natively share your mobile screen directly into a browser tab on iOS. The best method in 2026 is to plug your iPhone into your Mac using a cable. Open QuickTime Player, start a new Movie Recording, and select your iPhone as the camera source. Then, open StreamYard on your Mac and share that QuickTime window with your audience.
How long can I record my iPhone screen?
Apple does not impose an artificial time limit on your recordings. The only two limits you face are your battery life and your physical hard drive space. You can record for several hours continuously if your phone is plugged into a charger and you have fifty gigabytes of free storage available.
|
FAQ Topic |
Short Answer |
|
Face-cam recording |
Requires third-party apps like Loom |
|
Random audio texts |
Turn off “Raise to Listen” in settings |
|
Phone call capture |
Blocked by Apple for privacy laws |
|
Time limits |
Limited only by storage and battery |