We have all been there. You are cleaning up your desktop, clearing out old folders, or trying to free up space, and you accidentally delete a file you actually needed. The panic sets in immediately when you open the Recycle Bin and realize it is completely empty. Whether you used a permanent shortcut or your computer suffered an unexpected crash, losing your data is incredibly frustrating.
The good news is that those files are rarely gone forever right away. Windows handles data deletion in a specific way that leaves a window of opportunity for you to get your things back. If you act quickly and follow the correct steps, you can easily recover deleted files windows without losing your mind or your money. This guide covers everything you need to know to rescue your data safely.
|
Introduction Key Takeaway |
Target Outcome |
|
Deletion is rarely instant |
High chance of recovery if you act fast |
|
Panic causes bad decisions |
Stop using the drive immediately |
What Happens When a File is Permanently Deleted?
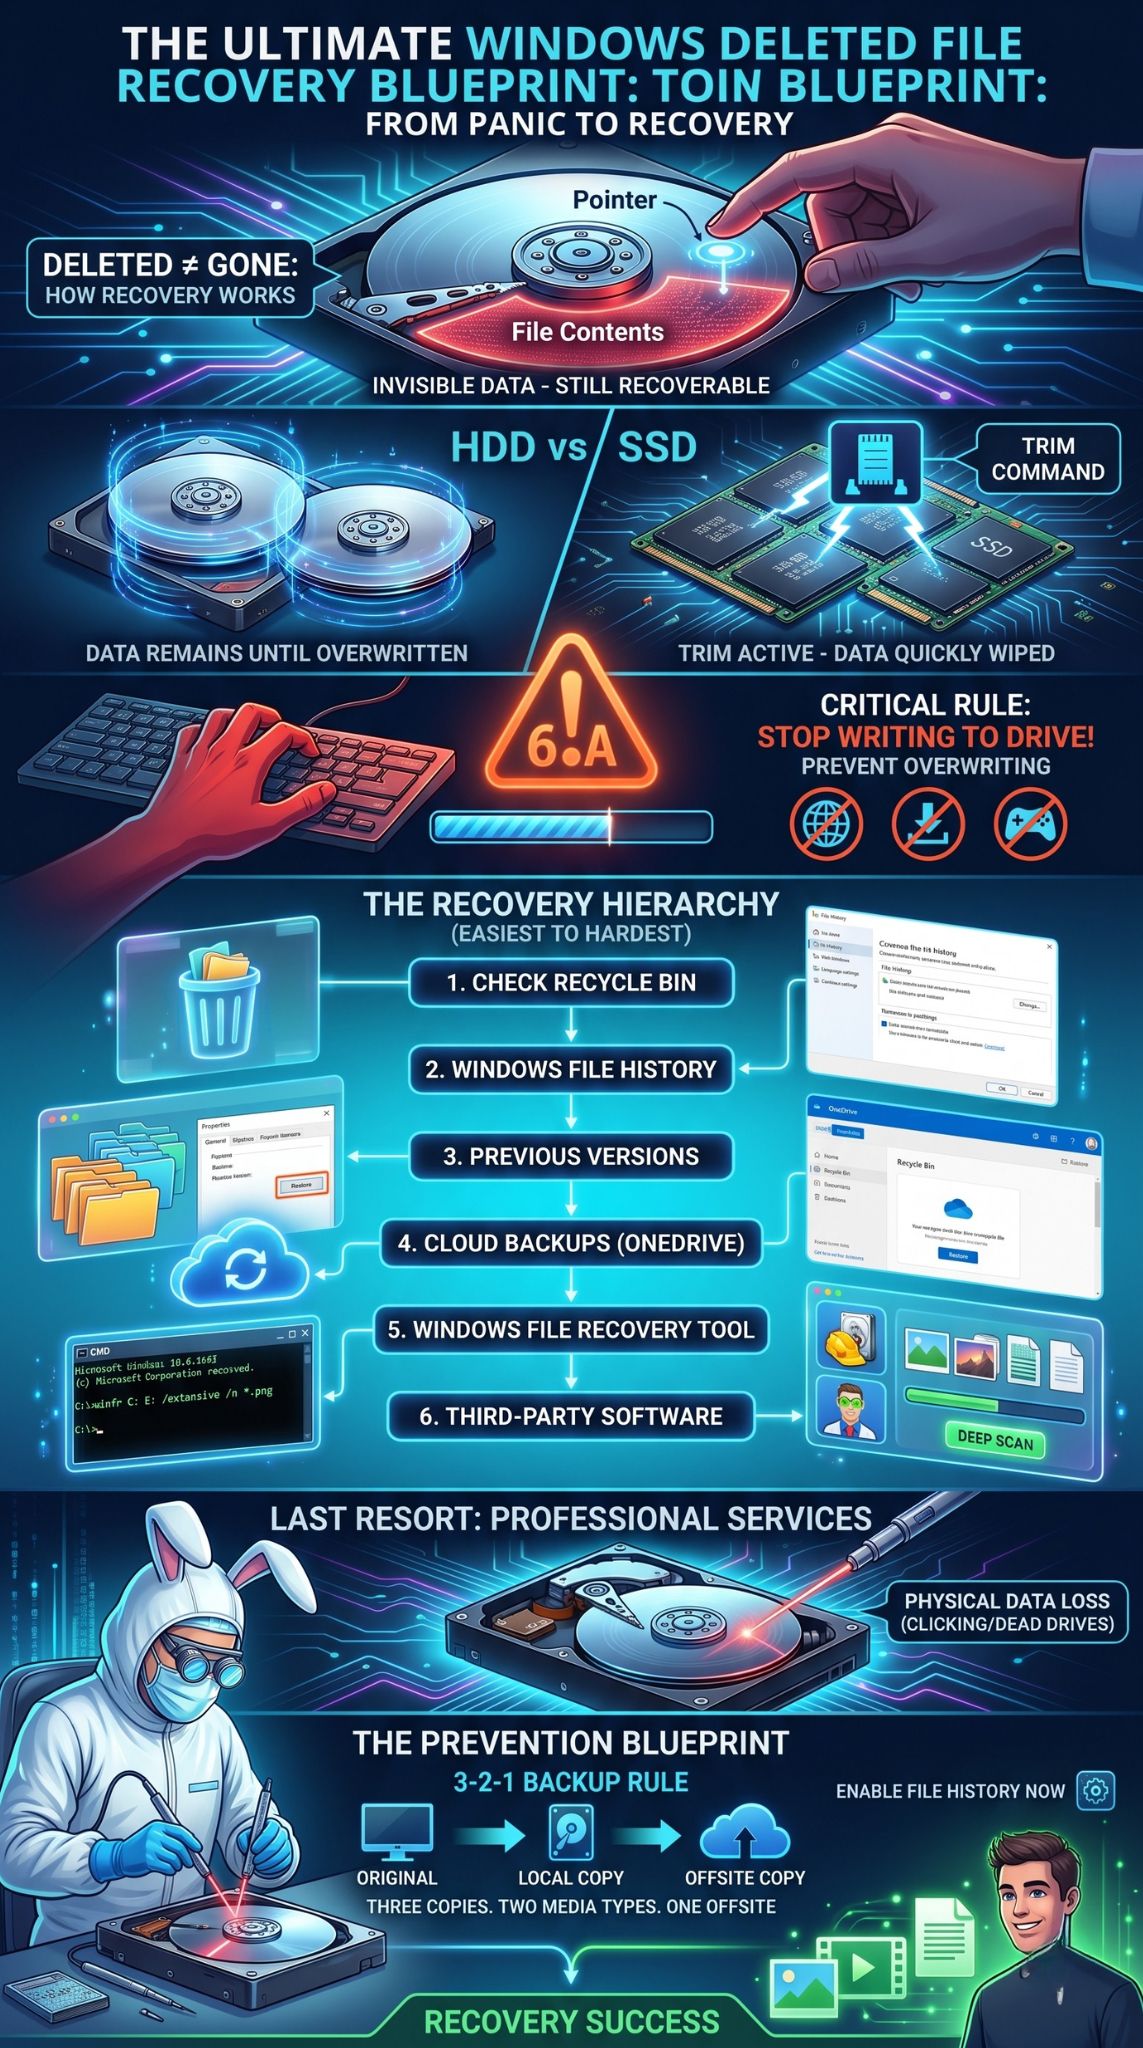
When you delete a file and bypass or empty the Recycle Bin, Windows does not instantly scrub the data from your drive. Instead, it alters an index marker. The operating system changes the file’s status to tell itself that this specific storage space is now free to be written over by new data.
Until new data actually claims that space, your old file remains fully intact but invisible to File Explorer. Think of it like removing a book title from a library catalog while leaving the physical book sitting on the shelf. This structural delay is the entire foundation of how data recovery works.
|
System Status |
File Condition |
Recoverability |
|
Just Deleted |
Intact but hidden |
Extremely High |
|
Light Drive Usage |
Partially cached |
Moderate to Low |
|
Heavy Overwriting |
Replaced by new data |
Virtually Impossible |
Understanding Storage Types: HDD versus SSD Recovery
The physical hardware inside your computer determines how easy or difficult it will be to salvage your lost items. Hard drives and solid-state drives handle data destruction differently.
How Hard Disk Drives Manage Deleted Files
Traditional mechanical hard drives (HDDs) use spinning magnetic platters to save your information. When a file is erased on an HDD, the physical magnetic charges stay exactly where they are. Windows simply marks the clusters as unallocated. Because physically wiping magnetic data takes extra time and energy, the drive ignores it until it has a specific reason to write something new over those exact coordinates. This makes HDDs an ideal environment for standard file rescue tools.
The SSD Challenge: Understanding the TRIM Command
Solid-state drives (SSDs) use flash memory chips and rely on a performance feature called TRIM. When you delete a file on a modern SSD, Windows immediately alerts the drive controller via the TRIM command. The drive then actively schedules those specific blocks to be cleared out during its next idle garbage collection cycle. Once TRIM wipes those cells to keep write speeds fast, standard recovery software cannot rebuild the original data signatures.
|
Drive Type |
Storage Technology |
TRIM Status |
Recovery Difficulty |
|
HDD |
Magnetic Platters |
Disabled |
Low / Easy |
|
SSD |
Flash Memory |
Enabled by default |
High / Time-sensitive |
The Role of File Systems in Data Recovery
File systems act like digital filing cabinets. How they map your storage affects how recovery software scans for lost folders.
NTFS and the Master File Table
The New Technology File System (NTFS) is the default configuration for almost all modern Windows installation drives. It relies on an internal database called the Master File Table (MFT). When a file drops out of sight, the MFT retains the file attributes, size logs, and sector addresses for a brief period. Recovery software reads these residual MFT entries to reconstruct your files perfectly, often preserving their original names and directory paths.
FAT32 and exFAT Recovery Characteristics
Older file systems like FAT32 and exFAT are typically found on SD cards, digital cameras, and older USB thumb drives. When a file leaves a FAT system, the drive completely wipes the cluster chain map that links the file pieces together. Because this map is gone, recovery tools must read raw file signatures directly off the drive. This process usually strips away the original file names, giving you a long list of generically numbered files to sort through manually.
|
File System |
Primary Use Case |
Metadata Retention |
Recovery Result |
|
NTFS |
Internal Windows Drives |
High (MFT records) |
Retains original names/paths |
|
FAT32 / exFAT |
USBs and SD Cards |
Low (Destroys chains) |
Generates generic file names |
Crucial First Step: Stop Using Your Drive Immediately
The moment you realize something important is missing, stop using the computer or drive right away. Do not surf the web, do not stream music, and absolutely do not download any software directly onto that drive.
Every single click, temporary internet file cache, or system update writes new bits of data to your storage. If Windows decides to place those new bits on top of the space your deleted file is occupying, that file is gone forever. If you must download a tool, do it on a separate laptop or a secondary USB drive to keep your system partition pristine.
|
Do This Immediately |
Avoid This At All Costs |
|
Close all active applications |
Don’t restart the PC unless necessary |
|
Unplug external drives if they hold the data |
Don’t download apps to the same drive |
|
Run recovery tools from a portable USB |
Don’t save new files or take screenshots |
Common Reasons Behind Permanent Data Loss
Data does not just vanish without a cause. Pinpointing how your files went missing helps you choose the fastest path to get them back.
- Shift + Delete shortcut: Bypasses the Recycle Bin safety net completely.
- Accidental bin emptying: Clearing out the Recycle Bin out of habit before checking the contents.
- Drive formatting: Wiping a partition table or changing file systems by mistake.
- Malware infections: Viruses or ransomware that delete, hide, or alter user directories.
- Hardware failure: Bad sectors forming on older drives, making specific file paths unreadable.
|
Loss Scenario |
Structural Impact |
Suggested First Approach |
|
Shift + Delete |
Pointer removed, data intact |
Check Backups / File Recovery Tool |
|
Formatted Drive |
Entire file table reset |
Third-Party Deep Scan |
|
Malware Attack |
Files hidden, encrypted, or moved |
System Restore / Anti-malware backup |
Method 1: Restore Files Using Windows File History
If you turned on Windows File History before your data went missing, you are in luck. This built-in system creates automated, incremental backups of your main user folders to a designated backup drive.
Read Also: Windows 11 Slow After Update: 10 Speed-Up Tips
Prerequisites for File History
To make use of this feature, you must have already enabled it in your Windows settings and connected an external hard drive or network location to store the backup snapshots.
Steps to Use File History
- Connect your external backup hard drive to your computer.
- Open the Start menu, type Control Panel, and press Enter.
- Click on System and Security, then choose File History.
- In the left-hand column, select Restore personal files.
- Use the green navigation arrows at the bottom to scroll through different dates and times.
- Locate your missing file, highlight it, and click the green Restore circle to return it to its original folder.
|
File History Component |
Requirement |
Benefit |
|
External Storage Drive |
Must be plugged in during backup |
Keeps backup safe from local drive failure |
|
Save Frequency |
Default is every hour |
Allows you to roll back to exact versions |
Method 2: Recover Using the Backup and Restore Feature
Windows still includes the older backup framework originally built for Windows 7. If you set up regular system images using this tool, your lost data is easily retrievable.
Steps for Backup and Restore
- Open the Control Panel via your Start menu search.
- Go to System and Security and select Backup and Restore (Windows 7).
- Under the Restore section, click the Restore my files button.
- Use the Browse for files or Browse for folders options to look inside your older backup archives.
- Select the files you want to retrieve and click Next.
- Choose whether to save the restored files back to their original location or a safe new folder.
|
Restore Step |
Action Required |
Safety Recommendation |
|
Select Archive |
Choose backup point prior to deletion |
Verify the backup timestamp matches |
|
Destination Selection |
Pick a custom recovery folder |
Save to a secondary drive to prevent overwriting |
Method 3: Restore Previous Versions of a File or Folder
Windows saves hidden system snapshots using a service called Volume Shadow Copies. This tool allows you to roll a specific folder back in time to an earlier state.
Steps to Restore Previous Versions
- Open File Explorer and go to the parent folder that used to hold your deleted file.
- Right-click the folder and select Properties from the bottom of the list.
- Click on the Previous Versions tab at the top of the properties panel.
- Look through the list of automatically generated folder versions organized by date.
- Click Open to look inside an older version to confirm your missing file is there.
- Drag your file out of the historical window and drop it safely onto your desktop.
|
Tab Option |
Primary Function |
Warning |
|
Open |
View and copy individual items |
Safest option; leaves current folder alone |
|
Restore |
Overwrites the entire current folder |
Reverts everything, removing any recent changes |
Method 4: Use the Official Windows File Recovery Tool
If you do not have any pre-made backups, you can try Microsoft’s official command-line tool. It is free and available in the Microsoft Store, providing a solid native option to recover deleted files windows.
Understanding the Recovery Modes
The Windows File Recovery app offers two main operations: Regular mode and Extensive mode. Regular mode uses the NTFS file table to track down recently deleted items quickly. Extensive mode ignores file tables entirely and performs a raw search across the drive surface, making it the best choice for formatted or older storage drives.
Detailed Syntax and Command Switches
The app uses a specific command formula: winfr source-drive: destination-drive: [/mode] [/switches]. You must always use a separate target drive to save your data so you do not overwrite the files you are scanning for. The switch /n helps you filter for specific names or extensions.
Step-by-Step Guide to Windows File Recovery
- Open the Microsoft Store, search for Windows File Recovery, and install it.
- Launch the tool from your Start menu; an administrator Command Prompt will open.
- To search your C: drive for a missing Word document and save it to an external E: drive in Regular mode, type:
- winfr C: E: /regular /n \Users\YourName\Documents\Project.docx
- To scan for all lost PNG images using Extensive mode, type:
- winfr C: E: /extensive /n \Users\YourName\Pictures\*.png
- Press Y when prompted to start the scan.
Troubleshooting Common Command Errors
If you see an error stating “Source and destination cannot be the same,” make sure your target drive letter is different from the drive you are actively scanning. If Regular mode returns zero results, close the app, open it again, and run your command using the /extensive switch instead.
|
Command Switch |
What It Does |
Best Used For |
|
/regular |
Scans the NTFS file index |
Very recently deleted items |
|
/extensive |
Scans all physical sectors |
Formatted or corrupted storage drives |
|
/n |
Filters by name, path, or extension |
Narrowing down specific folders or file types |
Method 5: Recover Files from Cloud Backups
Cloud storage services like OneDrive keep their own separate trash bins. If your primary local folders are synced online, your files might be waiting for you in the cloud.
Steps to Retrieve Files from OneDrive
- Open your web browser and go to the official OneDrive login page.
- Log in with the same Microsoft credentials you use for your Windows PC.
- Select Recycle bin from the left-side navigation panel.
- Scan the list for your accidentally deleted files or folders.
- Check the circle next to your items and click Restore at the top of the page to re-sync them to your computer.
|
Cloud Service |
Standard Retention Window |
Sync Behavior |
|
OneDrive (Personal) |
30 Days |
Restores automatically to your local folder |
|
OneDrive (Work/School) |
93 Days |
May require admin help if emptied from bin |
Method 6: Utilize Third-Party Data Recovery Software
When native Windows options fall short, third-party data recovery utilities offer advanced graphical interfaces and more powerful scanning engines.
Recuva: Best for Basic Recovery
Recuva is a classic, lightweight tool perfect for beginners. The free version does a great job finding recently deleted files on traditional hard drives without hiding your data behind a paywall.
Disk Drill: Best for Deep Scanning
Disk Drill features a modern, clean interface and highly advanced reconstruction algorithms. It excels at finding fragmented data on both HDDs and SSDs, allowing you to preview files for free before committing to a recovery.
EaseUS Data Recovery Wizard: Best for Formatted Drives
EaseUS is a heavy-duty recovery tool designed for complex data loss, like accidentally formatted partition drives or raw disks. It safely reconstructs complex folder hierarchies.
PhotoRec: Best for Open Source Enthusiasts
PhotoRec is entirely free and open-source. It handles heavily damaged file systems incredibly well, though its older text-only command interface can be difficult for some users to navigate.
General Steps for Using Recovery Software
- Download your chosen recovery app onto a separate computer or external flash drive.
- Run the program and select the specific drive partition you need to check.
- Start the scan (choose Deep Scan if a quick scan fails to find your files).
- Browse the results and use the built-in preview tool to check file integrity.
- Select your items and save them to a completely separate external drive.
|
Software Choice |
UI Type |
Best Feature |
Price Model |
|
Recuva |
Wizard/List |
Very easy for beginners |
Fully Free tier |
|
Disk Drill |
Modern UI |
Excellent preview feature |
Free preview / Paid recovery |
|
EaseUS |
Standard |
Rebuilds formatted trees |
Free trial / Premium pricing |
|
PhotoRec |
Text-only |
Deep sector carve |
100% Free / Open Source |
Method 7: Seek Professional Data Recovery Services
Software cannot save data from physical hardware failure. If your drive is broken or unresponsive, you will need a professional recovery lab.
When to Contact the Professionals
If your hard drive is making clicking, grinding, or buzzing noises, shut your computer down immediately. These sounds indicate mechanical failures that will permanently scrape away the data layer if the drive keeps spinning. You should also look into professional services if your drive was submerged in liquid or went through a fire.
What to Expect from a Cleanroom Service
Professional data recovery labs open damaged drives inside specialized, dust-free cleanrooms. Technicians manually replace broken read/write heads or swap out damaged circuit boards to clone your drive data safely. While cleanroom work is highly successful, it is expensive and typically reserved for irreplaceable personal records or critical business data.
|
Damage Type |
System Indicator |
Proper Action |
|
Logical Damage |
“Drive needs formatting” / Missing folders |
Run data recovery software |
|
Physical Damage |
Clicking sounds / Drive not detected in BIOS |
Unplug and ship to a cleanroom lab |
How to Prevent Permanent Data Loss in the Future
The easiest way to survive a data loss nightmare is to set up a dependable backup routine before anything goes wrong.
- Follow the 3-2-1 backup rule: Keep 3 copies of your data across 2 different media types (like an internal drive and an external portable drive), with 1 copy stored securely offsite in the cloud.
- Enable Windows File History: Plug in an external drive and turn on File History so Windows archives your data automatically every hour.
- Double-check your shortcuts: Avoid using Shift + Delete out of habit, and glance through your Recycle Bin before emptying it.
|
Backup Strategy |
Implementation Time |
Protection Level |
|
Cloud Sync (OneDrive/Google Drive) |
5 Minutes |
Immune to local hardware failure |
|
Local External Hard Drive |
10 Minutes |
Instant access to large files without internet |
|
Automated Windows Backups |
5 Minutes |
Protects against accidental user deletions |
Final Thoughts
Accidentally deleting important data can feel like a disaster, but it does not have to be the end of the world. Remember that your primary goal is to stop using the affected drive immediately to keep your files from being written over. Whether you rely on built-in options like File History, try the command line, or use advanced third-party utilities, you have a variety of ways to safely recover deleted files windows. Take a deep breath, follow the steps carefully, and make sure to set up an automatic backup routine today so you never have to deal with this stress again.
Frequently Asked Questions
Can I recover files from a drive that has been written over?
No. Once new data claims the storage sector where your old file was sitting, the original data structure is altered permanently. Recovery software cannot piece together files that have been overwritten.
Is there a way to recover files if the drive is showing as RAW?
Yes. A RAW status means the Windows file system format has become corrupted, but the underlying data is usually still intact. Third-Party tools like EaseUS or Disk Drill can bypass the corruption to read and export your files safely.
Why do some recovered files refuse to open or look broken?
This happens when a file is partially overwritten before it was rescued. The recovery software can find the file name and structural fragments, but missing pieces of code make the file unreadable for apps like Word or image viewers.
Does Windows 11 have a built-in Recycle Bin auto-empty feature?
Yes, a feature called Storage Sense can be configured to empty your Recycle Bin automatically every 1, 14, 30, or 60 days. Check your system storage settings to ensure it isn’t clearing out files before you have a chance to look through them.