Social media often feels like a crowded room where everyone is shouting at once. Sometimes, you just want to step into a quieter space and talk exclusively with people you actually know and trust. With constant updates, algorithm changes, and the sheer volume of users on X, keeping track of who can see your thoughts and photos can feel overwhelming. Millions of people prefer keeping their digital lives restricted to a close circle of friends, family, or trusted colleagues instead of leaving their profiles wide open for the whole world to see.
If you are looking for a way to lock down your personal information, you are not alone. You might be applying for a new job, trying to avoid online drama, or simply wanting a safe space to share memes and casual thoughts without strangers weighing in. Figuring out how to make twitter account private is one of the smartest steps you can take to regain control over your digital footprint.
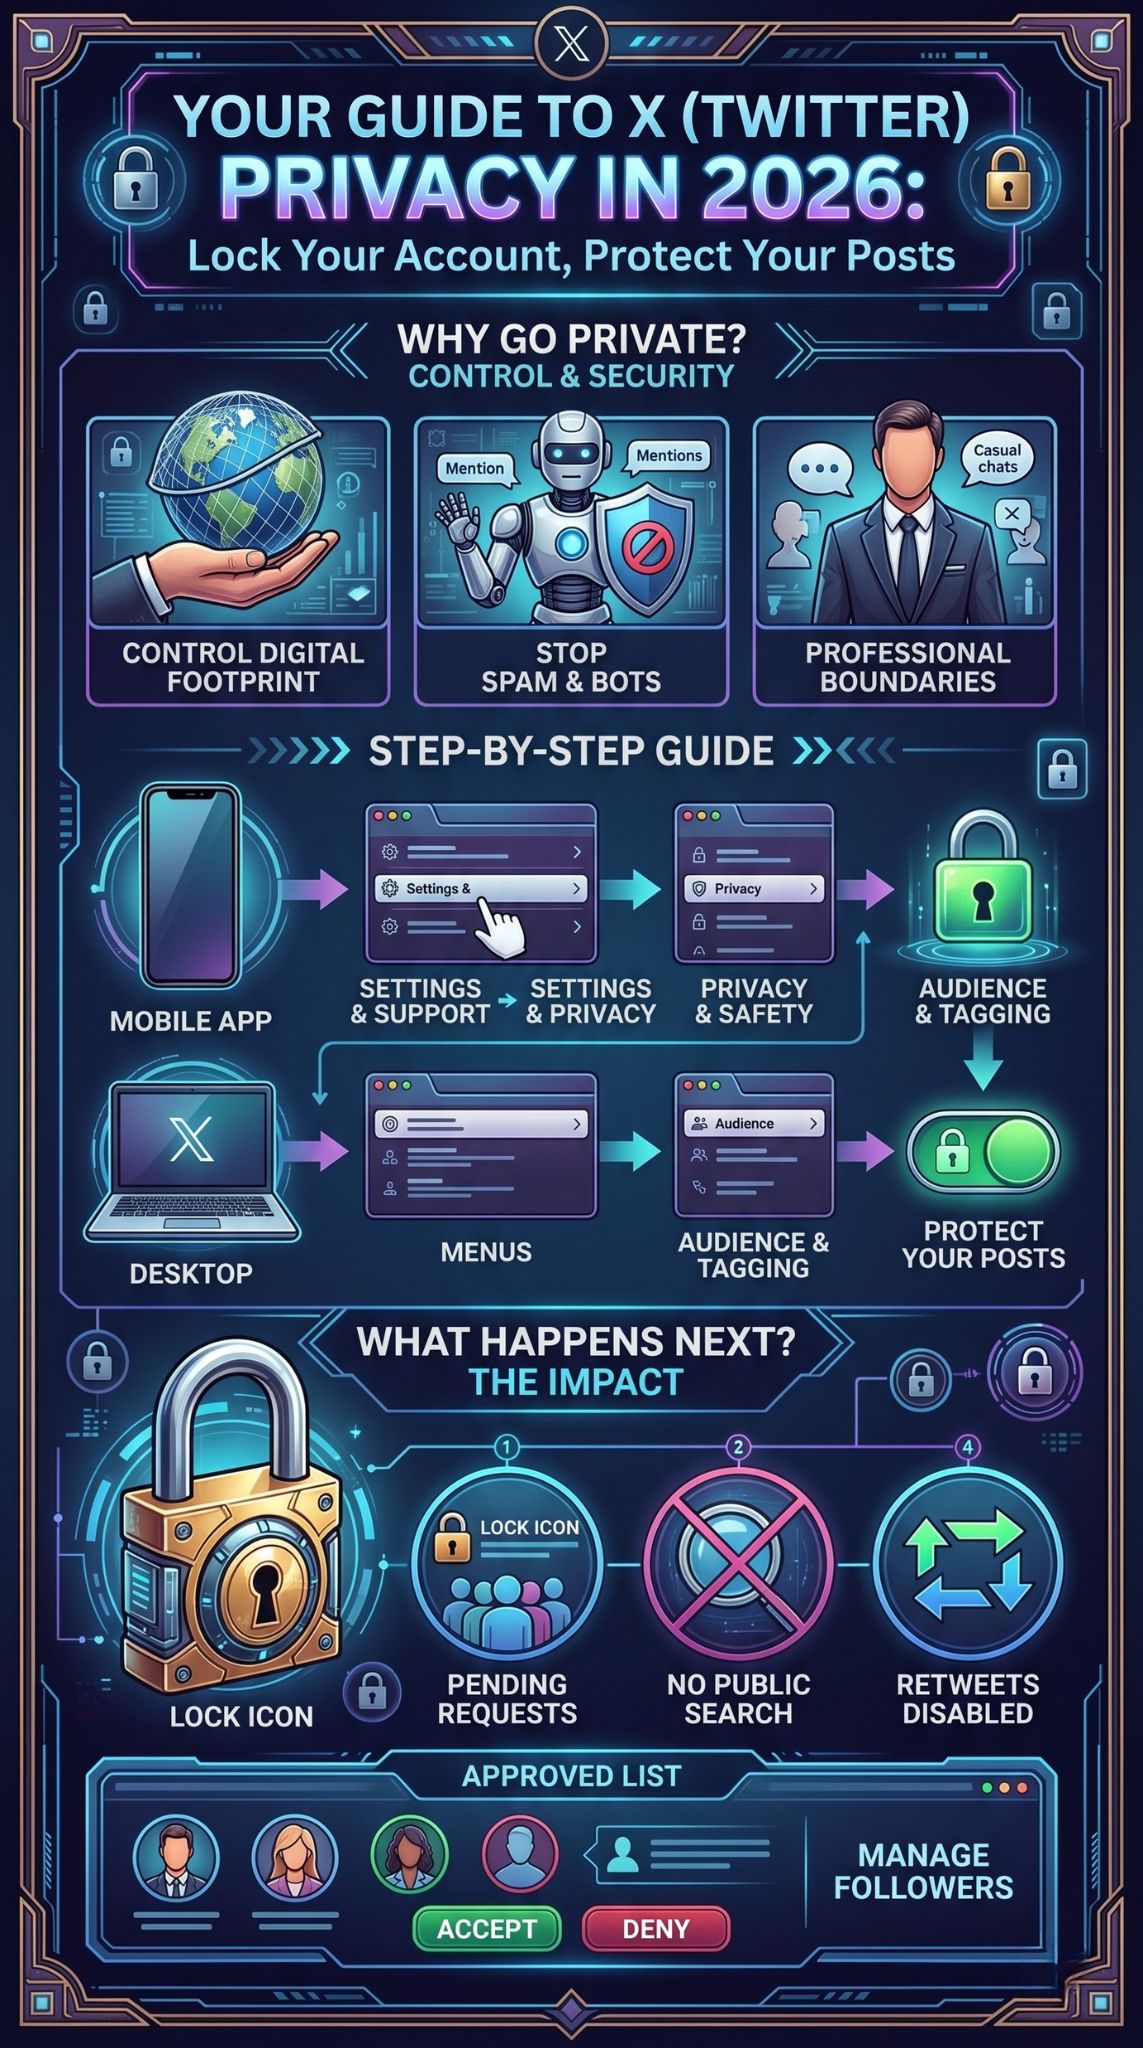
Navigating the settings menu on the X app or the desktop website looks a little different today than it did a few years ago. However, the core functionality of locking down your profile remains highly effective and surprisingly simple to do. In this comprehensive guide, we will walk you through the exact steps required to protect your posts, manage your audience, and secure your online identity. Whether you use an iPhone, an Android device, or a desktop computer, you will learn everything you need to know about setting up a secure profile quickly and easily.
Why You Should Consider a Private Twitter Account in 2026
There are plenty of valid reasons to lock your profile and restrict your audience. The internet is basically a massive public square, but not everyone wants to stand on a soapbox for the entire world to hear. By default, any profile you create on the platform is completely public. This means anyone on the internet can read your posts, view your media, and see exactly who you interact with daily. Changing this default setting gives you a strong layer of security that benefits you in several specific ways.
|
Reason |
Description |
Main Benefit |
|
Digital Footprint |
Keeps your posts off public search engines like Google and Bing. |
Prevents strangers from searching for your past posts. |
|
Spam Reduction |
Stops non-followers from replying to your posts or mentioning you. |
Cleans up your notifications and blocks automated bot spam. |
|
Professionalism |
Separates your casual social media use from your work life. |
Ensures employers and coworkers cannot snoop on your casual posts. |
|
Mental Peace |
Gives you total control over who sees your daily updates. |
Reduces anxiety about unwanted opinions and online harassment. |
Controlling Your Digital Footprint
Every time you post something online, you leave a trace. For public accounts, these traces get indexed by search engines, archived by third-party websites, and viewed by people who do not even have an account on the platform. When you make the switch to a protected profile, you immediately take control over that digital footprint. Only the people you explicitly approve can view your timeline. This is incredibly helpful if you want to share personal milestones, family photos, or casual thoughts without worrying about them surfacing in a public Google search five years down the line.
Avoiding Spam and Unwanted Interactions
The internet is packed with automated bots, spam profiles, and people who just want to start unnecessary arguments. Public accounts constantly get targeted by these entities because their replies and mentions are open to anyone with a keyboard. Protecting your posts drastically cuts down the amount of spam you have to deal with. Since non-followers cannot interact with your posts or quote them, you are safely shielded from the vast majority of negative interactions and unsolicited cryptocurrency promotions that clog up open comment sections today.
Separating Professional and Personal Lives
Plenty of professionals use social media to unwind, share jokes, and connect with their real-life friends. However, employers and recruiters frequently screen the social profiles of current and potential employees. A joke taken out of context or a strong opinion on a random topic can sometimes cause serious professional friction. By protecting your profile, you ensure your personal life stays entirely separate from your professional endeavors. You have the ultimate say over whether a coworker or a boss is allowed into your private digital space.
How to Make Twitter Account Private on the Mobile App (iOS and Android)
The vast majority of people access the platform through their smartphones. The application interface is designed to be intuitive, but the privacy toggles are tucked away under a few layers of menus to keep the main screen uncluttered. If you are using an iPhone or an Android device, the steps are identical. You just need to know exactly which menus to tap.
|
Step |
Action Required |
Expected Result |
|
1 |
Open the X app and tap your profile picture. |
Opens the main sidebar navigation menu. |
|
2 |
Tap Settings and Support, then Settings and privacy. |
Takes you to the core configuration hub. |
|
3 |
Tap Privacy and safety, then Audience and tagging. |
Opens the specific menu for profile visibility. |
|
4 |
Toggle the switch for Protect your posts. |
Your profile instantly becomes restricted. |
Step-by-Step Guide for Mobile
First, grab your phone, unlock it, and open the X application. Make sure you are logged into the exact account you want to lock down. If you have multiple accounts, double-check your profile picture to ensure you are on the right one.
Next, look at the top-left corner of your screen. You will see your profile picture sitting there. Tap on it to reveal the main sidebar menu. This sidebar holds all your navigation options, bookmarks, and lists.
Scroll down toward the bottom of this sidebar until you spot the option labeled Settings and Support. Tap it to expand a small dropdown menu, and then tap on Settings and privacy.
You are now looking at the main configuration hub for your entire account. Look for the section titled Privacy and safety. Tap on it. This area controls everything from your data sharing preferences to your direct message permissions.
Near the very top of the Privacy and safety screen, you will find an option called Audience and tagging. Tap this to move forward.
Finally, you will see a toggle switch labeled Protect your posts. By default, this switch is resting in the off position. Tap the slider to turn it on. Once the switch turns green or shows that it is active, you are done. If you ever need to learn how to make twitter account private again for a secondary profile, you will follow these exact same steps. You can also turn on the Protect your videos option on this same screen to stop people from downloading your media.
Read Also: How to Download Twitter Videos Without Watermark
How to Make Twitter Account Private on Desktop
If you prefer browsing the web on a laptop or desktop computer, locking down your profile is just as easy. The menu layout differs slightly from the mobile application because you have a lot more screen space, but the logic is exactly the same.
|
Step |
Action Required |
Expected Result |
|
1 |
Log into the website on your computer. |
Loads your main home timeline. |
|
2 |
Click More in the left-hand navigation menu. |
Opens the expanded options list. |
|
3 |
Go to Settings and privacy, then Privacy and safety. |
Takes you to your security settings. |
|
4 |
Click Audience, media and tagging, then check the box. |
Activates the privacy lock on your profile. |
Step-by-Step Guide for Desktop
Open up your favorite web browser, whether that is Chrome, Safari, or Edge, and head over to the platform’s official website. Log in using your username and password.
Once your main feed loads, look over at the navigation panel on the left side of your screen. Underneath your profile, notifications, and messages, you will see an icon labeled More. It usually looks like a circle with three horizontal dots inside it. Click that icon.
A secondary menu will pop up on your screen. From this new menu, click on Settings and privacy.
The screen will shift to show several columns. In the middle column, click on the Privacy and safety tab.
Now, look over at the right-hand column. At the top of that list, click on Audience, media and tagging.
You will see a small checkbox sitting right next to the phrase Protect your posts. Click this box to check it. A confirmation prompt might pop up on your screen asking if you are absolutely sure you want to change your visibility. Go ahead and confirm your choice. Just like on the mobile app, you can also check the box to protect your videos. Your profile will immediately update with a small padlock icon appearing next to your name. This padlock signals to everyone that your content is hidden from the general public.
What Happens After You Protect Your Posts?
Flipping that privacy switch fundamentally changes how your profile interacts with the rest of the network. It is extremely important to understand these changes so you are not caught off guard by the new rules governing your restricted profile. Things work very differently once that padlock icon appears next to your name.
|
Feature |
Public Account |
Private Account |
|
Following |
Anyone can follow you instantly. |
People must send a request for you to approve. |
|
Search Visibility |
Posts appear on Google and site searches. |
Posts are hidden from all public searches. |
|
Retweets |
Anyone can retweet your content. |
Retweeting your posts is completely disabled. |
|
Replies |
Anyone can see your replies to public posts. |
Only your approved followers can see your replies. |
Changes to Follower Mechanics
When you operate a public profile, anyone passing by can click the follow button and instantly start seeing your thoughts in their daily feed. Once you protect your posts, that follow button stops acting as an instant connection. Instead, it acts as a request system. Whenever a person attempts to follow you, they get placed into a pending request queue. You have to manually review every single request and decide whether to let them in or turn them away.
Visibility on Search Engines
Public profiles and their individual posts are constantly scanned and indexed by search engines like Google. This means anyone typing your name into a search bar can potentially read your thoughts without ever visiting the social platform itself. Once you lock your profile, your posts are scrubbed from these external search engine results moving forward. Even better, your posts will no longer show up in the platform’s internal search bar unless the person doing the searching is already on your approved follower list.
Limitations on Retweets and Quote Posts
The platform was built on the idea of rapidly sharing information through retweets and quote posts. However, a private profile intentionally breaks this flow to keep your data secure. Even your approved friends will not be able to use the retweet button on your posts. The retweet icon will literally be greyed out. This strict rule exists to guarantee that your thoughts cannot be accidentally shared with an audience you did not personally approve. If you want a specific way to make twitter account private without losing the ability to go viral, you are out of luck. Privacy means trading away massive reach in exchange for security.
How to Manage and Approve New Follower Requests
Now that your profile is locked down tight, you are the official gatekeeper of your own content. Managing your pending requests becomes a routine part of maintaining your secure profile. If you ignore your requests, people will just sit in limbo forever.
|
Device |
How to Find Requests |
Action |
|
Mobile App |
Sidebar Menu -> Follower requests |
Tap the checkmark to approve, X to deny. |
|
Desktop Web |
Left Menu -> More -> Follower requests |
Click the checkmark to approve, X to deny. |
If you are using your phone, tap your profile picture in the top-left corner to slide open the main menu. Look for a dedicated item labeled Follower requests. Tapping this takes you to a simple list showing everyone who wants to see your posts. You can tap on their names to inspect their profiles and see if they look legitimate. If you know them, hit the checkmark to approve. If they look like a bot or a stranger, hit the cross to deny them.
If you are sitting at your computer, click the More option on the left-hand navigation bar, and then select Follower requests from that popup menu. You will see the exact same list of pending approvals. One important thing to remember: denying a request is a completely silent action. The other person does not get a notification saying you rejected them. They will simply see that their request is no longer pending if they visit your profile again.
Advanced Privacy Settings to Combine With a Private Account
Locking your posts is a fantastic first step, but it is not the only privacy tool at your disposal. If you really want to fly under the radar, you should combine your protected profile with a few other hidden settings.
|
Setting |
Location |
What It Does |
|
Discoverability |
Privacy and safety -> Discoverability |
Stops people from finding you using your phone number or email. |
|
Activity Status |
Privacy and safety -> Direct Messages |
Hides the green dot that shows when you are online. |
|
Photo Tagging |
Audience and tagging -> Photo tagging |
Prevents strangers from tagging you in their photos. |
|
Message Requests |
Privacy and safety -> Direct Messages |
Stops random people from sending you direct messages. |
Disabling Discoverability
Even with a locked profile, the platform constantly tries to connect you with people in your phone’s contact list. If you used your real phone number or email address to sign up, people who have that information saved in their phones can find your profile through the app’s suggestion algorithm. To stop this, head into Privacy and safety, find the Discoverability and contacts section, and uncheck the boxes that allow people to find you by your email address or phone number.
Hiding Your Activity Status
Sometimes you just want to scroll through your feed without anyone knowing you are online. By default, the platform might show a status indicator to people you message. You can turn this off by going into the Direct Messages settings under the Privacy and safety tab. Disabling your online status means you can read things in peace without feeling pressured to reply to messages immediately.
Final Thoughts
Taking charge of your online presence is one of the smartest things you can do in today’s highly connected and constantly recording world. Learning how to make twitter account private takes only a minute or two of tapping through menus, but it provides lasting peace of mind. By locking your profile and carefully vetting your followers, you curate a much safer, quieter environment where you can express yourself without the anxiety of the public gaze.
Whether you are trying to avoid digital clutter, protect your professional reputation from past jokes, or simply keep your family life completely hidden from search engines, utilizing these audience settings is the absolute best way to achieve your goals. Always remember to regularly check your follower requests and review your existing followers from time to time to maintain the integrity of your freshly secured profile.
Frequently Asked Questions (FAQs)
When you change major settings on your social media, you naturally have a lot of questions about how things work behind the scenes. Here are some of the most common and uncommon questions users ask based on recent search trends.
|
Question |
Short Answer |
|
Do old posts become hidden? |
Yes, everything you ever posted becomes hidden immediately. |
|
Can people retweet me? |
No, the retweet button is disabled for all your posts. |
|
Can my followers screenshot? |
Yes, there is nothing stopping someone from taking a screenshot. |
|
Will current followers stay? |
Yes, you do not need to re-approve people who already follow you. |
Can someone retweet my protected tweets?
Absolutely not. The platform completely disables the retweet and quote functions for protected profiles. Your followers can read your posts, like them, and reply to them, but they cannot use the built-in sharing tools to broadcast your thoughts to their own followers. Keep in mind, however, that anyone can still take a physical screenshot of your post using their phone or computer.
Will my old posts become private after I switch?
Yes, the privacy setting applies to your entire account history. The moment you flip the switch, all of your past posts, photos, and replies become invisible to the general public. You do not need to go back and manually delete old thoughts to hide them.
If I reply to a public account, can everyone see it?
This is a very common point of confusion. If you reply to a massive public account, your reply does not show up in their public comment section. Only people who follow you will be able to see that you replied. The person who runs the public account will not even see your reply unless they happen to be on your approved follower list.
Do I need a VPN to keep my account private?
Using a Virtual Private Network hides your physical location and encrypts your internet connection, but it has nothing to do with your social media profile visibility. If you want to stop strangers from reading your posts, you just need to adjust your app settings. A VPN is great for general internet security, but it does not change who can read your timeline.
Can people still mention me or tag me?
Anyone on the platform can type your username to mention you, but if a non-follower mentions you, you might not see the notification depending on your filter settings. To stop people from tagging you in photos, you need to turn off photo tagging in your audience settings.