Need to send a signed form? Save a receipt? Upload an ID copy? Turn a paper note into a clean PDF?
You don’t need a scanner. You don’t even need to download an app. You can scan documents on iPhone using tools that are already built into iOS.
The easiest options are Notes and Files. Notes works best when you want to keep a scan with comments or reminders. Files is better when you need a clean document you can rename, upload, email, or store in a folder. If your iPhone runs iOS 26, Preview also gives you a stronger PDF workflow.
That means no ads. No trial limits. No scanner app asking for a monthly fee after two scans.
For most daily paperwork, your iPhone is more than enough. You can scan receipts, forms, handwritten notes, school papers, bills, contracts, IDs, and printed pages in just a few taps.
Why You Don’t Need a Scanner App on iPhone
|
Built-In Option |
Best For |
Main Benefit |
|
Notes |
Quick scans saved with notes |
Easy for personal records |
|
Files |
Scans saved in folders |
Best for upload and sharing |
|
Preview |
PDF scanning and editing on iOS 26 |
Better PDF workflow |
|
Markup |
Signing and annotating |
Good for forms |
|
Live Text |
Copying text from paper |
Useful when you need editable words |
|
Continuity Camera |
Scanning from iPhone to Mac |
Fast for Mac users |
A regular photo isn’t the same as a scan.
A photo may show shadows, a crooked angle, table edges, or background clutter. A scan looks cleaner. Your iPhone finds the paper, crops the page, straightens it, and saves it in a document-friendly format.
Apple’s support guide confirms that iPhone users can scan documents through Notes and Files. You can use automatic or manual capture, adjust the corners, apply filters, add more pages, and save the scan. You can also sign scanned documents in Notes using Markup.
Use the built-in scanner for:
- Receipts
- Signed office forms
- School assignments
- Handwritten notes
- Tax records
- Medical bills
- ID copies
- Printed contracts
- Travel documents
- Warranty papers
Paid scanner apps still have a place. Some offer stronger OCR, bulk scanning, cloud workflows, or business tools. But for normal day-to-day scanning, your iPhone already does the job.
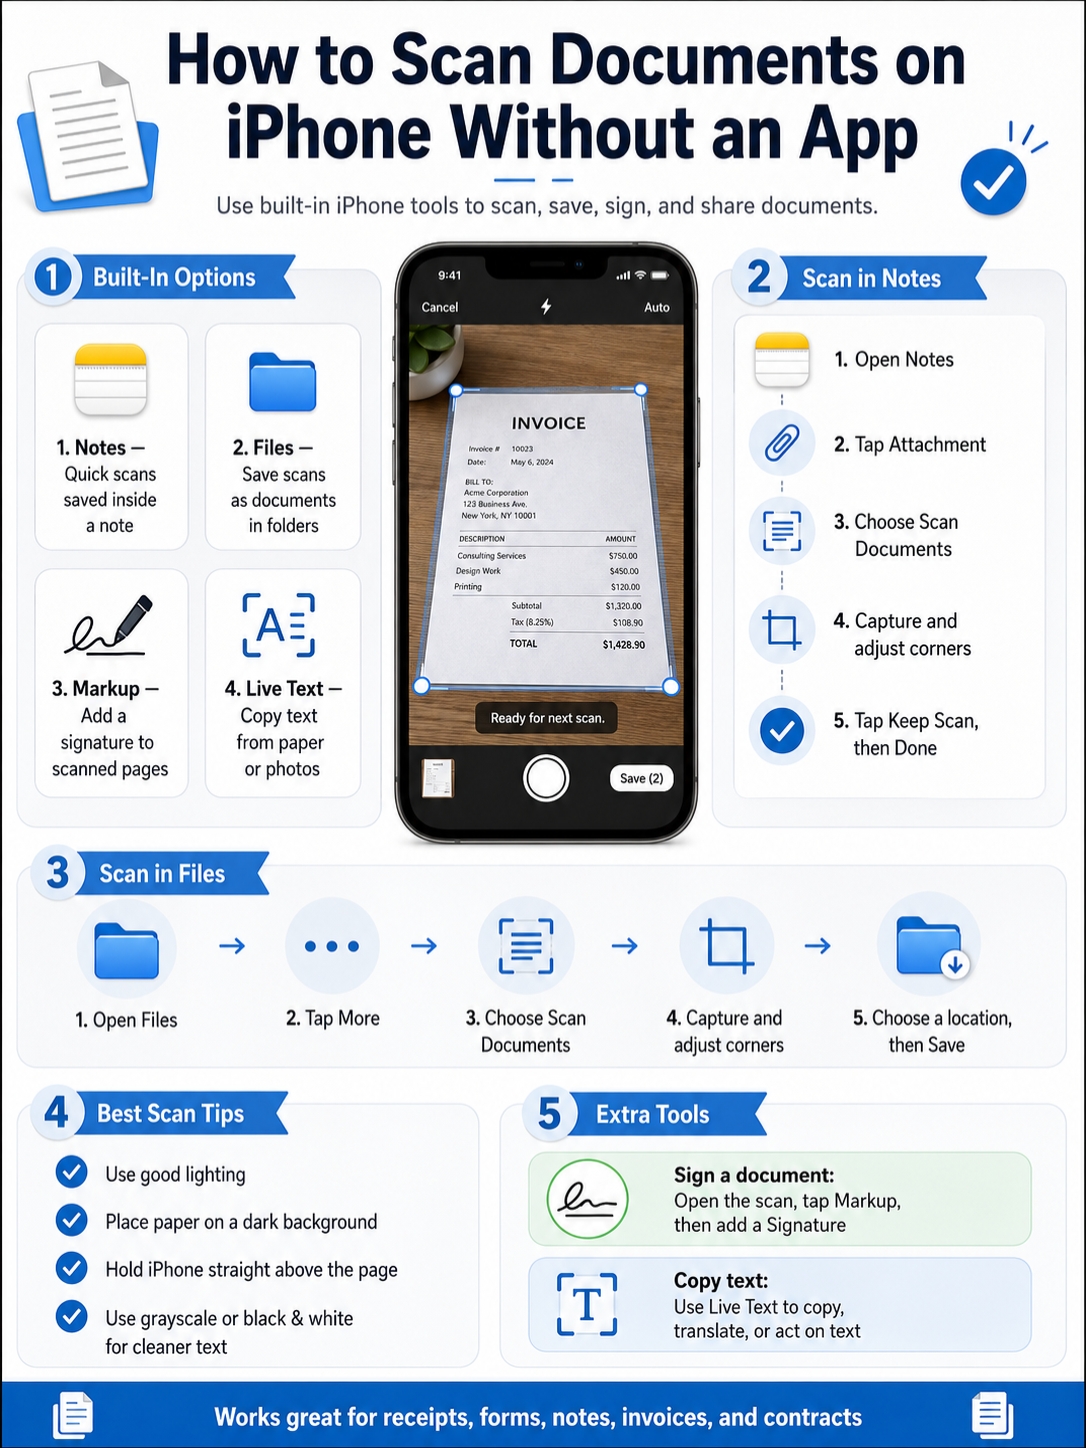
How to Scan Documents on iPhone With Notes
|
Step |
What to Do |
Helpful Tip |
|
1 |
Open Notes |
Use a new note or an existing one |
|
2 |
Tap the attachment button |
It may look like a paperclip or camera option |
|
3 |
Choose Scan Documents |
The camera scanner opens |
|
4 |
Place the paper in view |
Use a flat surface and good light |
|
5 |
Let Auto capture or press the shutter |
Manual mode gives more control |
|
6 |
Adjust the corners |
Crop tightly around the page |
|
7 |
Tap Keep Scan, then Done or Save |
Add more pages before finishing |
Notes is the easiest place to start.
Open the Notes app. Create a new note or open an existing one. Tap the Attachment button, then choose Scan Documents.
Now place the document on a flat surface. Keep your iPhone steady above the page. If Auto mode is on, your iPhone will capture the page when it detects the edges.
If the scan doesn’t look right, don’t worry. Use manual capture instead. Tap the shutter button or press one of the volume buttons.
After the scan, drag the corners so the border fits the page. Then tap Keep Scan.
Have more pages? Scan the next page before saving. When you’re finished, tap Done or Save, depending on your iOS version.
Apple’s iPhone guide says scanned documents in Notes are saved as PDFs inside the note. You can also scan more pages before finishing the file.
When Notes Is the Best Choice
Use Notes when you want the scan to sit next to extra details.
For example, you might scan a receipt and write “June client lunch” above it. Or you can scan class notes and add your own summary below the page.
Notes works well for:
- Quick receipts
- Personal paperwork
- Meeting notes
- School handouts
- Handwritten pages
- Documents that need extra comments
I’d use Notes for anything casual or personal. It’s fast, and you don’t have to think too much about folders.
How to Sign a Scan in Notes
You can sign a scanned document right inside Notes.
Open the scanned document. Tap Markup. Tap the Add button, then choose Signature. You can use a saved signature or create a new one with your finger.
Place the signature where it belongs. Resize it if needed. Tap Done.
This is handy for basic forms, permission slips, approvals, and simple agreements. It won’t replace every formal signing tool, but for many everyday forms, it works fine.
How to Scan Documents on iPhone With Files
|
Step |
What to Do |
Why It Helps |
|
1 |
Open Files |
Best place for saved documents |
|
2 |
Go to the folder you want |
iCloud Drive or On My iPhone works |
|
3 |
Tap the More button |
Usually shown as three dots |
|
4 |
Tap Scan Documents |
Opens the scanner |
|
5 |
Capture the page |
Use Auto or Manual mode |
|
6 |
Adjust edges and keep scan |
Fix bad crops before saving |
|
7 |
Choose location and save |
Easier to upload later |
Files is the better option when you need a real document file.
Use it when you want to upload a form, email a PDF, organize paperwork, or save something in a folder.
Open the Files app. Go to the folder where you want the scan to live. You can use iCloud Drive, On My iPhone, or another storage location.
Tap the More button, usually shown as three dots. Then tap Scan Documents.
Place the document in the camera view. Let your iPhone scan it automatically, or tap the shutter yourself. Adjust the corners. Tap Keep Scan. Add more pages if needed.
When you’re done, choose where to save the file.
Apple confirms that Files can scan documents, adjust the page corners, add more pages, and save the scan to a chosen location.
When Files Is the Best Choice
Use Files when the scan needs to behave like a normal PDF or document.
Files is best for:
- Job applications
- School uploads
- Bank forms
- Visa or travel paperwork
- Signed contracts
- Invoices
- Insurance papers
- Documents you need to email later
After saving the scan, press and hold the file to rename it.
Read Also: How to Fix iPhone Overheating in 2026
Use clear names like:
- signed-rental-form-july-2026
- passport-copy-renewal
- medical-bill-claim
- client-invoice-june-2026
- school-form-signed
This sounds small, but it matters. A folder full of files named “Scanned Document” becomes useless very quickly.
Use Preview on iPhone for PDF Scanning in iOS 26
|
Preview Feature |
What It Does |
Best Use |
|
Scan Documents |
Creates a PDF from paper |
Clean PDF workflow |
|
Crop and rotate |
Fixes page edges and direction |
Better document layout |
|
Color adjustment |
Improves readability |
Receipts and forms |
|
PDF form filling |
Adds text to forms |
Office and admin work |
|
Signature tools |
Signs PDF forms |
Quick approvals |
|
PDF locking |
Adds password protection |
Sensitive files |
Preview is now part of the iPhone experience in iOS 26. It gives you a cleaner way to work with PDFs, scans, forms, and images.
With Preview, you can view documents, edit PDFs, scan paper documents, fill out PDF forms, add signatures, and export files in different formats or sizes.
To scan with Preview, open the Preview app. Tap Scan Documents. Place the paper in view. Your iPhone can capture the page automatically, or you can switch to Manual and tap the shutter yourself.
After scanning, tap the page thumbnails to crop, rotate, or adjust the look of the scan.
Preview is a good choice when you want to scan and work with a PDF in one place. It feels more document-focused than Notes.
Use Preview when you want to:
- Scan a PDF
- Fill out a form
- Add a signature
- Review pages before sending
- Manage a scanned file
- Protect a PDF with a password
Not every iPhone will show Preview. If you’re using an older iOS version, use Notes or Files instead. They still handle the main scanning job well.
Best Settings for Clean iPhone Scans
|
Problem |
Best Fix |
Result |
|
Dark page |
Move near a window or use flash |
Clearer text |
|
Wrong crop |
Use a darker background |
Better edge detection |
|
Blurry scan |
Hold the iPhone steady |
Sharper page |
|
Yellow paper tone |
Try grayscale or black-and-white |
Cleaner look |
|
Small text |
Move closer before scanning |
Better detail |
|
Curved page |
Flatten the document first |
Straighter scan |
|
Glossy reflection |
Move the light source |
Less glare |
A clean scan starts before you tap the button.
Place the paper on a flat surface. Use good light. Hold your iPhone straight over the page, not at a steep angle.
If the document is white, don’t place it on a white table. Your iPhone may struggle to find the edges. A darker background helps the camera detect the page faster.
Use the Right Filter
Most iPhone scan tools let you adjust the look of the scan.
You may see options like Color, Grayscale, Black & White, or Photo. Apple’s latest guide also mentions flash and image filters for scans in Notes and Files.
Use Color for IDs, certificates, stamps, highlighted notes, and documents where color matters.
Use Grayscale for invoices, office forms, and printed paperwork.
Use Black & White for text-heavy pages. It can make printed words sharper, but it may look too harsh for photos or light handwriting.
Use Manual Mode When Auto Mode Gets Annoying
Auto mode is fast. But it can be jumpy.
Sometimes it scans too soon. Sometimes it misses a corner. Sometimes it gets confused by receipts or messy backgrounds.
Switch to manual mode when:
- The page has weak edges
- The room is dark
- The background is busy
- The receipt is narrow
- The paper is bent
- Auto mode keeps capturing too early
Manual capture takes a few extra seconds, but the result is often better.
|
Task |
Best Tool |
Why |
|
Rename the scan |
Files |
Keeps documents organized |
|
Share by email |
Share sheet or Mail |
Best for formal sending |
|
Send to nearby Apple device |
AirDrop |
Fast transfer |
|
Upload to a website |
Files |
Easy file picker access |
|
Add a signature |
Markup or Preview |
No signing app needed |
|
Store long-term |
iCloud Drive or local folder |
Easier backup and search |
After you scan, think about what happens next.
Do you only need a quick personal record? Notes is fine.
Do you need to upload the file? Use Files.
Do you want to fill, sign, or manage a PDF on iOS 26? Try Preview.
Open the scan and tap the Share button.
You can send it through Mail, Messages, AirDrop, WhatsApp, Google Drive, Dropbox, or another app on your iPhone.
For official documents, email or a secure upload portal is usually safer than messaging apps. For casual sharing, Messages or WhatsApp may be enough.
How to Find Scanned Documents Later
If you scanned in Notes, search inside the Notes app. Try the note title or words like “scanned document.”
If you scanned in Files, open the Files app and search there.
Check these places:
- iCloud Drive
- On My iPhone
- Downloads
- Recently Used
- The folder you opened before scanning
A simple folder system saves a lot of time. You can use folders like:
- Finance
- Tax
- Work
- School
- Medical
- Travel
- Receipts
This may feel boring now. But when you need one form six months later, you’ll be glad you named and stored it properly.
Use Live Text When You Need Words From Paper
|
Need |
Use Scanner? |
Use Live Text? |
|
Save a signed form |
Yes |
No |
|
Keep a receipt copy |
Yes |
Maybe |
|
Copy a phone number |
No |
Yes |
|
Translate printed text |
No |
Yes |
|
Save a full-page PDF |
Yes |
No |
|
Copy a paragraph into Notes |
Maybe |
Yes |
|
Search text from an image |
No |
Yes |
Sometimes you don’t need a scanned PDF. You need the words on the paper.
That’s where Live Text helps.
Live Text can recognize text in photos, videos, online images, and the Camera app. You can copy text, translate it, call phone numbers, send emails, search addresses, and use quick actions.
To use it, open the Camera app and point it at the text. When the Live Text button appears, tap it. Select the words you want. Then copy, translate, share, or search.
Live Text is useful for:
- Copying phone numbers from flyers
- Saving addresses from printed papers
- Translating menus or notices
- Copying a quote from a book
- Pulling text from a receipt
- Turning printed notes into editable text
Live Text requires a supported iPhone. Apple says it works on iPhone XS, iPhone XR, or later with iOS 15 or later. Live Text for video requires iOS 16 or later.
Live Text doesn’t replace scanning. Use scanning when you need the full document. Use Live Text when you need the words.
Scan From iPhone to Mac With Continuity Camera
|
Requirement |
Details |
|
iPhone support |
iOS 12 or later for scanning to Mac |
|
Mac support |
macOS Mojave 10.14 or later on supported Mac models |
|
Connection |
Wi-Fi and Bluetooth must be on |
|
Account |
Both devices must use the same Apple Account |
|
Best use |
Scanning straight into Mac apps or Finder |
If you use a Mac, Continuity Camera is a neat shortcut.
You can start from your Mac, scan with your iPhone, and have the scan appear on the Mac automatically.
Apple says this works in built-in Mac apps such as Finder, Freeform, Mail, Messages, Notes, TextEdit, Pages, Keynote, and Numbers.
Here’s how it works.
On your Mac, open a supported app or folder. Control-click where you want the scan to appear. Choose Scan Documents. Your iPhone camera opens.
Scan the page. Adjust the corners. Tap Keep Scan, then save it. The scanned PDF appears on your Mac.
This is useful for:
- Scanning receipts straight into a Mac folder
- Adding signed pages to a document workflow
- Scanning directly into Mail
- Saving paperwork without sending files between devices
Apple lists iOS 12 or later and macOS Mojave 10.14 or later as the base requirements for this scan-to-Mac feature on supported devices.
Privacy and Safety Tips Before Scanning
|
Document Type |
Safety Tip |
|
Passport or ID |
Share only with trusted parties |
|
Bank papers |
Avoid sending through casual messaging apps |
|
Medical forms |
Store carefully and delete extra copies |
|
Tax documents |
Use clear names and secure storage |
|
Contracts |
Keep both original and digital copies |
|
Receipts |
Organize by month, project, or client |
Scanning is easy. Sharing the wrong file is also easy.
Before sending a scan, check the full page. Make sure it doesn’t show extra personal details, another document, or anything private in the background.
For sensitive documents, keep things simple:
- Save the scan in the right folder
- Rename it clearly
- Send it only to the correct person
- Delete test scans you don’t need
- Avoid storing extra copies everywhere
One important privacy note: don’t assume every scanned note can be locked.
Apple says Notes can lock many types of notes, but notes with PDF attachments can’t be locked. Since scanned documents in Notes are PDF-based, this matters.
For sensitive scans, Files or Preview may be a better choice. Preview on iOS 26 also supports PDF password protection.
Common iPhone Scanning Problems and Fixes
|
Problem |
Likely Cause |
Quick Fix |
|
Scan looks blurry |
Phone moved |
Rescan and hold steady |
|
Edges are wrong |
Poor contrast |
Use a darker background |
|
Scan is too dark |
Bad lighting |
Move to better light |
|
File is hard to find |
Saved in wrong place |
Search Notes or Files |
|
PDF is too large |
Many color pages |
Use grayscale or split pages |
|
Text is hard to read |
Camera too far away |
Move closer |
|
Scan button missing |
Wrong account or app view |
Try Files or a fresh iCloud note |
Why Can’t I See Scan Documents in Notes?
The Notes layout can change depending on your iOS version and account type.
Some Notes features work best with iCloud notes or notes saved directly on your iPhone. If your note is tied to another email account, you may not see every option.
Try this:
- Create a new note under iCloud
- Tap the attachment button
- Look for Scan Documents
- Update iOS if your layout looks different
- Use Files if Notes doesn’t show the option
Why Won’t My Scan Upload?
Some websites have file-size limits. Others are picky about file names or file types.
Try these fixes:
- Rename the file with simple letters and numbers
- Use grayscale or black-and-white
- Split a long scan into smaller files
- Save it in Files first
- Remove special characters from the file name
- Try uploading through Safari instead of an in-app browser
Why Does My Scan Look Yellow?
Warm indoor lights can make white paper look yellow.
Move near daylight if you can. You can also try flash, grayscale, or black-and-white mode.
Final Thoughts
Once you learn how to scan documents on iPhone, small paperwork tasks become much easier.
You can scan a receipt at lunch, sign a form from home, save a bill, upload a school paper, or send a contract without touching a printer.
Use Notes for quick personal scans. Use Files when you need a clean document you can upload or email. Use Preview on iOS 26 if you want a stronger PDF workflow. Use Markup when you need a signature. Use Live Text when you need the words from a page. Use Continuity Camera when you want the scan to land straight on your Mac.
The best part? You probably don’t need a paid scanner app at all.
Your iPhone already has the tools. You just need to know where to tap.
FAQs About Scanning Documents on iPhone
|
Question |
Short Answer |
|
Can I scan without downloading an app? |
Yes, use Notes, Files, or Preview |
|
Can iPhone scan multiple pages? |
Yes, scan more pages before saving |
|
Can I sign a scanned document? |
Yes, use Markup or Preview |
|
Can I copy text from a document? |
Yes, use Live Text where supported |
|
Can I scan to Mac? |
Yes, use Continuity Camera |
|
Can I scan offline? |
Yes, but sharing or cloud sync needs internet |
Can I scan documents on iPhone without internet?
Yes. Basic scanning works offline because it uses the iPhone camera and built-in apps.
You only need internet if you want to email, upload, sync to iCloud, or share through an online service.
Are iPhone scans accepted like scanner copies?
Often, yes.
Many schools, offices, and online portals accept clear PDF scans. But some legal, banking, government, or immigration tasks may require certified copies, notarized documents, or original papers.
Always check the receiver’s rules before sending anything important.
Can I scan both sides of an ID card?
Yes.
Scan the front first. Then scan the back before tapping Done or Save. This keeps both sides in one document.
Use a dark background so your iPhone can detect the card edges more easily.
Should I use Notes or Files for official forms?
Use Files for most official forms.
It makes the scan easier to rename, upload, email, and store. Notes is better for personal records or scans you want to keep with comments.
Can I scan handwritten notes?
Yes.
The scan will preserve the handwriting as part of the document. If you want editable text, try Live Text, but check the result carefully. Handwriting recognition can make mistakes.
Can I make a scanned PDF smaller?
Yes.
Use grayscale or black-and-white instead of color. You can also split a long document into smaller scans.
Can I scan old photos with the document scanner?
You can, but it’s not always the best choice.
The document scanner may crop and process the photo like a paper form. For old family photos, the Camera app or Photos app may keep the image looking more natural.