
Most people don’t think seriously about backups until a file disappears.
Maybe you delete the wrong folder. Your Mac refuses to start. A drink spills across the keyboard. Or the internal drive fails without warning.
That’s when a backup stops feeling optional.
Apple builds Time Machine into macOS, so you don’t need to buy separate backup software. Once the time machine backup setup is complete, your Mac can automatically copy your files to an external drive or supported network location.
It doesn’t just save the latest copy. Time Machine keeps older versions of documents and folders too. You can recover a deleted file, return to an earlier draft, or move your apps and accounts to another Mac.
The basic setup takes only a few minutes. The important part is doing it properly. You need a suitable drive, enough storage, encryption, and a schedule you’ll actually maintain.
This guide covers the full process, from choosing a drive to restoring your first test file.
What Time Machine Actually Backs Up
Time Machine protects most of the information stored in your user account.
That usually includes documents, photos, music, videos, emails, downloaded apps, user settings, and files saved on the Desktop.
It doesn’t create a simple one-time copy. Instead, Time Machine builds a backup history.
The first backup is usually the largest because your Mac needs to copy most of your existing data. Later backups focus on files that have been added or changed.
Apple says Time Machine keeps:
- Hourly backups for the previous 24 hours
- Daily backups for the previous month
- Weekly backups for earlier months
When the backup drive runs low on space, Time Machine removes the oldest backups first.
|
Time Machine Feature |
What It Does |
|
Automatic backups |
Saves your files on a recurring schedule |
|
File history |
Keeps older versions of changed documents |
|
Deleted-file recovery |
Brings back files removed from your Mac |
|
Incremental backups |
Copies mostly new or changed data after the first run |
|
Migration support |
Moves accounts, apps, files, and settings to another Mac |
|
Local snapshots |
Stores temporary restore points on the Mac itself |
Time Machine and iCloud Aren’t the Same
It’s easy to assume that iCloud already covers everything. It doesn’t.
iCloud mainly keeps supported files and data synchronized across Apple devices. If you delete a synchronized file, that deletion may also appear on your other devices.
Time Machine keeps dated versions. That gives you a better chance of recovering a file from before it was changed or removed.
Using both is sensible.
iCloud gives you access across devices. Time Machine gives you a separate backup history.
Local Time Machine snapshots can also help when your external disk isn’t connected. However, those snapshots stay on the Mac’s internal storage. They won’t help if the Mac is stolen or the internal drive fails completely.
Choose a Drive That Won’t Fill Up Too Soon
Apple recommends using a backup drive with at least twice the storage capacity of your Mac.
A Mac with 512GB of internal storage should ideally have a 1TB backup drive. A Mac with 1TB of storage should use at least a 2TB drive.
That doesn’t mean Time Machine immediately fills the whole disk. The extra room lets it keep more older versions before it needs to remove them.
|
Mac Storage Capacity |
Recommended Minimum |
Better for Longer History |
|
256GB |
512GB |
1TB |
|
512GB |
1TB |
2TB |
|
1TB |
2TB |
4TB |
|
2TB |
4TB |
5TB or larger |
|
4TB |
8TB |
10TB or larger |
SSD or Traditional Hard Drive?
Both work, but they suit different users.
An external SSD is faster, quieter, and easier to carry. It’s a good match for a MacBook, especially if you move between home and work.
A traditional hard disk drive costs less per terabyte. It works well for a desktop Mac or a backup drive that stays on one desk.
For most people, capacity matters more than extreme speed. The first backup may take a while, but later backups are usually much smaller.
|
Drive Type |
Main Benefit |
Main Drawback |
Best For |
|
External SSD |
Fast, quiet, and portable |
Costs more per terabyte |
MacBook users |
|
External hard drive |
More storage for the price |
Slower and easier to damage |
Home and office use |
|
Compatible NAS |
Wireless backups for several Macs |
More setup and network dependence |
Shared households or teams |
|
Another Mac |
Uses an existing Mac as the destination |
The host Mac must stay available |
Homes with multiple Macs |
|
AirPort Time Capsule |
Built for older Apple backup setups |
Discontinued and outdated |
Existing legacy setups only |
Which Destinations Does Time Machine Support?
The simplest choice is a drive connected directly through USB or Thunderbolt.
Time Machine can also use:
- A compatible network-attached storage device
- A shared folder on another Mac
- Certain older AirPort Time Capsule configurations
For a network-attached storage device, look for Time Machine support over SMB. Apple no longer recommends AFP-based NAS backups and says AFP support will end in macOS 27 or later.
That makes SMB the safer choice for a new network backup setup.
Format the Backup Drive Correctly
For a new Time Machine disk, Apple prefers APFS or APFS Encrypted.
APFS is Apple’s modern file system. It works well with current macOS versions and supports Time Machine efficiently.
Older Time Machine drives formatted as Mac OS Extended can still work. There’s no need to erase a reliable existing backup just because it uses an older format.
A Windows-formatted drive is different. Time Machine can’t use it without reformatting. That process erases everything on the drive.
|
Current Drive Format or Condition |
What to Do |
|
New empty drive |
Let Time Machine prepare it as APFS |
|
Drive contains important files |
Copy those files somewhere else first |
|
Existing Mac OS Extended backup |
Keep using it if it works |
|
Windows-formatted drive |
Back up its contents, then reformat |
|
One drive needed for backups and files |
Create a separate APFS volume |
Can You Keep Normal Files on the Same Drive?
Yes, but don’t place them inside the Time Machine backup volume.
Instead, open Disk Utility and create a separate APFS volume. One volume can hold Time Machine backups, while the other holds ordinary files.
Both volumes share the space available on the physical drive.
This setup is safer and cleaner than mixing personal files directly into the backup volume.
Check the Drive Before Erasing It
Never click through an erase warning without checking the disk.
Open it in Finder and look through every folder. Copy anything important to another location. Then open a few of the copied files to confirm they work.
Only start formatting after you’re sure nothing valuable remains on the original drive.
Time Machine Backup Setup: Step-by-Step
On macOS Ventura and later, you’ll find Time Machine inside System Settings.
The menu names may look slightly different on older versions of macOS, but the process is similar.
|
Step |
What to Do |
|
1 |
Connect the external drive |
|
2 |
Open System Settings |
|
3 |
Select General |
|
4 |
Open Time Machine |
|
5 |
Click Add Backup Disk |
|
6 |
Choose the drive |
|
7 |
Turn on encryption |
|
8 |
Save the password |
|
9 |
Let the first backup begin |
Step 1: Connect the Drive
Plug the drive into your Mac using USB or Thunderbolt.
If you use a hub or adapter, make sure it supports data transfer. Some cheap adapters only provide power or may not supply enough power for a portable hard drive.
When macOS asks whether the accessory may connect, click Allow.
Step 2: Open Time Machine Settings
Follow this path:
- Click the Apple menu.
- Open System Settings.
- Select General.
- Click Time Machine.
- Select Add Backup Disk.
Your Mac will show available drives and supported network destinations.
On macOS Monterey or earlier, open System Preferences and choose Time Machine.
Step 3: Choose the Backup Destination
Select the drive you want to use, then click Set Up Disk.
Your Mac may ask to erase or reformat the disk. Stop and check the drive if you haven’t already done so.
You may also see an option to claim an existing backup created by another Mac. Only accept that option when you recognize the backup and want to continue using its history.
Read Also: How to Split Screen on Mac in 2026
Step 4: Encrypt the Backup
Turn on Encrypt Backup.
You’ll be asked to create a password. Save it in a trusted password manager or another secure place.
Don’t rely on memory alone.
Without the correct password, you may not be able to open or restore an encrypted backup later.
Encryption matters even more if the drive contains:
- Client files
- Financial records
- Private photos
- Tax documents
- Work projects
- Saved email
- Personal identification documents
FileVault and Time Machine encryption do different jobs.
FileVault protects the Mac’s internal storage. Time Machine encryption protects the separate backup disk.
Step 5: Start the First Backup
Time Machine should begin using the drive after setup.
To start a backup manually:
- Click the Time Machine icon in the menu bar.
- Select Back Up Now.
The same menu shows backup progress and the date of your latest completed backup.
When the icon isn’t visible, open System Settings > Control Center and choose to show Time Machine in the menu bar.
Adjust the Backup Schedule and Other Settings
The default settings work for most people, but it’s worth checking the available options.
Open:
System Settings > General > Time Machine > Options
Here you can control the backup schedule, battery use, and excluded folders.
|
Setting |
Practical Choice |
|
Automatic backups |
Keep enabled |
|
Backup frequency |
Hourly for active work, less often for light use |
|
Back up on battery |
Enable only when needed |
|
Encryption |
Keep enabled |
|
Excluded folders |
Use sparingly |
|
Menu-bar icon |
Show for quick status checks |
Pick a Sensible Backup Frequency
Hourly backups make sense when you regularly edit documents, photos, spreadsheets, videos, code, or client work.
A less frequent schedule may be enough for a Mac that changes very little.
Manual-only backups sound convenient, but they’re easy to forget. Automatic backups remove that problem.
The best schedule is the one that runs without needing your attention.
Decide Whether to Back Up on Battery Power
Mac laptops may show a Back up on battery power option.
Turn it on when you often work away from a charger and need frequent backups.
Leave it off when battery life matters more and your Mac will reconnect to power later.
Can Time Machine Work While the Mac Sleeps?
Sometimes.
On Macs that support Power Nap, Time Machine may run while the computer is asleep and connected to power.
Network backups depend on the destination too. If another Mac hosts the shared backup folder and that Mac goes to sleep, the destination may become unavailable.
Exclude Only What You Can Replace
Exclusions can reduce backup size, but they also create gaps.
Possible candidates include:
- Temporary render files
- Downloaded installers
- Replaceable cache folders
- Large virtual machine files backed up elsewhere
Avoid excluding Documents, Desktop, Pictures, project folders, or account data just to speed up the first backup.
Saving time now isn’t worth losing important files later.
What to Expect From the First Backup
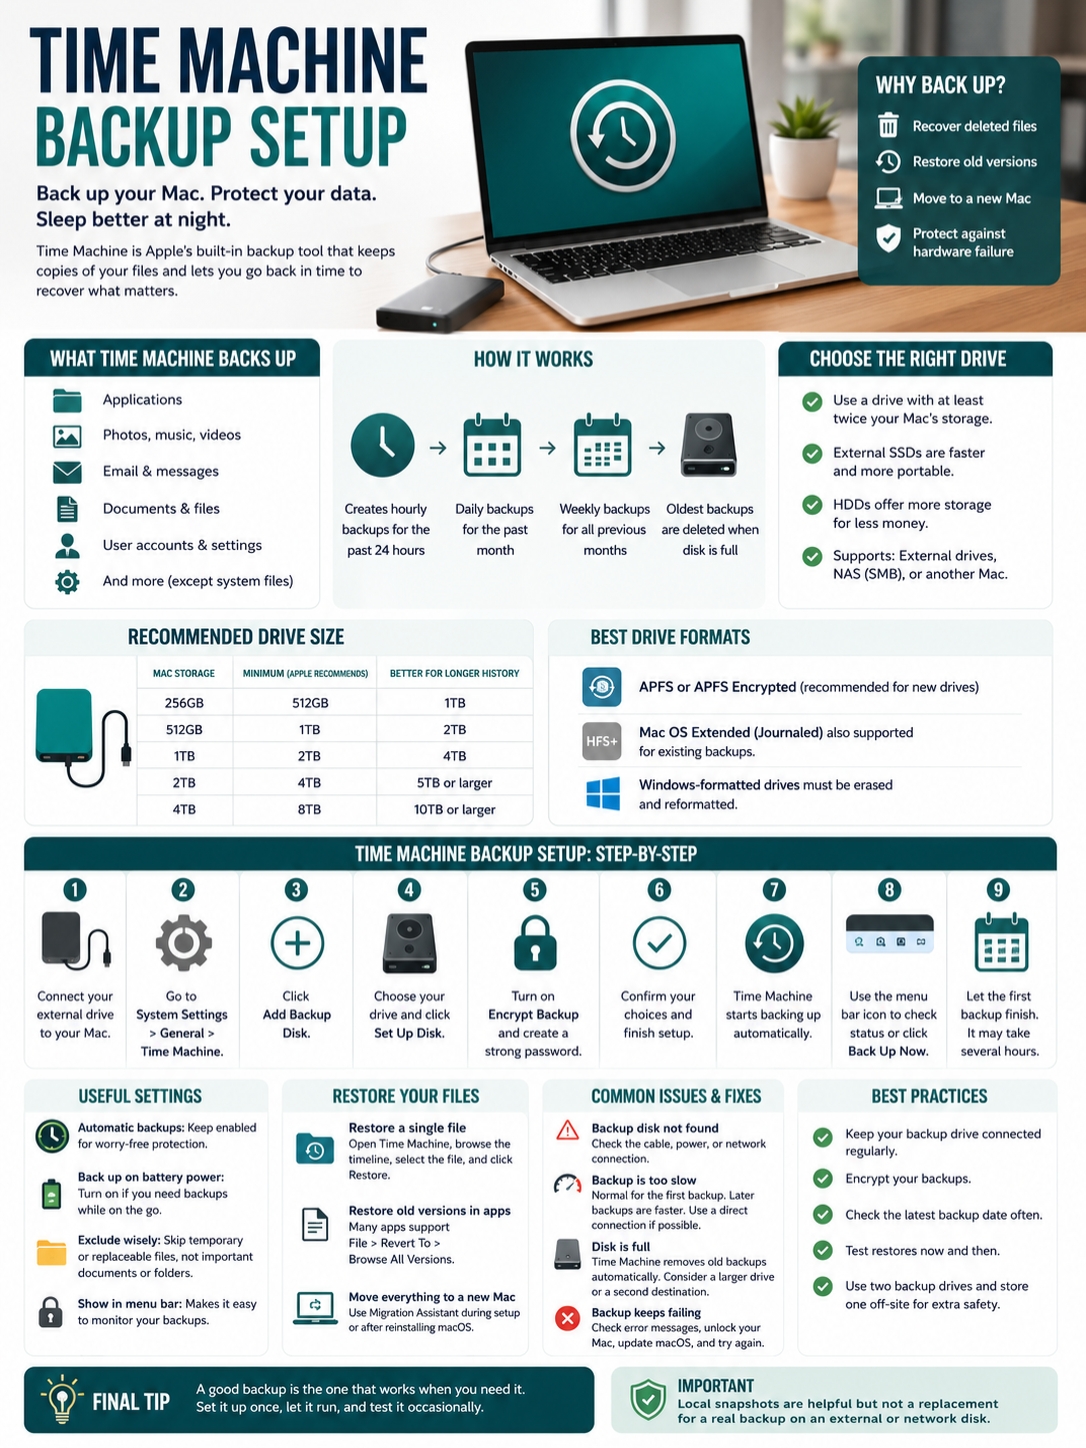
The first backup may take several hours.
That’s normal.
Time Machine needs to examine and copy a large amount of data. The exact time depends on your used storage, drive speed, connection, file count, and whether the backup runs over a network.
You can continue using your Mac, although heavy file transfers may slow things down.
|
Factor |
How It Affects Speed |
|
Large amount of stored data |
Extends the first backup |
|
External SSD |
Usually completes faster |
|
Traditional hard drive |
May take longer |
|
Direct USB or Thunderbolt connection |
Usually faster than a network |
|
Large files that change often |
May be copied repeatedly |
|
Antivirus scanning |
Can slow access to the backup disk |
|
Later incremental backups |
Usually finish more quickly |
Keep a MacBook connected to power during a large first backup.
If you need to disconnect the drive, eject it first. Time Machine should resume its schedule after you reconnect it.
Check That the Backup Finished
Click the Time Machine icon in the menu bar.
Look for the date and time of the latest completed backup.
Don’t assume everything is working just because the drive is plugged in. Check the status now and then, especially after macOS updates, cable changes, or drive errors.
Test the Backup Before You Need It
A backup that has never been tested is still a question mark.
Create a small test document and let Time Machine back it up. Delete the original, then restore it.
This simple check tells you whether:
- The backup disk is readable
- Time Machine shows older versions
- The encryption password works
- You understand the restore process
- The recovered file opens properly
|
Test |
What You Should Confirm |
|
Latest backup date |
Shows a recent successful backup |
|
Drive connection |
Appears in Time Machine settings |
|
Backup history |
Includes previous recovery points |
|
Encryption |
Accepts the saved password |
|
File restoration |
Returns the correct file |
|
File integrity |
Restored file opens normally |
Restore a Single File
To recover one file:
- Open the Finder folder where the file originally lived.
- Open Time Machine from the menu bar or Spotlight.
- Move through the timeline.
- Select the file or folder.
- Click Restore.
Time Machine usually returns the item to its original location.
Some apps also support File > Revert To > Browse All Versions, which lets you restore an earlier version without leaving the app.
Move Everything to Another Mac
Use Migration Assistant when you want to transfer a full user account.
It can move:
- Applications
- User accounts
- Documents
- Folders
- Settings
- Other personal data
During a new Mac setup, choose the option to transfer information from a Mac, Time Machine backup, or startup disk.
If you had to reinstall macOS, finish the installation first. Then open Migration Assistant and restore your personal data.
Large transfers can take hours, so keep both the Mac and backup drive connected to power.
Fix Common Time Machine Problems
Most Time Machine issues come from a small number of causes: loose cables, unavailable network drives, unsupported formats, low storage, software conflicts, or frequently changing large files.
Start with the simple checks before considering a full reset.
|
Problem |
First Thing to Check |
|
Backup disk doesn’t appear |
Cable, power, Finder, and Disk Utility |
|
Network destination is missing |
Wi-Fi, SMB sharing, NAS status, or host Mac |
|
Backup is very slow |
First-backup status, file size, network speed, and antivirus |
|
Disk is full |
Capacity and old backup removal |
|
Backup fails repeatedly |
Error message, macOS updates, and software conflicts |
|
Password doesn’t work |
Correct encrypted-backup password |
|
Mac asks to erase the drive |
Existing format and files stored on it |
The Backup Disk Doesn’t Appear
Reconnect the cable and check whether the drive appears in Finder.
Open Disk Utility if Finder doesn’t show it.
For a network destination, confirm that the Mac and storage device are connected to the same network. Check that the NAS is running or that the other Mac remains awake and available.
The Backup Takes Too Long
A slow first backup isn’t unusual.
Later backups should be faster. When they aren’t, check for:
- A slow hub or adapter
- A weak Wi-Fi connection
- Large files that change constantly
- Antivirus software scanning the backup
- A nearly full drive
- An older disk format
A direct USB or Thunderbolt connection is usually quicker than a network backup.
Apple also notes that APFS can improve Time Machine performance. Reformatting a drive erases it, though, so don’t switch formats without protecting the existing data first.
The Backup Disk Is Full
Time Machine normally removes the oldest backups when it needs space.
That’s expected.
When the disk can no longer keep a useful history, move to a larger drive or add a second destination.
Don’t open the backup disk and randomly delete folders. That can damage the backup structure.
The Backup Keeps Failing
Read the error message before changing anything.
Check for available storage, install current macOS updates, and make sure the drive remains connected.
Some encrypted files may be unavailable while the Mac is locked. A third-party firewall can also interfere with network backups.
Unlock the Mac and try again before taking more drastic steps.
Make Your Backup Routine Harder to Break
The time machine backup setup only protects you when the drive remains available.
A portable drive left in a drawer for six months won’t contain your latest work.
Desktop users can leave a trusted drive connected. MacBook users can connect the drive at the end of each workday or use a compatible network destination.
|
Good Backup Habit |
Why It Matters |
|
Keep automatic backups enabled |
Prevents missed backup sessions |
|
Encrypt portable drives |
Protects data if the disk is lost |
|
Check the latest backup date |
Reveals silent failures |
|
Restore a test file |
Confirms recovery works |
|
Use a second backup disk |
Reduces dependence on one device |
|
Keep one copy elsewhere |
Protects against theft or physical damage |
|
Replace unreliable hardware |
Avoids trusting a failing drive |
Use Two Time Machine Drives
Time Machine supports multiple backup disks.
You could keep one at home and another at work. macOS rotates between them and saves the changes made since each disk was last connected.
That gives you another layer of protection without changing your daily workflow.
Back Up to Another Mac
Another Mac on the same network can host a Time Machine destination.
On the destination Mac:
- Open System Settings > General > Sharing.
- Turn on File Sharing.
- Enable SMB.
- Add the folder you want to share.
- Open its advanced options.
- Select Share as a Time Machine backup destination.
- Set a storage limit when needed.
The host Mac must remain available while the backup runs.
Final Thoughts
A reliable time machine backup setup doesn’t require advanced skills.
Start with a drive that has at least twice your Mac’s storage capacity. Use APFS for a new backup disk. Turn on encryption and save the password somewhere secure.
Then let Time Machine run automatically.
|
Final Check |
Recommended Setup |
|
Drive capacity |
At least twice the Mac’s storage |
|
Format for a new drive |
APFS or APFS Encrypted |
|
Encryption |
Enabled |
|
Backup schedule |
Automatic |
|
Latest backup date |
Checked regularly |
|
Test restoration |
Completed |
|
Second destination |
Recommended for important files |
Check the latest backup date from time to time. Restore a test file occasionally. Replace the drive if it starts disconnecting, making unusual noises, or showing errors.
The setup takes a few minutes. Recovering years of lost work may be impossible.
That makes Time Machine one of the easiest precautions you can take on a Mac.
Frequently Asked Questions
|
Question |
Quick Answer |
|
Can Time Machine use two drives? |
Yes, it rotates between them |
|
Can it back up to an iPhone or iPad? |
No |
|
Can it use a Windows-formatted disk? |
Only after reformatting |
|
Can another Mac host the backup? |
Yes, through SMB file sharing |
|
Are local snapshots enough? |
No, they remain on the same Mac |
|
Can you limit a shared backup folder? |
Yes |
Can I Continue a Backup Created by Another Mac?
Sometimes. During setup, macOS may offer to claim an existing backup history.
Only accept when you recognize the backup and want the current Mac to continue using it.
Can Time Machine Back Up to an iPhone or iPad?
No. Time Machine can’t use an iPhone, iPad, or iPod as a backup destination.
Use a supported external disk, NAS, or shared Mac instead.
Can I Use a Windows-Formatted Drive Without Erasing It?
No.
Time Machine needs a compatible Mac format. Reformatting deletes the drive’s current contents, so copy important files elsewhere first.
Can I Limit the Size of a Network Backup?
Yes.
When another Mac shares a folder as a Time Machine destination, you can set a storage limit for that folder.
Can a New Time Machine Backup Restore to an Old macOS Version?
Not always.
Apple says backups created in macOS 12 or later can only be restored to a Mac running macOS 11 or later.
How Long Do Local Snapshots Stay on a Mac?
Time Machine generally creates a local snapshot about once an hour and keeps it for around 24 hours.
macOS may remove snapshots sooner when it needs storage.
Are Local Snapshots a Replacement for an External Drive?
No.
They’re stored on the same internal drive as your original files. They can help with quick recovery, but they won’t protect you from theft, major hardware failure, or physical damage.