A messy desktop slows you down more than you think. One browser window hides your notes. Your email sits behind a spreadsheet. A video call takes over the whole screen. Before you know it, you spend more time hunting for windows than doing the actual work.
That’s where windows 11 snap layouts help.
Snap Layouts let you arrange apps into clean sections on your screen. You can place two apps side by side, split your display into three zones, or build a neat four-window workspace. No dragging corners for five minutes. No guessing. No chaos.
It’s one of those Windows 11 features that looks small at first. Then you start using it every day, and it quietly changes how you work.
Microsoft built Snap into Windows 11 so users can resize, arrange, and group open windows more easily. Snap Assist helps fill the empty spaces after you place the first window. Snap Groups let you jump back to a snapped set of apps from the taskbar.
And this feature matters more now because Windows 11 is widely used. StatCounter listed Windows 11 at 69.92% of worldwide desktop Windows version share in June 2026, while Windows 10 held 28.1%. In simple terms, most Windows users are now on a system where Snap Layouts are part of the daily experience.
What Are Windows 11 Snap Layouts?
|
Key Point |
What It Means |
|
Main purpose |
Arrange open apps into clean screen zones |
|
Best for |
Writing, research, meetings, coding, studying, office work |
|
Main shortcut |
Windows key + Z |
|
Helper feature |
Snap Assist |
|
Best screen types |
Laptops, desktops, ultrawide monitors, portrait displays |
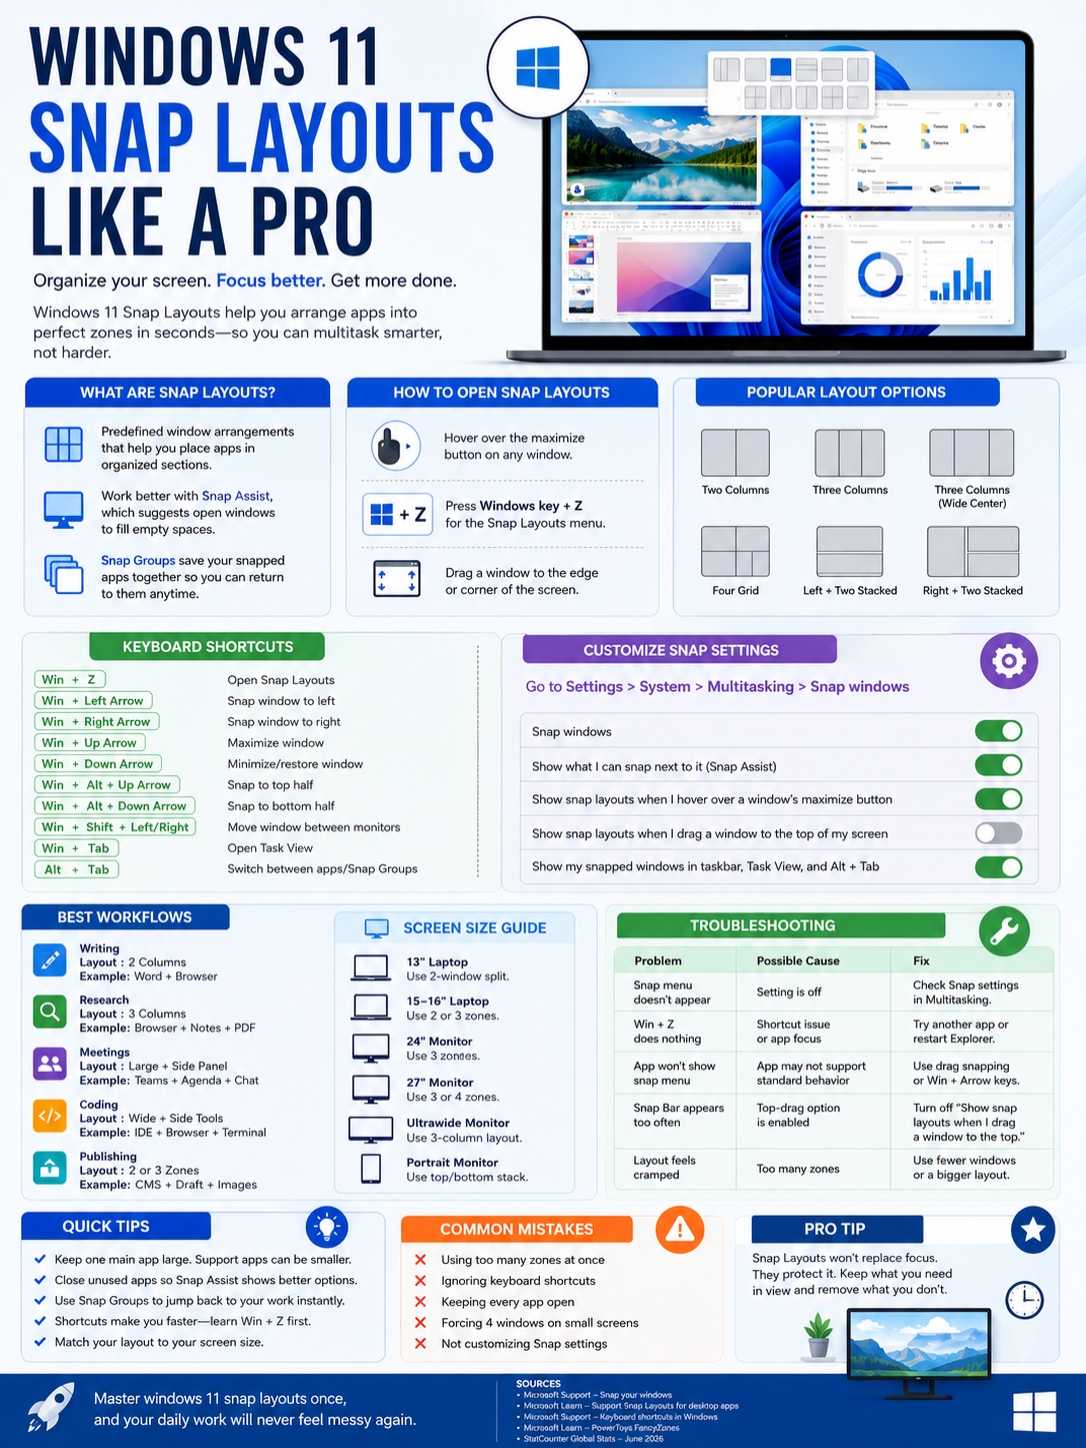
Windows 11 Snap Layouts are ready-made window arrangements. They help you place apps into fixed spots on your screen.
Instead of manually resizing every window, you choose a layout. Then Windows places your app in one section and helps you fill the rest.
You can open Snap Layouts in two easy ways:
- Hover over the maximize button on a window.
- Press Windows key + Z.
Microsoft confirms both methods in its official Windows documentation. The layout choices can also change based on your screen size and orientation. A large monitor may show more layout options. A portrait screen may offer stacked windows.
That makes Snap Layouts useful for many setups. A laptop user may want a simple split screen. A desktop user may want three columns. An ultrawide monitor user may turn one screen into a full work dashboard.
Snap Layouts vs Snap Assist vs Snap Groups
|
Feature |
What It Does |
|
Snap Layouts |
Shows the layout choices |
|
Snap Assist |
Suggests other apps to fill empty spaces |
|
Snap Groups |
Keeps snapped apps together as a group |
|
Snap Bar |
Appears when you drag a window to the top of the screen |
These names sound similar, but they do different jobs.
Snap Layouts are the templates. They show where each app can go.
Snap Assist appears after you snap the first window. It shows other open apps and lets you pick what goes into the remaining space.
Snap Groups keep your snapped windows together. When you hover over a taskbar app in that group, Windows can bring back the full snapped workspace.
Snap Bar appears when you drag a window toward the top of the screen. Some people love it. Others turn it off because it feels too sensitive.
How to Turn On and Customize Snap Layouts
|
Setting |
Recommended Choice |
Why It Helps |
|
Snap windows |
On |
Turns on the main feature |
|
Show Snap Assist |
On |
Helps fill empty layout spaces |
|
Show layouts on maximize hover |
On |
Gives quick access to layout choices |
|
Show layouts when dragging to top |
Optional |
Useful for some, distracting for others |
|
Show snapped windows in taskbar/Alt + Tab |
On |
Makes Snap Groups easier to use |
Before using Snap Layouts like a pro, check the settings.
Here’s how:
- Open Settings.
- Go to System.
- Select Multitasking.
- Expand Snap windows.
- Turn the options on or off.
For most users, Snap windows should stay on. The maximize-button hover menu should also stay on. It’s the fastest way to pick a layout with your mouse.
Keep Snap Assist on too. It saves time because Windows shows the other apps you can place in the layout.
The top-screen Snap Bar is more personal. If you like dragging windows upward to pick a layout, keep it on. If it pops up too often, turn off only that setting. Don’t disable Snap completely.
Read Also: How to Use Local Account on Windows 11 in 2026
Best Settings for Most Users
|
Option |
Keep It? |
Reason |
|
Snap windows |
Yes |
Core feature |
|
Show what I can snap next |
Yes |
Speeds up multitasking |
|
Show layouts on maximize button |
Yes |
Easy visual control |
|
Show layouts when dragging to top |
Maybe |
Depends on your workflow |
|
Show snapped windows in taskbar |
Yes |
Helps restore workspaces |
A small settings tweak can make Snap feel smoother. Don’t treat the default setup as fixed. Adjust it until it matches how you actually work.
How to Use Windows 11 Snap Layouts
|
Method |
How It Works |
Best For |
|
Maximize button |
Hover and choose a layout |
Beginners and mouse users |
|
Win + Z |
Opens Snap Layouts by keyboard |
Fast daily use |
|
Drag to edge |
Snaps a window left or right |
Quick split screen |
|
Drag to corner |
Places a window in a quarter section |
Four-window layouts |
|
Win + Arrow keys |
Moves windows by keyboard |
Keyboard-heavy work |
The easiest method is the maximize button.
Open an app. Move your cursor over the maximize button in the top-right corner. Wait for the layout menu to appear. Choose a section. Windows will move the app there.
Then Snap Assist appears. Pick the next app you want in the empty space. Keep going until the layout is full.
The faster method is Windows key + Z. This opens Snap Layouts without moving your mouse.
You can also use classic snapping. Drag a window to the left or right edge of the screen, and Windows will snap it into place. Drag it to a corner, and it can take one quarter of the screen.
A Simple Workflow for Beginners
|
Step |
Action |
|
1 |
Open the apps you need |
|
2 |
Press Windows key + Z |
|
3 |
Choose a layout |
|
4 |
Place the first app |
|
5 |
Use Snap Assist to fill the rest |
Start with two apps. Don’t jump straight into four-window setups. A clean 50/50 split already saves a lot of time.
Try this setup:
- Browser on the left.
- Word, Google Docs, or Notepad on the right.
That’s perfect for writing, fact-checking, studying, or comparing information.
Pro Workflows for Better Multitasking
|
Workflow |
Best Layout |
Example Setup |
|
Writing |
50/50 split |
Draft + research source |
|
Research |
Three-column layout |
Browser + notes + PDF |
|
Meetings |
Large window + side panel |
Teams + agenda + chat |
|
Coding |
Wide main app + side tools |
IDE + browser + terminal |
|
Publishing |
Two or three zones |
CMS + draft + image folder |
The real strength of windows 11 snap layouts is not the feature itself. It’s the habit you build around it.
Once you create a few repeatable setups, your work feels lighter. You stop moving windows around. You stop digging through the taskbar. You just open the right layout and get moving.
For Writing and Editing
Use a two-column layout.
Put your draft on one side. Put your source, outline, or notes on the other.
This works well for:
- Blog writing
- SEO editing
- Academic work
- Email drafting
- Report writing
On a larger monitor, use a three-column layout. Keep your main draft in the center, your source on one side, and your notes on the other.
For Research
Use three zones.
A good setup looks like this:
|
Zone |
App |
|
Left |
Browser |
|
Center |
Notes app |
|
Right |
PDF, report, or spreadsheet |
This keeps your sources visible. It also makes it easier to compare facts without switching windows every few seconds.
For Meetings
Video calls often take over the screen. They don’t have to.
Use one large zone for the meeting app. Use a narrow side zone for your notes, agenda, or chat.
This setup works well for:
- Microsoft Teams
- Zoom
- Google Meet
- Slack huddles
- Online interviews
You can stay present in the meeting without losing access to your notes.
For Coding
Developers can get a lot from Snap Layouts.
Use the largest zone for your code editor. Keep documentation beside it. Add Terminal, logs, or a preview window in a smaller area.
A simple layout:
|
Zone |
App |
|
Main area |
VS Code or IDE |
|
Side area |
Browser documentation |
|
Bottom or third area |
Terminal or logs |
This cuts down on constant app switching.
For Content Publishing
If you publish articles, Snap Layouts can speed up the final editing stage.
Try this:
- CMS on one side.
- Draft on the other.
- Image folder or SEO checklist in a third zone.
This makes it easier to copy, paste, check formatting, add images, and review metadata.
Use Snap Groups to Return Faster
|
Use Case |
Why Snap Groups Help |
|
Writing sessions |
Bring back draft, notes, and sources together |
|
Research tasks |
Return to browser, PDF, and notes as one group |
|
Meetings |
Reopen meeting, agenda, and chat together |
|
Admin work |
Group email, calendar, and documents |
|
Analytics review |
Group dashboard, spreadsheet, and notes |
Snap Groups are easy to ignore, but they are one of the best parts of Snap.
After you snap a few apps together, Windows can treat them as a group. When you switch away, you can return to the whole group from the taskbar or Task View.
That means you don’t have to rebuild the same layout again and again.
Think of Snap Groups like temporary workspaces. You can have one for writing, one for email, and one for research. Move between them without losing your screen setup.
It’s not a full project-saving system. But for daily work, it’s useful.
Best Snap Layouts by Screen Size
|
Screen Size |
Best Layout |
Practical Advice |
|
13-inch laptop |
Two-window split |
Keep text readable |
|
15–16-inch laptop |
Two or three zones |
Good for work and study |
|
24-inch monitor |
Three zones |
Great for office tasks |
|
27-inch monitor |
Three or four zones |
Strong multitasking setup |
|
Ultrawide monitor |
Three-column layout |
Feels close to dual monitors |
|
Portrait monitor |
Top/bottom stack |
Great for reading and coding |
Not every layout works on every screen.
A four-window grid may look productive, but it can feel cramped on a small laptop. If the text becomes tiny, the layout is hurting you.
Small Laptops
On a 13-inch laptop, use two apps.
A 50/50 split works best. Keep your main task on one side and your support app on the other.
Good examples:
- Word + browser
- Excel + email
- Notes + PDF
- Calendar + inbox
Larger Laptops
On a 15-inch or 16-inch laptop, three zones can work well.
Use one large zone and two smaller zones. Avoid three equal columns if the text feels squeezed.
External Monitors
A 24-inch or 27-inch monitor gives Snap Layouts room to breathe.
You can comfortably use three apps at once. On a 27-inch display, a four-zone layout can also work if you don’t need to read long text in every window.
Ultrawide Monitors
An ultrawide monitor is where Snap Layouts really shine.
Use a three-column layout:
- Main app in the center
- Reference app on the left
- Communication app on the right
It can feel close to a dual-monitor setup without needing a second screen.
Portrait Monitors
Portrait monitors are great for stacked layouts. Use one app on top and another below.
This works well for:
- Long documents
- Code
- Chat apps
- Reading
- Research notes
Windows 11 Snap Layouts Shortcuts You Should Know
|
Shortcut |
What It Does |
|
Windows key + Z |
Opens Snap Layouts |
|
Windows key + Left Arrow |
Snaps window to the left |
|
Windows key + Right Arrow |
Snaps window to the right |
|
Windows key + Up Arrow |
Maximizes the active window |
|
Windows key + Down Arrow |
Restores or minimizes the active window |
|
Windows key + Alt + Up Arrow |
Snaps window to the top half |
|
Windows key + Alt + Down Arrow |
Snaps window to the bottom half |
|
Windows key + Shift + Left/Right Arrow |
Moves a window between monitors |
|
Windows key + Tab |
Opens Task View |
Keyboard shortcuts make Snap Layouts much faster.
The mouse is fine when you’re learning. But once you use Snap every day, keyboard shortcuts save more time.
Start with these:
- Win + Z to open Snap Layouts.
- Win + Left Arrow to snap left.
- Win + Right Arrow to snap right.
- Win + Tab to view open tasks.
- Win + Shift + Arrow to move a window between monitors.
You don’t need to memorize every shortcut at once. Learn one or two. Add more when they feel useful.
Best Shortcut Habit
|
Situation |
Shortcut to Use |
|
You want a full layout menu |
Win + Z |
|
You want a quick split screen |
Win + Left/Right Arrow |
|
You work across two monitors |
Win + Shift + Left/Right Arrow |
|
You want to see open windows |
Win + Tab |
|
You want to switch fast |
Alt + Tab |
The best habit is simple: use Win + Z whenever you feel tempted to resize a window by hand.
That one shortcut can clean up your screen in seconds.
Troubleshooting Snap Layout Problems
|
Problem |
Likely Cause |
Fix |
|
Snap menu doesn’t appear |
Setting is off |
Check System > Multitasking |
|
Win + Z does nothing |
Shortcut or focus issue |
Try another app or restart Explorer |
|
One app won’t show layouts |
App compatibility issue |
Use drag snapping or Win + Arrow |
|
Snap Bar appears too often |
Top-drag option is on |
Turn off that setting |
|
Layout feels cramped |
Too many apps on screen |
Use fewer zones |
|
Snap Assist feels messy |
Too many apps are open |
Close apps you don’t need |
Snap Layouts usually work without trouble. When they don’t, the fix is often simple.
First, check the settings.
Go to:
Settings > System > Multitasking > Snap windows
Make sure Snap windows is turned on. Then check the smaller options under it.
If the hover menu doesn’t appear, try Win + Z. If that works, your hover setting may be off. If it doesn’t work, try another app.
Some older desktop apps don’t behave like modern Windows apps. They may not show the Snap Layout menu when you hover over the maximize button. In that case, use drag snapping or keyboard shortcuts instead.
If the Snap Bar gets in your way, turn off the option that shows layouts when you drag a window to the top of the screen.
And if Snap Assist shows too many choices, close apps you’re not using. Snap works best when your workspace is not already overloaded.
Should You Use FancyZones Instead?
|
Feature |
Snap Layouts |
PowerToys FancyZones |
|
Built into Windows 11 |
Yes |
No |
|
Beginner-friendly |
Yes |
Medium |
|
Custom layouts |
Limited |
Strong |
|
Best for |
Most users |
Power users |
|
Extra install needed |
No |
Yes |
For most people, Snap Layouts are enough.
They are built into Windows 11. They are easy to learn. They work well for normal multitasking.
But power users may want more control. That’s where Microsoft PowerToys FancyZones helps.
FancyZones lets you create custom window zones. You can design your own layouts and place apps exactly where you want them.
It’s useful for:
- Ultrawide monitors
- Multi-monitor setups
- Developers
- Designers
- Analysts
- Heavy multitaskers
Use Snap Layouts first. If you keep wishing for custom zones, then try FancyZones.
Common Mistakes to Avoid
|
Mistake |
Better Approach |
|
Using too many zones |
Keep one main app and one or two support apps |
|
Ignoring shortcuts |
Learn Win + Z first |
|
Keeping every app open |
Close apps that add noise |
|
Forcing four windows on a laptop |
Use a simple split screen |
|
Leaving annoying options on |
Customize Snap settings |
|
Not using Snap Groups |
Return to grouped workspaces faster |
Snap Layouts can help you work faster, but only if you use them with purpose.
Don’t fill the screen just because you can. Four apps on screen may look busy, but busy isn’t the same as productive.
Use fewer windows when you need focus. Use more zones when you need comparison.
A good rule is this:
Keep your main task large. Keep support apps close. Hide everything else.
Final Thoughts
|
Key Lesson |
What to Do Next |
|
Start simple |
Use a 50/50 split first |
|
Learn one shortcut |
Start with Windows key + Z |
|
Keep Snap Assist on |
Let Windows fill empty spaces |
|
Match the layout to your screen |
Don’t cram too much onto a small display |
|
Try FancyZones later |
Use it only when you need custom zones |
Windows 11 Snap Layouts are one of the easiest ways to make your desktop feel cleaner. They help you stop chasing windows and start working with a calmer screen.
Start with two apps. Try a 50/50 split. Then test three zones when you need notes, research, or chat nearby.
Learn Windows key + Z first. That shortcut alone can save you from endless dragging and resizing.
The goal is not to pack your screen with every app you have open. The goal is to keep the right apps visible at the right time.
Use windows 11 snap layouts with that mindset, and your desktop will feel faster, cleaner, and much easier to control.
FAQs About Windows 11 Snap Layouts
|
Question |
Quick Answer |
|
Can I use Snap Layouts without a mouse? |
Yes. Press Windows key + Z. |
|
Do Snap Layouts work on every app? |
Most apps support them, but some older apps may not. |
|
Can I turn off only the top Snap Bar? |
Yes. You can change this in Snap windows settings. |
|
Can I create custom layouts? |
Not with built-in Snap. Use FancyZones for that. |
|
Do Snap Layouts work with multiple monitors? |
Yes. They work well across displays. |
Why are Snap Layouts not showing on Windows 11?
The feature may be turned off.
Go to Settings > System > Multitasking and turn on Snap windows. Also make sure the option for showing layouts when hovering over the maximize button is enabled.
Can I use Snap Layouts with only the keyboard?
Yes. Press Windows key + Z to open Snap Layouts. You can also use Windows key + Left Arrow and Windows key + Right Arrow for quick snapping.
Do Snap Layouts slow down a PC?
No, Snap Layouts themselves should not slow down your PC.
The apps you run use memory and CPU. If your PC feels slow, close heavy apps, browser tabs, or background programs.
Can I save a Snap Layout permanently?
Windows can keep snapped apps together as Snap Groups during active use. But built-in Snap Layouts do not work like a full saved workspace tool.
For reusable custom layouts, use Microsoft PowerToys FancyZones.
Why does one app refuse to snap properly?
Some apps don’t follow standard Windows title-bar behavior. If one app does not show the Snap menu, try dragging it to the screen edge or using Windows key + Arrow keys.
Are Snap Layouts useful on small laptops?
Yes, but keep them simple.
On small screens, use two windows side by side. Avoid four-window grids unless you are working with very simple apps.
What is the fastest way to use Snap Layouts?
Press Windows key + Z. Pick a layout. Then choose the apps for each section.
That’s usually faster than dragging windows around manually.