Discord has transformed from a simple voice chat app for gamers into a massive hub for creators, brands, and hobbyists. If you run a private space, you might be wondering how to make a discord server public to reach a global audience. Taking the leap to a public platform is a fantastic way to grow your member count, increase voice activity, and build a thriving digital ecosystem.
When you remove the barriers to entry, you allow curious users to preview your channels and decide if they want to stick around without needing a special link. This guide will walk you through everything you need to know to open your doors, configure your safety settings, and get listed on the official discovery page this year.
Understanding Public Servers on Discord
When you first launch a new community, it operates as an exclusive, invite-only space by default. You have to manually generate links and send them to friends or post them online to get anyone to join your channels. Opening your doors changes this entire dynamic, allowing anyone browsing the platform to find and join your group naturally. This transition is a massive step for any community builder looking to scale their audience and increase daily active users. We will explore exactly what this means for your daily operations and why getting onto the main directory is such a game changer for long-term growth.
What It Means to Go Public
Making your space public means anyone can find and join it without needing a direct invite link from an existing member. Users can search for topics they care about directly inside the app or through web searches, and your community will appear in the results. This removes the friction of joining, allowing people to simply drop in, read your welcome screen, and decide if the vibe matches what they are looking for. It shifts your group from a closed clubhouse into an open forum where new ideas and conversations flow constantly.
The Benefits of Server Discovery
The Server Discovery page is essentially the front page of Discord. Landing a spot here is the ultimate goal for community managers. It provides free, organic traffic, meaning you do not have to spend hours spamming invite links on social media platforms or external forums. When you are featured in the directory, people who are already actively looking for spaces like yours will simply show up. This brings in fresh perspectives, increases your daily message count, and gives you a much larger audience if you ever plan to launch digital products or premium roles through the built-in shop features.
|
Feature |
Private Server |
Public Discovery Server |
|
Join Method |
Direct invite link only |
Searchable in the app directory |
|
Visibility |
Hidden from search engines |
Indexed and searchable |
|
Growth Rate |
Relies on manual sharing |
Organic, automated growth |
|
Moderation Needs |
Minimal, relies on trust |
Requires robust safety bots |
Requirements to Enable Server Discovery in 2026
Discord maintains strict quality control over which communities get to be openly searchable to ensure a good experience for users. You cannot just flip a switch on a brand new, empty server and expect people to flood in. You have to prove that your space is active, safe, and well-managed by a competent team. Before you can even access the setup page for the directory, you must meet several specific milestones that demonstrate your community is ready for a wider audience.
Reaching the Member Milestone
Your server must have at least 1,000 total members before it can qualify for the public directory. This is often the hardest hurdle for new creators to overcome. You will need to rely on external marketing, content creation, brand partnerships, and manual invite links to reach this initial critical mass. You cannot use fake accounts or bot users to inflate this number, as Discord routinely audits member lists and will permanently ban servers attempting to manipulate their counts.
Age and Activity Metrics
Discord requires your server to be at least eight weeks old. This prevents bad actors from spinning up temporary spaces just to spam the discovery page or run quick scams. Additionally, there are specific activity thresholds you must maintain on a weekly basis. While the platform does not publish the exact daily message count required to deter manipulation, your community needs to show consistent, organic engagement. A server with 1,000 completely silent members will not qualify for the public directory. You need real people talking, sharing media, and joining voice channels regularly.
Strict Safety and Moderation Standards
A public space requires robust safety measures to protect users from malicious content. Your server name, description, and channel names must adhere strictly to the community guidelines, meaning absolutely no explicit or offensive language. You also have to agree to follow the primary rules of the platform and maintain a safe environment for all demographics. This includes setting up an explicit media content filter that automatically scans all images and videos uploaded by your members.
Implementing Two-Factor Authentication
You must enable the two-factor authentication requirement for your entire moderation team. This means anyone with administrative, kick, or ban privileges must have an authenticator app linked to their personal Discord account. This is a critical security step that prevents hackers from hijacking a moderator account and destroying your carefully built community in the middle of the night.
|
Requirement |
Details |
Verification Method |
|
Minimum Members |
1,000 total users |
Automated system check |
|
Server Age |
8 weeks minimum |
Creation date verification |
|
Engagement |
Consistent daily messaging |
Algorithmic activity tracking |
|
Security |
2FA enabled for staff |
Account level verification |
Steps to Make a Discord Server Public
Once you have hit all the required milestones, the actual process of turning on the public features is straightforward and user-friendly. You will need full administrative privileges on your account to access these specific settings and make structural changes. Following these exact steps will ensure your transition from a private group to an open community is seamless and fully compliant with the platform rules.
Step 1: Accessing Server Settings
To begin the process, open your desktop application or access the platform through your web browser. Look at the top left corner of your screen where your server name is displayed. Click on the downward-pointing arrow next to the name to open the main dropdown menu. From this list, select the option labeled Server Settings. This will open a new window containing all the backend configuration options for your community.
Step 2: Enabling the Community Feature
Before you can be listed in the public directory, you must officially convert your standard space into a recognized Community Server. Scroll down the left sidebar until you find the section labeled Community. Click on Enable Community, and then click the purple Get Started button. This will launch a short setup wizard that asks you to confirm safety settings, such as requiring verified email addresses for all members and turning on the media content scanner.
Read Also: How to Add Bots to Discord Server: Complete Guide
Step 3: Setting Up Rules and Update Channels
During the wizard, you will be prompted to designate specific channels for organization and communication. You will need a dedicated rules channel where new members can read your guidelines before they are allowed to chat. You will also need a community updates channel where Discord can send important administrative announcements directly to your moderation team. If you do not have these channels created yet, the wizard allows you to generate them automatically with the correct permissions.
Step 4: Accessing the Discovery Tab
After your server is officially recognized as a Community, the layout of your settings menu will change slightly. A new Discovery tab will appear under the community header in the left sidebar. Click on this tab, and you will see a visual checklist of all the requirements. If you have successfully met the member count, age, activity, and safety metrics, a button labeled Set Up Discovery will light up and become clickable.
Step 5: Finalizing Your Listing Details
Clicking the setup button takes you to the directory customization page. Here, you will write a compelling description that tells people exactly what your server is about and why they should join. You will select a primary category, such as Gaming, Music, Education, or Science and Tech, which helps the algorithm sort your listing. Finally, you will choose the primary language spoken in your channels to ensure you attract the right demographic from the search results.
|
Setup Step |
Action Required |
Location in App |
|
1. Open Settings |
Click the dropdown menu |
Top left corner |
|
2. Enable Community |
Complete the safety wizard |
Left sidebar menu |
|
3. Assign Channels |
Pick rules and update feeds |
Inside the setup wizard |
|
4. Setup Discovery |
Click the activation button |
Discovery tab |
|
5. Add Details |
Write description and pick tags |
Directory customization page |
Optimizing Your Public Server for Maximum Visibility
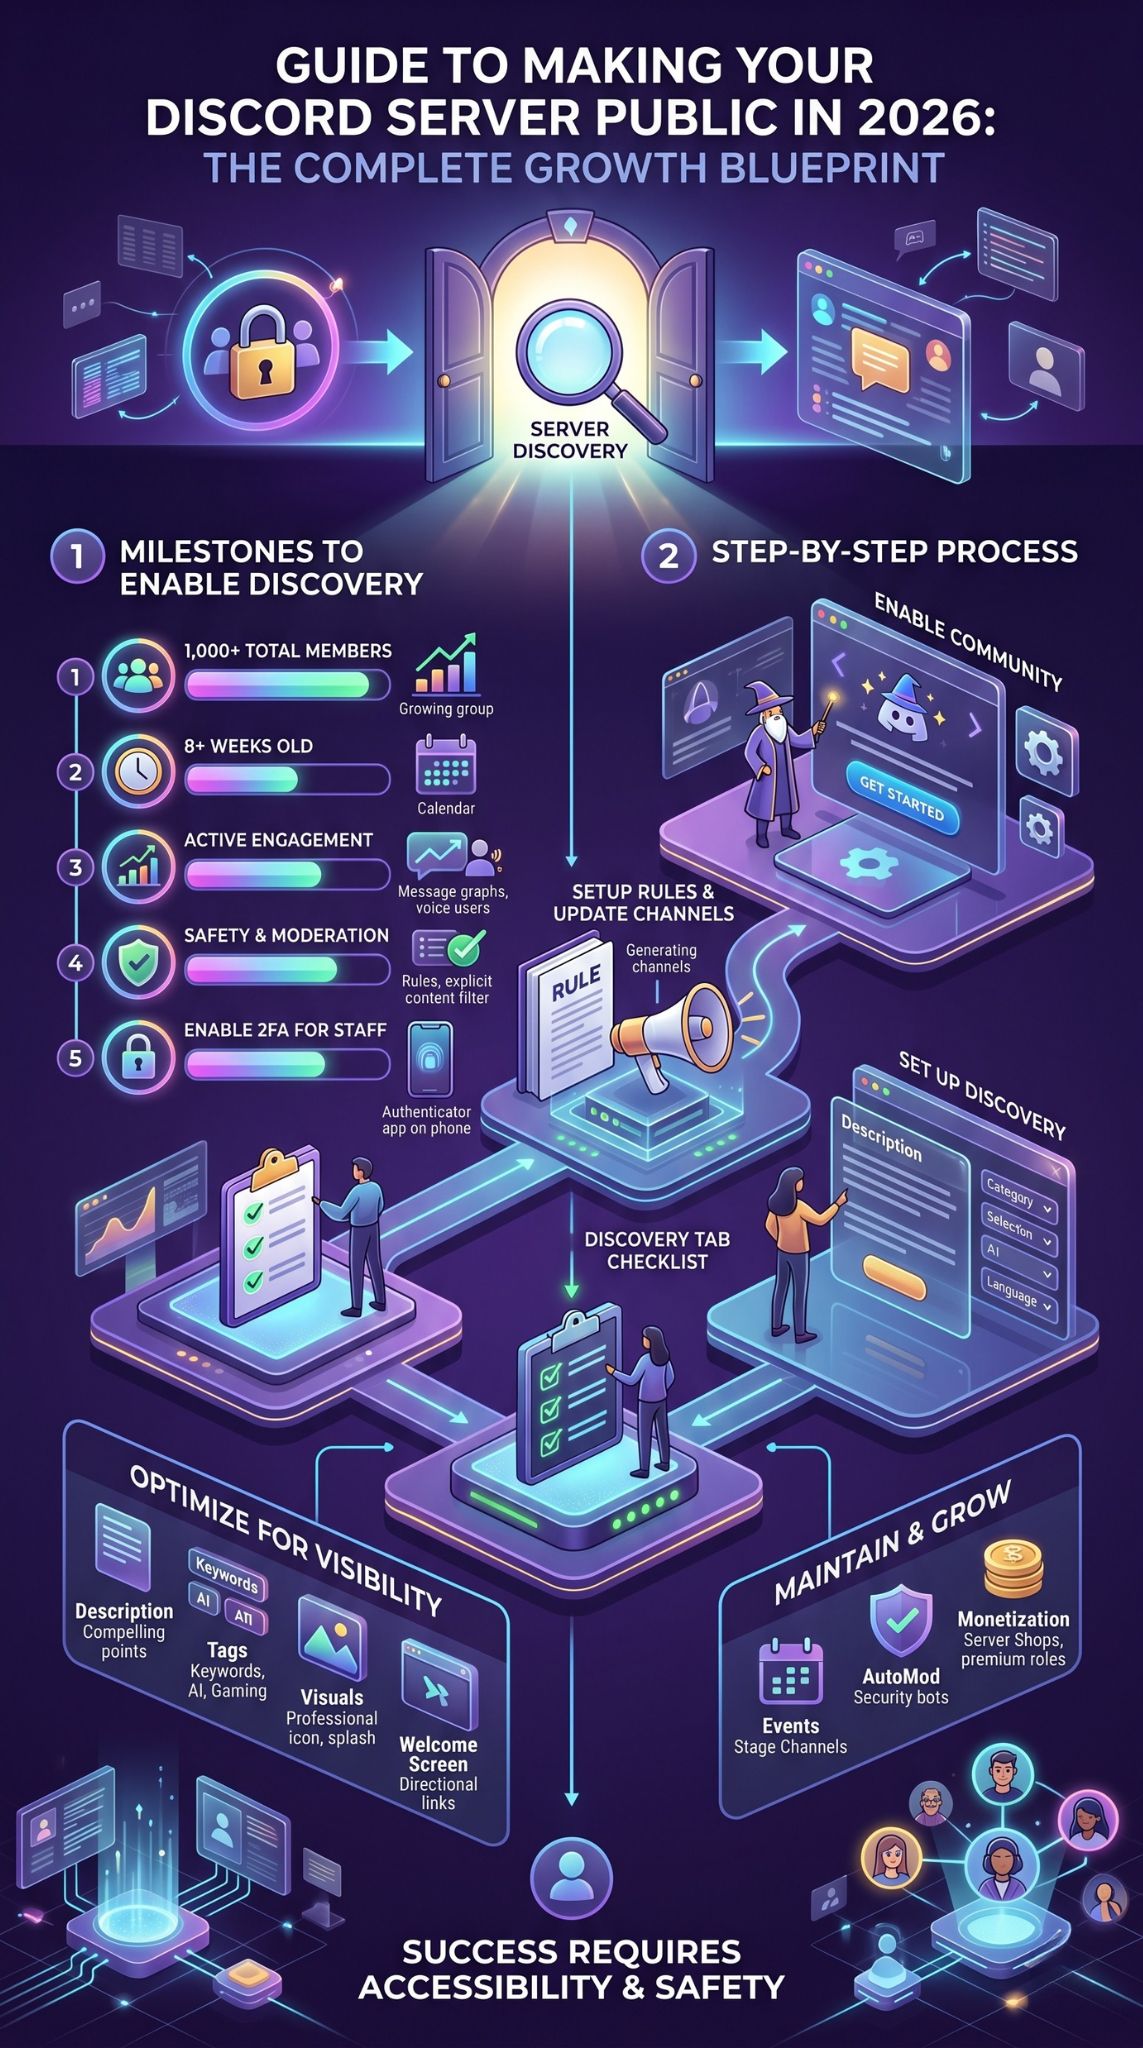
Just getting listed on the discovery page is not the end of your journey. You are competing with thousands of other communities for attention, so you need to optimize your profile so that users browsing the directory choose to click on your card instead of scrolling past. A well-optimized listing acts as a magnet for new members, while a poorly designed one will leave you struggling to grow despite being public. We will look at how to refine your presentation to capture the most organic traffic possible.
Crafting the Perfect Server Description
Your description acts as your elevator pitch to the world. Keep it concise, energetic, and completely free of confusing jargon. Clearly state the main purpose of the group, what kind of activities happen daily, and why someone should spend their free time there. Highlight your unique features, like weekly game nights, exclusive custom bots, or expert advice sessions. You only have a few sentences to grab their attention, so make every single word count.
Utilizing Tags Effectively for Search
Tags function exactly like keywords in standard search engine optimization. You can select up to five custom tags that define your specific niche within the platform. If you run a tech community, you might use tags like programming, hardware, artificial intelligence, and software development. Choose these carefully based on what you think your target audience is typing into the search bar. Do not use irrelevant tags just because they are popular, as this will lead to high bounce rates when users realize your content does not match their interests.
Designing Eye-Catching Visuals
Your server icon and discovery splash image are the very first things people see when scrolling through the directory. Invest time in creating high-quality, professional graphics that represent your brand perfectly. As a best practice, keep your splash image completely text-free to maintain a clean, modern look. A blurry, stretched, or generic icon will cause users to ignore your listing entirely. Make sure your branding looks sharp and matches the overall energy of your community.
Setting Up a Welcome Screen
First impressions matter immensely when you make a discord server public. The welcome screen is a popup that appears the moment a new user clicks your join link. It should guide them on exactly what to do next. Set up specific channel recommendations, such as pointing them to an introductions channel or a role-selection menu. A clear, helpful welcome screen drastically reduces the number of people who join, get confused by the layout, and immediately leave.
|
Optimization Area |
Best Practice |
Impact on Growth |
|
Description |
Clear, engaging, and concise |
High – drives click-through rate |
|
Search Tags |
Relevant to your specific niche |
High – controls search visibility |
|
Visual Assets |
High resolution, text-free splash |
Medium – builds initial trust |
|
Welcome Screen |
Directs users to key channels |
High – improves user retention |
Maintaining Your Public Status and Growing
Getting onto the Discovery page is a huge achievement, but the work does not stop there. The platform continually monitors public servers to ensure they remain active, healthy, and safe for everyone. If your daily activity drops significantly or if rule violations run rampant without moderator intervention, your public status can be quickly revoked. You must implement sustainable strategies to manage your growing population while keeping the core community engaged.
Keeping Up with Activity Requirements
Host regular scheduled events to keep your metrics healthy and your members excited. Use stage channels for live question and answer sessions, create dedicated discussion threads for focused topics, and utilize the built-in polling features to gauge member interest on new ideas. Encourage daily voice channel usage by setting up dedicated rooms for streaming, studying, or casual co-working. A community that plays and works together stays together.
Managing New Members Safely with AutoMod
A public server will inevitably attract trolls, automated spammers, and raid attempts from bad actors. Setting up automated moderation tools is absolutely essential for your sanity. Configure the built-in AutoMod features to block common profanity, ethnic slurs, and dangerous phishing links before they are ever posted in chat. You can also utilize third-party security bots like Wick or Dyno to assign quarantine roles to brand new accounts or require new members to complete a verification system before they can type in the main channels.
Exploring Monetization and Server Shops
With a steady, reliable stream of incoming traffic from the discovery page, you can start looking into the latest community monetization features. You can offer downloadable digital products or set up premium subscription roles that grant access to exclusive VIP channels, special emoji packs, or ad-free experiences. As your audience grows, providing premium value becomes a highly sustainable way to fund custom bot development, pay for better graphics, and fairly compensate your dedicated moderation team for their hard work.
|
Maintenance Strategy |
Tool Used |
Primary Benefit |
|
Sustaining Activity |
Stage Channels & Events |
Keeps discovery metrics healthy |
|
Spam Prevention |
Built-in AutoMod |
Automatically deletes bad links |
|
Raid Protection |
Verification Bots |
Stops automated bot accounts |
|
Revenue Generation |
Server Shop |
Funds server improvements |
~ “A thriving public community is not just built on numbers, but on the careful balance of accessibility and safety.”
~ Digital Community Manager
Final Thoughts
Deciding to make a discord server public is one of the most exciting milestones for any digital community. It marks the transition from a small, private gathering into a vibrant, searchable ecosystem capable of reaching thousands of people globally. By carefully following the requirements, ensuring your safety settings are locked down, and optimizing your discovery profile with the right tags and text-free visuals, you set yourself up for massive organic growth. Remember that while the discovery page brings people to your door, it is your engaging content, active voice channels, and welcoming atmosphere that will convince them to stay long-term. Stay consistent, rely heavily on your automated moderation tools to keep the space safe, and enjoy the incredible experience of watching your community flourish in 2026.
Frequently Asked Questions
Can I make my server public if I have less than 1,000 members?
You cannot list your server on the official Discovery page without meeting the 1,000 member minimum requirement. However, you can still act like a public server by generating a permanent invite link and sharing it openly on your social media, website, or external forums to gather those initial members.
Does Discord charge a monthly fee to list a server in the public directory?
No, the Server Discovery feature is completely free for everyone to use. As long as your community organically meets all the necessary safety, age, and activity requirements, you will never be charged a fee to appear in the search results.
What happens if my active member count drops below the threshold?
The system monitors server activity on a rolling weekly basis. If your community goes completely dormant for an extended period and fails to meet the engagement metrics, your server may be quietly removed from the public directory. It is crucial to maintain engagement through regular events to prevent this.
What is the explicit media content filter requirement?
This is an automated safety feature built directly into the platform. When enabled for a public community, the system automatically scans all images, videos, and attachments uploaded by members. If it detects explicit, illegal, or dangerous content, it immediately deletes the file before anyone else can view it.
Can I reverse the process and make my server private again?
Yes, you have full control over your privacy settings at all times. You can return to your server settings, navigate to the Discovery tab, and disable your public listing instantly. You can also disable the Community features entirely if you decide you want to return to a standard, invite-only setup.