
Let’s be honest for a second. Your Facebook account is basically a digital basement filled with boxes of old memories you haven’t looked at in years. Since the platform has been around for over two decades, you probably have thousands of photos buried in albums, from high school graduations to that one vacation you barely remember. Relying on a social media site to keep these memories safe forever is a risky move.
Accounts get hacked, platforms change their rules, and sometimes you just want to take your data and run. This guide will show you exactly how to download all facebook photos at once so you can keep them safe on your own terms.
Why You Should Back Up Your Facebook Media
Storing your entire life’s history on a single server owned by a giant corporation isn’t exactly the definition of “safe.” While Facebook is great for sharing, it is not a professional-grade backup service. If you lose access to your account tomorrow due to a security glitch or a forgotten password, those photos could vanish forever. Taking a local backup gives you total control over your files and ensures you aren’t at the mercy of an algorithm.
|
Reason for Backup |
Description |
|
Account Security |
Protects your media if your account is hacked or disabled. |
|
Data Ownership |
Moves your personal history from Meta’s servers to your own hardware. |
|
Platform Migration |
Allows you to delete or deactivate your profile without losing memories. |
|
Offline Access |
Lets you view and organize photos without an internet connection. |
The Risk of Digital Loss in 2026
We live in a time where digital platforms are more volatile than ever. Privacy laws change, and sometimes features we rely on simply disappear overnight. If you don’t have a copy of your media on a physical hard drive or a private cloud, you don’t actually own those memories. Having a local copy means you can print them, put them in a digital frame, or share them with family members who aren’t on social media.
Privacy and Data Sovereignty
Data sovereignty is just a fancy way of saying you should be the boss of your own information. When your photos are on Facebook, they are used to train AI models and build your advertising profile. By downloading them and storing them elsewhere, you take a step toward reclaiming your digital footprint. It is a smart move for anyone who cares about their long-term privacy and wants to minimize their reliance on big tech.
Understanding Meta’s Data Export Tools
Meta has updated its interface significantly, moving everything into a centralized hub called the Accounts Center. You no longer have to hunt through twenty different menus to find your data settings. However, you need to understand the difference between the two main options provided. One allows you to download files to your device, while the other sends them directly to another cloud service like Google Photos or Dropbox.
|
Tool Name |
Best For |
Output Format |
|
Download Your Information |
Local storage (PC/Mac/External Drive) |
ZIP (HTML or JSON) |
|
Transfer Your Information |
Cloud-to-cloud migration |
Direct Transfer |
|
Album Download |
Saving small, specific groups of photos |
ZIP |
|
Single Photo Save |
Quick, one-off image saving |
JPEG/PNG |
Download vs. Transfer: Which Is Better?
If you have a lot of storage space on your computer or an external hard drive, the “Download” option is the gold standard. It gives you a complete ZIP file that you can tuck away for safekeeping. On the other hand, the “Transfer” tool is perfect if you are already a heavy user of Google Photos or iCloud. It saves you the hassle of downloading gigabytes of data only to upload them somewhere else, which is a lifesaver if you have a slow internet connection.
Choosing Between HTML and JSON
When you request your data, Facebook will ask you to pick a file format. For 99% of people, HTML is the only choice that makes sense. It creates a simple, clickable website on your computer that lets you browse your photos just like you would online. JSON is a coding format meant for developers who want to import data into new apps. Unless you plan on writing code to sort your pictures, stick with HTML so you can actually see what you downloaded.
How to Download All Facebook Photos at Once on Desktop
Using a laptop or desktop is the most reliable way to handle a massive data request. These devices handle large ZIP files much better than phones do, and you likely have more storage space to work with. The process involves requesting an archive, waiting for Meta to build it, and then downloading it within a specific time window. This is the most efficient way to download all facebook photos without running into mobile app glitches.
|
Step |
Action |
Key Detail |
|
1 |
Access Accounts Center |
Found in Settings & Privacy. |
|
2 |
Request Download |
Choose “Your Information and Permissions.” |
|
3 |
Select Data Types |
Pick “Photos and Videos” to save time. |
|
4 |
Configure Quality |
Set format to HTML and Media Quality to High. |
|
5 |
Submit and Wait |
Facebook will email you when it’s ready. |
To start, click your profile picture in the top right and go to “Settings & Privacy,” then click “Settings.” You will see a box on the left for the Meta Accounts Center. This is the brain of your account. Inside, look for “Your information and permissions.” This section is where all the power tools live, and it’s where you will initiate the request to grab your media library in bulk.
Setting Your Date Range and Quality
Once you hit “Request a download,” you have some choices to make. You can download everything, but that might take days to process. Instead, choose “Select types of information” and just check the boxes for photos and videos. Most importantly, change the date range to “All time” and make sure the “Media Quality” is set to “High.” If you leave it on medium or low, your downloaded photos will look blurry and pixelated when you try to view them later.
Finalizing the Request
After you submit the request, Facebook’s servers start working in the background. They have to gather every image you’ve ever posted, package them into folders, and compress them into a ZIP file. You will get a notification and an email when it is done. Keep in mind that you only have four days to download the file once it’s ready. If you wait too long, the link will expire for security reasons, and you will have to start all over again.
Read Also: Facebook Touch: How to Download and Install Facebook Touch App
Managing Your Data on Mobile Apps
If you don’t have a computer handy, you can still get the job done through the Facebook app on your iPhone or Android. The steps are almost identical to the desktop version, but you have to be careful about your phone’s storage. A lifetime of photos can easily reach 20GB or more, which might crash your phone if you don’t have enough empty space. This method is convenient but requires a bit of digital housekeeping before you begin.
|
Mobile Feature |
iOS Steps |
Android Steps |
|
Menu Access |
Bottom right profile icon. |
Top right three-line menu. |
|
Settings Hub |
Gear icon at the top. |
Settings & Privacy > Settings. |
|
File Storage |
Saves to the “Files” app. |
Saves to the “Downloads” folder. |
|
Extraction |
Tap ZIP to uncompress. |
Use File Manager to extract. |
Initiating the Mobile Export
Inside the app, tap your menu icon and head to the settings gear. Just like on the desktop, you will find the Accounts Center at the top of the list. Follow the same path: “Your information and permissions” and then “Download your information.” The mobile interface is actually quite snappy, but make sure you are on a stable Wi-Fi connection. Trying to download a massive photo archive over a cellular data plan is a great way to blow through your data cap in ten minutes.
Unzipping Files on a Smartphone
Once the download is finished, you will have a ZIP file sitting in your phone’s internal storage. On an iPhone, you can find this in the “Files” app. On Android, it will be in your “Downloads” or “My Files” folder. You just need to tap the file to extract it. This will create a new folder where you can browse all your pictures. From there, you can move them to your camera roll or upload them to a private cloud storage app.
Moving Photos Directly to Cloud Storage
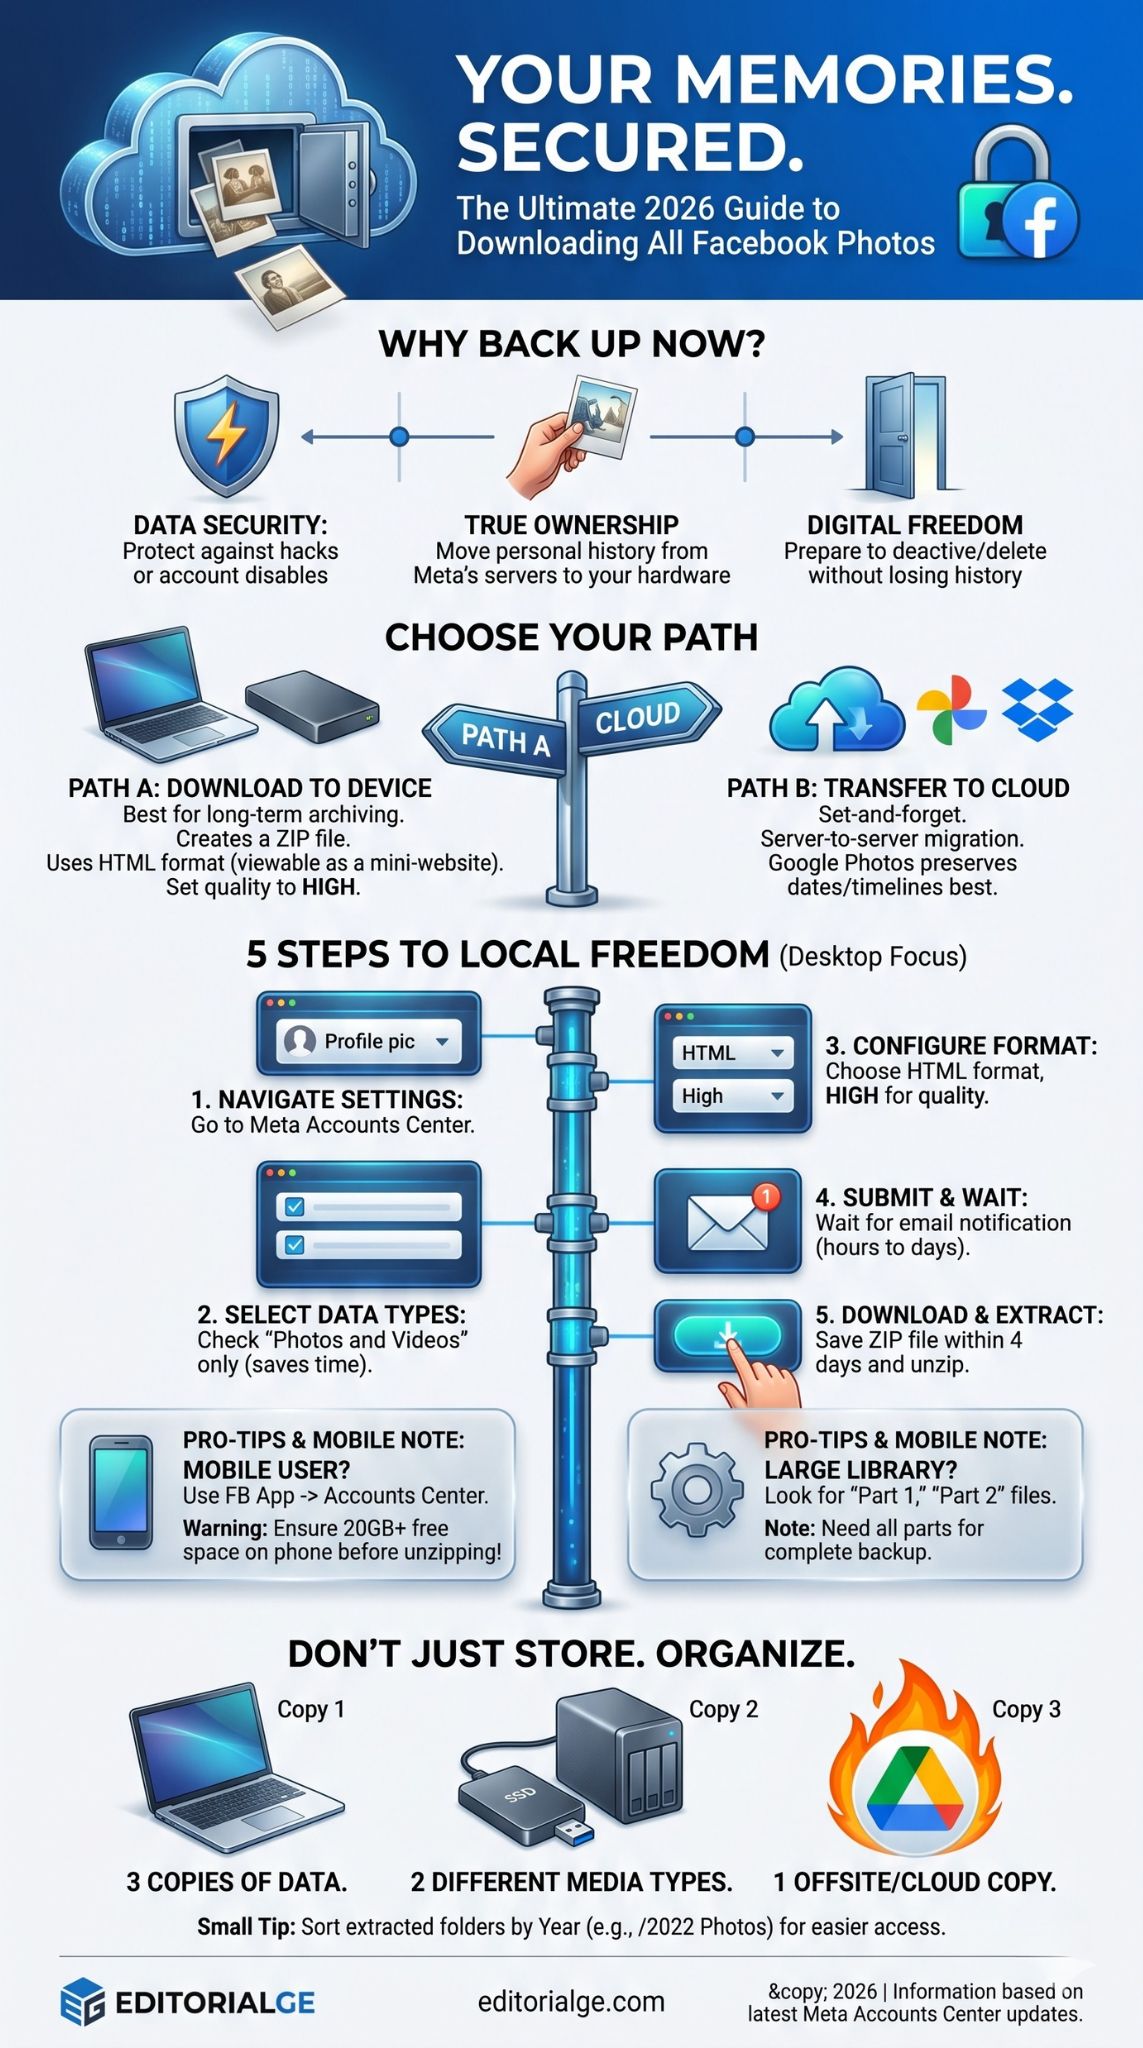
If the idea of handling ZIP files and hard drives sounds like a chore, you should use the transfer tool. This is a “set it and forget it” method that moves your photos from Meta’s servers directly to a service like Google Photos or Dropbox. It doesn’t use your phone’s battery or your home’s internet bandwidth because the data moves directly between the two companies. This is a fantastic way to download all facebook photos if you want them backed up in a searchable gallery.
|
Destination |
Best Usage |
Connectivity |
|
Google Photos |
Best for search and AI organization. |
Meta-to-Google API. |
|
Dropbox |
Best for traditional file/folder storage. |
Secure OAuth login. |
|
Koofr/Backblaze |
Best for long-term privacy and cold storage. |
Direct server transfer. |
|
iCloud |
Best for Apple-only users. |
Requires manual upload usually. |
Linking Your Google Account
When you choose “Transfer a copy of your information,” you will be asked to pick a destination. If you choose Google Photos, you will have to log in and give Facebook permission to add files to your library. Don’t worry—this doesn’t give Facebook access to your other Google data; it’s a one-way bridge for your media. Once the link is established, you can choose to move your entire library or just specific albums.
The Benefits of a Direct Transfer
The biggest perk here is the organization. When you download a ZIP file, you get folders that can be a mess. When you transfer to Google Photos, the service often recognizes the dates and locations of the images, placing them correctly in your timeline. This makes it much easier to find that one specific photo from 2016 without scrolling through thousands of unnamed files in a Windows folder. It’s the ultimate time-saver for busy people.
Sorting and Storing Your Archived Files
Once you have your photos, you aren’t done yet. A giant folder with 5,000 images is just a different kind of clutter. You need to spend some time organizing your archive so you can actually enjoy it. If you leave the files as they are, you will eventually forget what is in there or lose the drive. Proper storage and organization are what turn a pile of data into a digital family heirloom.
|
Organization Step |
Recommended Tool |
Purpose |
|
Unzipping |
WinRAR / 7-Zip / Native |
To access the raw image files. |
|
Renaming |
Bulk Rename Utility |
To change “IMG_9823” to something useful. |
|
Deduplication |
Duplicate Photo Finder |
To remove multiple copies of the same image. |
|
Physical Backup |
External SSD |
To ensure the files survive a computer crash. |
Dealing with ZIP Files and HTML Indexes
When you unzip your download, you will see a file called “index.html.” Open this first. It provides a clean interface that shows your captions, comments, and the dates the photos were posted. It is much easier than clicking through the “photos_and_videos” subfolders manually. If you just want the raw images, navigate to the subfolders, but keep that index file handy—it’s the only thing that preserves the “story” behind your pictures.
The Best Way to Organize by Date
Facebook’s folder structure can be a bit weird. It often groups photos by how they were uploaded (Mobile Uploads, Timeline Photos, Cover Photos). To make this useful, I recommend creating new folders on your computer by year (e.g., “2015 Photos,” “2016 Photos”). Drag the relevant albums into these folders. This makes your archive much more manageable and allows you to find specific milestones without a headache.
Advanced Tips for Large Photo Libraries
If you have been on Facebook since 2004, your library is likely massive. We are talking tens of thousands of photos. In this case, a standard download might fail or the file might be too big for a single ZIP. Facebook usually handles this by splitting your data into multiple parts (Part 1, Part 2, etc.). You must download every single part to get the complete picture. This is where a bit of technical patience goes a long way to download all facebook photos successfully.
|
Tip |
Description |
Benefit |
|
Check Part Numbers |
Ensure you download Part 1 through Part X. |
Avoids missing large chunks of media. |
|
External SSDs |
Use a Solid State Drive for storage. |
Much faster than old-school spinning drives. |
|
Verify Files |
Open a few random folders to check quality. |
Ensures the download didn’t corrupt. |
|
NAS Storage |
Use Network Attached Storage for home access. |
Allows everyone in the house to see the archive. |
Using an External SSD
Don’t just leave these photos on your laptop’s main drive. Laptops get stolen, they get dropped, and their drives eventually die. For about $60, you can get a high-speed external SSD. These are much more durable than the old clunky hard drives and are small enough to fit in a pocket. Copy your entire Facebook archive to one of these and keep it in a safe place, like a fireproof box or a desk drawer.
Why You Should Avoid Third-Party Apps
You might see ads for “Facebook Photo Downloader” apps or browser extensions. Be very careful with these. Most of them are designed to scrape your data or steal your login credentials. You don’t need them because Facebook’s native tools are now much better than they used to be. Stick to the official Accounts Center to keep your account secure and your data private.
Final Thoughts
Taking the time to download all facebook photos is one of the smartest digital moves you can make this year. We often forget that our social media profiles are essentially “rented” space. We don’t own the platform, and we don’t control its future. By grabbing a copy of your photos today, you are essentially buying insurance for your memories.
The process is simpler than it used to be, thanks to the Meta Accounts Center, but it still requires a little bit of patience. Whether you choose to download a ZIP file to your laptop or transfer everything to Google Photos, the important thing is that you have a second copy. Once you have your files, organize them, back them up on an external drive, and enjoy the peace of mind that comes with knowing your history is safe. Don’t wait for a security scare or a platform change to act—get your photos off the cloud and into your hands today.
FAQs
Can I download photos I was tagged in by other people?
No, the bulk download tool only includes photos that you personally uploaded to your account. If you want to save photos that friends tagged you in, you will have to go to those specific photos and download them individually using the “Save” or “Download” option on the image itself.
Will Facebook notify my friends if I download all my photos?
No, this is a completely private action. Facebook does not send notifications to your friends or followers when you request your data or transfer your photos to another service. It is a strictly personal administrative task.
My download keeps failing. What should I do?
Downloads usually fail due to a weak Wi-Fi connection or a lack of storage space on your device. Try using a computer with a wired ethernet connection if possible. Also, make sure you aren’t running out of space on your hard drive, as the ZIP files can be quite large.
Does downloading my photos delete them from my profile?
No, downloading is just making a copy. Your photos will remain on your Facebook profile exactly as they were. If you want them gone from the platform, you will have to manually delete the albums or delete your account after you have confirmed your download is safe.
Can I choose to only download videos?
Yes, when you are in the “Select types of information” menu, you can uncheck “Photos” and only check “Videos.” This is a great way to save time if you already have your photos backed up but realized you missed your old uploaded clips.