
Losing years of photos, important work messages, or your perfectly organized home screen layout is a stressful experience. Whether you have just unboxed a brand new device or you are desperately trying to recover missing data after a sudden software glitch, knowing how to properly move your data is a highly practical skill. Technology can be unpredictable, but Apple built safety nets to ensure your digital life remains intact.
In this comprehensive guide, we walk you through the entire process of getting your data back onto your phone safely. We cover the official methods using cloud storage, Mac computers, and Windows PCs. By the end of this article, you will have a clear understanding of the exact steps required to restore iphone backup smoothly and without unnecessary frustration.
Why You Might Need to Restore an iPhone Backup
There are plenty of reasons why you might need to wipe your device and pull data from an older save point. Maybe you bought the newest model and want all your old apps right where you left them on the home screen. Sometimes, a rogue software update wrecks your battery life, or you accidentally delete an important work document. Knowing the right way to manage this process saves you a lot of panic when these inevitable tech hurdles pop up.
|
Reason Category |
Description |
Common Scenarios |
|
Hardware Upgrades |
Moving data to a newer phone |
Buying a new device, getting an insurance replacement |
|
Data Recovery |
Getting deleted files back |
Accidentally deleting texts, losing old family photos |
|
System Fixes |
Clearing out persistent bugs |
Overheating issues, severe battery drain, apps crashing |
Upgrading to a New iPhone
The most common reason for this process is buying new hardware. When you transition from an older model to the latest release, you want your new phone to look and feel exactly like the old one. A full restore transfers your apps, messages, wallpapers, Wi-Fi passwords, and even your alarm clock settings. It makes the transition seamless. You basically pick up exactly where you left off the day before.
Recovering Lost or Deleted Data
Accidents happen to everyone. You might accidentally delete a crucial thread of text messages, remove a folder of cherished family photos, or lose a vital document stored locally on your device. If these files were not synced to a cloud service but were included in a recent save file, rolling back your device to that specific point in time is usually the only way to retrieve them. You lose any new data created after that save, but you get the older, more important files back.
Fixing Persistent iOS System Issues
Software bugs sometimes embed themselves deep within the operating system. You might experience severe battery drain, applications constantly crashing, or a touchscreen that behaves erratically for no physical reason. When standard troubleshooting steps like restarting the phone fail to resolve the issue, wiping the device clean and pulling down a stable save file flushes out corrupted data and gets your phone running smoothly again.
Essential Preparation Before You Restore
Jumping straight into a data transfer without checking your settings first is asking for trouble. You need to make sure your save files actually exist and that your new device has enough room to hold all your pictures, videos, and apps. Taking ten minutes to verify your passwords and update your software prevents hours of headaches later. If you want to successfully restore iphone backup, doing this prep work is absolutely non-negotiable. A tech savvy user always checks these details first.
|
Preparation Step |
Why It Matters |
How to Check |
|
Verify Data Exists |
Ensures you actually have files to pull |
Check cloud settings or Finder software history |
|
Check Storage Size |
Prevents mid-transfer failure |
Look at device settings under general storage |
|
Gather Passwords |
Needed to bypass activation lock |
Have main account and encryption passwords ready |
|
Update Software |
Avoids version compatibility errors |
Look under general settings for software updates |
Verify Your Backup Exists
Timing is critical here. Before you wipe your current device or begin setting up a new one, you need to confirm that a valid save point actually exists. If you are trying to recover a text message deleted yesterday, you need a file created before that deletion occurred. To check your cloud saves, open your settings application, tap on your name at the very top of the screen, navigate to the cloud settings, and look for the backup section. Here, you will see a timestamp indicating the last successful sync.
Ensure Sufficient iPhone Storage Capacity
A very common reason for a failed transfer is a simple lack of physical space. Cloud files are heavily compressed. A file that takes up fifty gigabytes in the cloud expands to take up significantly more space once it unpacks onto your device. If you try to squeeze a massive amount of data onto a phone with a smaller storage capacity, the process will inevitably fail. Always check the storage capacity of your target device before beginning the download.
Read Also: How to Unsend iMessages on iPhone in 2026
Have Your Passwords Ready
Security protocols require authentication at multiple stages of this process. You will need your main account credentials, including your email address and password. If you have two-factor authentication enabled, you also need a trusted device to receive a temporary verification code. Additionally, if you use a computer and you previously chose to encrypt your local files to protect sensitive health data, you absolutely need that specific encryption password to unlock it.
Update Your iOS Software
You cannot load data made on a newer version of the operating system onto a device running an older version. If your previous phone was running the latest software update, but your new phone has been sitting in a box for months and is running an older version, the system blocks the transfer. You need to set the new phone up as a blank device first, run the software update, erase it completely, and then begin the process over again.
How to Restore iPhone from Backup via iCloud
Pulling your data from the cloud is the most popular method because you do not need to plug into a computer. As long as you have a strong Wi-Fi connection and a charging cable, you can grab your data from anywhere in the world. Just keep in mind that larger storage capacities take a longer time to download over the internet. This is generally the easiest way to restore iphone backup for most folks who travel or do not own a laptop.
|
Step |
Action |
Important Note |
|
Erase Device |
Factory reset the phone |
Only required if phone is already set up and running |
|
Initial Setup |
Connect to a stable Wi-Fi network |
Do not use cellular data for massive downloads |
|
Select Restore |
Choose the cloud option |
Pick the correct date and time from the list |
|
Wait Patiently |
Leave the phone plugged into power |
Background downloads continue for several days |
Step 1: Erase Your iPhone (If Already Set Up)
If you are holding a brand new device that is still displaying the welcome screen, you skip this step completely. However, if you are currently using the phone and need to roll back to a previous state, you must wipe the slate clean first. Navigate to your general settings, scroll to the bottom, and select the option to transfer or reset your device. Choose to erase all content. You will be prompted to enter your device passcode to authorize the wipe.
Step 2: Power On and Follow Initial Setup
Once your device restarts, you are greeted by the classic welcome screen flashing in multiple languages. Swipe up to begin. You need to select your preferred language and your country. The setup assistant ~ a very helpful built-in guide ~ asks you to connect to a Wi-Fi network. Do not use cellular data for this process, as the amount of data being transferred is massive and causes network instability. Connect to a strong home network.
Step 3: Choose “Restore from iCloud Backup”
After configuring face recognition or fingerprint security, you arrive at a screen titled Transfer Your Apps and Data. This is the main junction for the process. Do not choose to set up as a new device. Instead, select the option clearly labeled for pulling from a cloud save.
Step 4: Sign In and Select the Correct Backup File
The system asks you to authenticate your identity. Enter the email address associated with your account and type in your password. Once authenticated, the screen populates with a list of available files. Carefully review the dates, times, and sizes of these files. Select the one that makes the most sense for your current situation. Once you tap your choice, the transfer initiates immediately.
Step 5: Keep the Device Connected to Wi-Fi and Power
A progress bar appears on your screen indicating the estimated time remaining. The time it takes varies wildly depending on the speed of your internet connection and the sheer volume of data being downloaded. It could take fifteen minutes, or it could take a few hours. It is imperative that you plug your phone into a wall charger and leave it connected to the Wi-Fi network until the progress bar completes.
What Happens After the Initial iCloud Restore?
It is important to understand that the initial progress bar only represents the core system settings and text messages. When your phone restarts and you see your home screen, the process is not actually over. Your applications appear greyed out with small loading icons next to them. Your phone works in the background to download the applications from the store and pull your high-resolution photos. Keep it connected to Wi-Fi and power as much as possible over the next few days.
How to Restore iPhone from Backup on Mac (Using Finder)
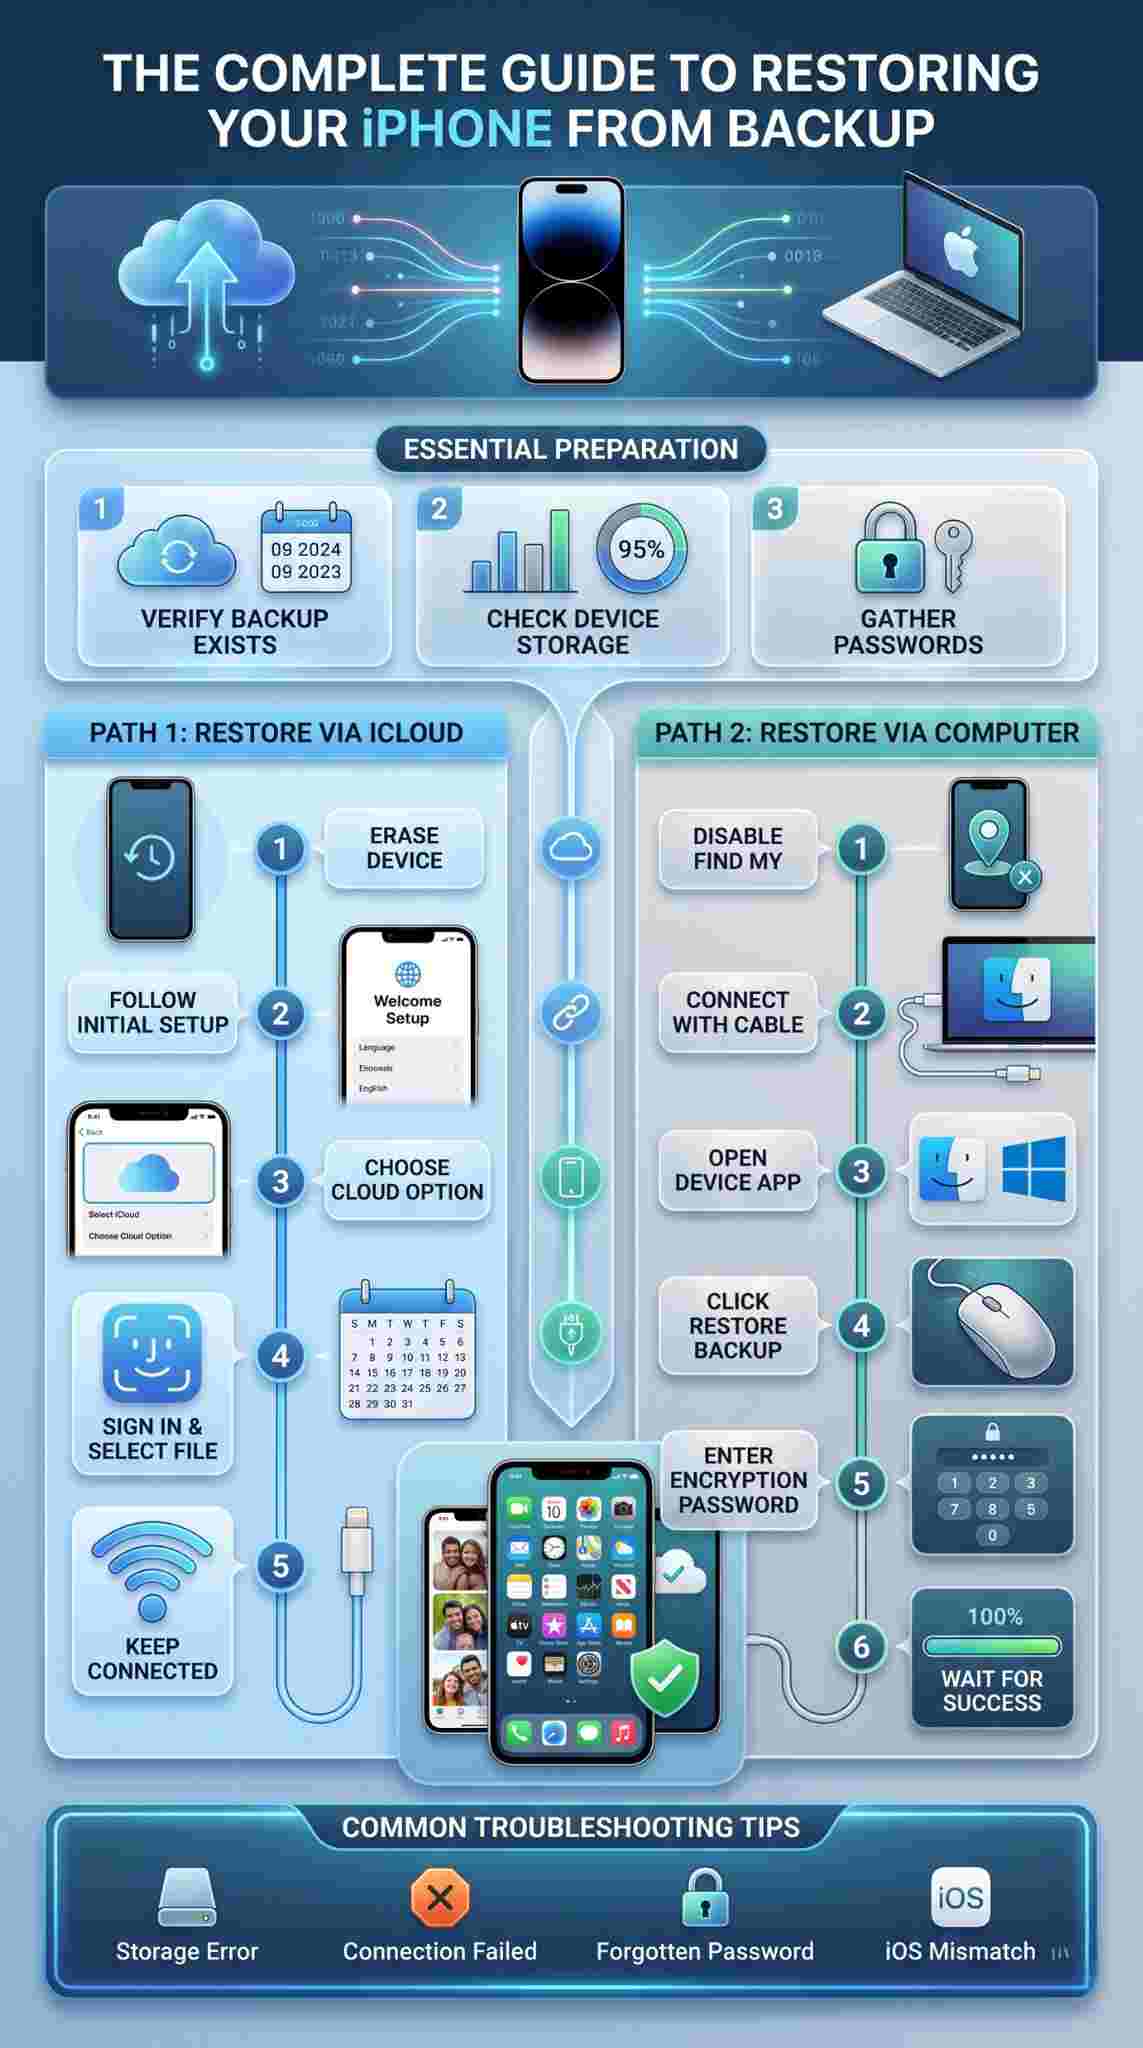
For folks who prefer keeping their data off the cloud, a direct cable connection to a Mac is incredibly fast and secure. Apple removed older media management software from modern Mac computers a few years ago, so now you manage everything directly through your file system. This local method pushes the data directly over the wire, which is perfect if you have slow home internet or strict data caps.
|
Step |
Action |
Requirement |
|
Disable Tracking |
Turn off the location tracking feature |
Needs your main account password to authorize |
|
Connect Cable |
Plug phone into the Mac computer |
Use a certified data cable, not a cheap charging cable |
|
Open Finder |
Locate device in the sidebar |
Trust the computer on both the Mac and the phone screen |
|
Push Data |
Click the restore button in the panel |
Enter your specific encryption password if prompted |
Step 1: Disable Find My iPhone
If you are putting data onto a phone you are currently using, Apple requires you to turn off the tracking feature first. This is a security measure to prevent unauthorized users from overriding a stolen device. Go into your settings, tap your name, select the tracking feature, and toggle it off. You need your account password to authorize this action before the computer allows you to proceed.
Step 2: Connect Your iPhone to Your Mac
Take a high-quality data cable and plug one end into your phone and the other into your Mac. The first time you do this, your phone displays an alert asking if you trust the connected computer. Tap the option to trust the computer and enter your device passcode to establish a secure, encrypted connection between the two pieces of hardware.
Step 3: Open Finder and Locate Your Device
Open a new Finder window on your Mac desktop. Look at the sidebar on the left side of the window. Under the locations section, you should see your device listed. Click on it. If you have not connected the two devices recently, you might be prompted to pair them, which requires clicking a confirmation button on both screens.
Step 4: Click on “Restore Backup”
Once your device dashboard loads in the Finder window, ensure you are on the general tab. Look for the section dedicated to managing local files. Here, you see a clearly marked button giving you the option to load a previous save state. Click this button to open the selection menu.
Step 5: Choose the Backup and Enter Your Password
A drop-down menu appears on your computer screen listing all the locally stored files. Click the menu and select the specific date and time you wish to use. If you previously checked the box to encrypt your local files, the system prompts you to enter the encryption password you created at that time. Carefully type in the password to unlock the file.
Step 6: Wait for the Process to Complete
After you confirm your selection, the computer begins transferring the data through the cable. Do not disconnect the cable under any circumstances while this is happening. An interruption corrupts the data and forces you to start the entire process over from scratch. Wait until the computer indicates the transfer is finished and your phone successfully reboots.
How to Restore iPhone from Backup on Windows PC
Windows users can manage Apple hardware just as easily as Mac users, though the software looks a bit different. Depending on how old your computer is, you will either use the modern device management application or the legacy media software. Both programs do exactly the same thing when you plug in your phone, allowing you to quickly move large amounts of data over a wired connection.
|
Software Type |
Best Used For |
Key Feature |
|
Apple Devices App |
Windows 10 and Windows 11 |
Modern, lightweight interface dedicated to hardware |
|
Legacy iTunes |
Older Windows operating systems |
All-in-one media player and hardware management tool |
Using the Apple Devices App for Modern Windows
If you run Windows 10 or Windows 11, Apple transitioned away from their older, bulky software and introduced a streamlined application specifically designed for managing mobile hardware. This is the recommended route for modern PC users.
Connect Your iPhone and Open the App
Plug your phone into your Windows PC using a reliable data cable. Open the management application from your Start menu. Just like on a Mac, you must unlock your phone, tap the prompt to trust the computer, and enter your passcode so the software recognizes the hardware.
Inside the application, click on your device in the sidebar to open the management dashboard. Click on the general tab. In the main viewing area, look for the section dedicated to local files and click the button to initiate the transfer. Select the correct file from the drop-down menu and allow the software to push the data onto your phone. Keep the cable securely connected until the device restarts.
Using iTunes for Older Windows Versions
If you use an older version of Windows or have not yet downloaded the newer application, the legacy software is still perfectly capable of handling this task without any major issues.
Connect to iTunes and Access the Device Icon
Launch the application on your PC. Connect your phone using a USB cable. Once the software recognizes the hardware, a small icon resembling a smartphone appears near the top left corner of the application window. Click this icon to access your main device summary page.
Select Restore Backup in the Summary Panel
In the main summary panel, locate the section dedicated to managing your data saves. Click the prominent button to load your information. Choose the appropriate date from the list provided, enter any required encryption passwords, and click confirm. Watch the progress bar in the display window and do not unplug the device until the sync is entirely complete.
Common Issues and How to Troubleshoot Them
Even if you follow every step perfectly, tech can still throw a wrench into your plans. Connections drop, passwords get forgotten, and storage limits get reached faster than you expect. Knowing how to troubleshoot these common errors keeps a minor hiccup from ruining your entire day. Let us look at what goes wrong when you try to restore iphone backup and how you fix it fast.
|
Common Issue |
Likely Cause |
Suggested Solution |
|
Storage Error Alert |
Target phone memory is too small |
Set up as a new phone, use manual sync services instead |
|
Wi-Fi Drops Mid-Download |
Unstable home internet router |
Move closer to the router or restart the entire process |
|
Password Lost |
Forgot local encryption key |
Try old passwords or you must abandon the locked file |
|
Version Mismatch |
Save file is from a newer iOS version |
Update the target phone as a new device first, then erase |
The “Not Enough Storage to Restore” Error
This is incredibly frustrating but completely logical. If you receive a warning that your target device lacks the necessary storage space, the process halts immediately. You cannot force a massive amount of data onto a small phone. If you move to a device with smaller capacity, you cannot use a full copy. Instead, you need to set the phone up as new and rely on individual sync services to pull down only your essential contacts, calendars, and photos.
Wi-Fi Disconnections During an iCloud Restore
Pulling heavy data from the internet requires a rock-solid connection. If your home router drops the signal, or if you walk out of range, the download pauses. Sometimes, it pauses indefinitely and fails to resume even when the connection is reestablished. If your download seems frozen for an extended period, the best course of action is to completely erase the device and start the setup process over from the beginning.
Forgotten Encrypted Computer Backup Password
When you choose to encrypt a local save on a Mac or PC, the software warns you heavily that the password cannot be recovered. If you are prompted for this password during restoration and you cannot remember it, you are effectively locked out of that specific data file. There is no forgotten password link for this. If you absolutely cannot guess it, you have to abandon that file and look for an older, unencrypted save.
iOS Version Incompatibility Alerts
As mentioned in the preparation section, data saved from a newer operating system cannot load onto an older operating system. If you receive an incompatibility alert, simply unplug the device or cancel the setup assistant. Set the phone up as a completely new, blank device without transferring anything. Go into the general settings, run the software update to install the latest version, and once the update is complete, erase the phone and try again.
Final Thoughts
Retrieving your digital life does not have to be a daunting or overly complicated task. By verifying your storage capacity, ensuring your software is up to date, and choosing the method that best fits your current situation, you navigate this process with total confidence. Whether you rely on the wireless convenience of the cloud or the secure speed of a hardwired computer connection, following these detailed steps ensures your photos, messages, and settings return to your device exactly where they belong.
|
Best Practice |
Main Benefit |
|
Enable Daily Syncs |
You never lose more than a single day of text messages |
|
Delete Old Videos |
Keeps your storage requirements low for faster transfers |
|
Inspect Cables |
Prevents random disconnects that corrupt local computer files |
Moving Forward With Your Data
Remember to practice good data management moving forward by enabling automatic daily cloud syncs or plugging your device into your computer regularly. That way, you are always prepared for whatever hardware failures the future holds. Knowing how to quickly restore iphone backup gives you peace of mind, knowing that your digital memories and important work documents are never truly lost to a sudden glitch or a shattered screen. ~ Keep your data safe, and your devices run smoothly ~ as the saying goes.
Frequently Asked Questions (FAQs)
We get a lot of questions about this topic, especially from folks doing it for the very first time. The process seems a bit scary since you are erasing a device completely. Here are some of the less common but highly important questions users ask when dealing with their digital data and trying to get their phone working perfectly again.
|
FAQ Topic |
Question Focus |
|
Digital SIMs |
What happens to eSIM profiles during a wipe |
|
Hardware Heat |
Why the phone gets incredibly warm during transfers |
|
App Freezing |
Dealing with applications stuck on the waiting screen |
|
Data Merging |
Whether you can combine two different save states |
What happens to my eSIM when I wipe my device?
When you go into the settings to erase your device, the system specifically asks if you want to keep your eSIM data or delete it. If you are keeping the phone and just wiping it to fix a software bug, choose to keep the cellular plan. If you are trading the phone in, you should delete it. If you accidentally delete it, you have to contact your cellular provider to issue a new digital SIM card.
Why is my phone getting so hot during the download?
This is completely normal. Pulling down gigabytes of data over Wi-Fi, unpacking compressed files, and indexing millions of photos puts a heavy load on the internal processor. The battery also works hard during this time. As long as the phone does not display a specific temperature warning screen that locks you out, just leave it plugged in and let it finish its heavy lifting. It cools down once the background indexing finishes.
Can I merge two different saves together?
No, Apple does not allow you to merge data from two different points in time. When you apply a save file to a phone, it completely overwrites whatever is currently on the device. You cannot take photos from a file made in 2023 and merge them with text messages from a file made in 2025. You have to pick one specific point in time and accept that layout.
Why are my apps stuck on “Waiting” for hours?
After the home screen loads, apps turn dark and say they are waiting. The phone downloads them sequentially to manage bandwidth. If an app is stuck for an unusually long time, you can usually pause the download by tapping the app icon once, and then tap it again to resume. If that fails, restarting the phone often forces the download queue to refresh and begin moving again.