Your iPhone was fine a minute ago. Then it showed a cable-and-computer screen. Or maybe it restarted during an iOS update and never came back to the Home Screen.
That screen can make your stomach drop. Your photos, chats, notes, banking apps, and work files suddenly feel trapped.
But take a breath. An iphone stuck recovery mode issue doesn’t always mean your iPhone is dead. Most of the time, it happens after a failed iOS update, a bad cable connection, low storage, a drained battery, or a software crash.
The risky part is choosing the wrong fix too soon.
Many people panic and click Restore right away. That can erase the phone. A better move is to start with safer steps first. Try a force restart. Then try Update from a computer. Check the cable, port, and software. Use Restore only when the safer options fail.
This guide walks you through the process step by step.
What Does Recovery Mode Mean on iPhone?
|
Key Point |
What It Means |
|
Recovery mode is a repair screen |
It helps your computer fix or reinstall iOS |
|
It is not a normal restart |
Your iPhone needs Finder, Apple Devices, or iTunes |
|
Update is the safer option |
It tries to keep your data |
|
Restore is stronger but risky |
It erases the iPhone and installs iOS again |
|
Hardware can also be involved |
A bad port, button, battery, or board can cause repeat issues |
Recovery mode is a built-in repair state on the iPhone. You’ll usually see a cable pointing toward a computer. Some people call it the “connect to computer” screen.
Your iPhone enters this mode when iOS can’t start properly. It may also appear when an update or restore fails.
You may see recovery mode after:
- A failed iOS update
- A failed restore
- A frozen Apple logo
- A black screen problem
- A restart loop
- A broken computer connection
- An update that stopped halfway
Recovery mode looks scary, but it exists to help. It gives your Mac or Windows PC a way to repair iOS.
Still, it’s not something to click through blindly. The choice between Update and Restore matters.
Recovery Mode vs DFU Mode
Recovery mode and DFU mode are not the same.
Recovery mode is the normal repair route. It lets your computer update or restore iOS.
DFU mode goes deeper. It can reload firmware-level software. Most users don’t need it unless recovery mode fails.
Start with recovery mode. Don’t jump into DFU mode unless you understand the risk.
Why Your iPhone Gets Stuck in Recovery Mode
|
Cause |
What Usually Happens |
Best First Move |
|
Failed iOS update |
iPhone shows recovery screen after updating |
Try Update from a computer |
|
Bad USB cable |
Computer loses connection during repair |
Try another Apple or certified cable |
|
Weak USB port |
iPhone appears and disappears |
Use another port |
|
Low storage |
Update can’t finish properly |
Update through a computer |
|
Battery problem |
iPhone shuts down during update |
Charge first, then retry |
|
Dirty or damaged port |
Cable feels loose |
Check the charging port |
|
Software corruption |
iPhone loops back to recovery mode |
Try Update first |
|
Hardware fault |
Restore errors keep repeating |
Contact Apple Support |
An iPhone usually gets stuck in recovery mode because iOS can’t load cleanly.
A failed update is one of the most common causes. If the phone loses power, runs out of space, or disconnects during the update, it may boot into recovery mode instead of the Home Screen.
A weak cable can cause the same mess. During an update or restore, the iPhone and computer need a steady connection. If the cable disconnects even once, the repair can fail.
Storage can also trigger problems. iOS needs free space to download, unpack, and install files. If your iPhone was almost full, the update may crash.
Sometimes the issue is physical. A worn battery, damaged charging port, stuck button, or internal hardware fault can push the phone back into recovery mode again and again.
Warning Signs Before Recovery Mode Appears
You may notice these clues first:
- The Apple logo stays on screen too long
- The phone restarts by itself
- Updates fail often
- Battery drops suddenly
- The cable only works at one angle
- The computer keeps losing connection
- The phone freezes during setup
- Storage warnings keep appearing
These signs help you spot the real cause. A cable issue needs a different fix than a software crash. A hardware fault won’t go away with endless restores.
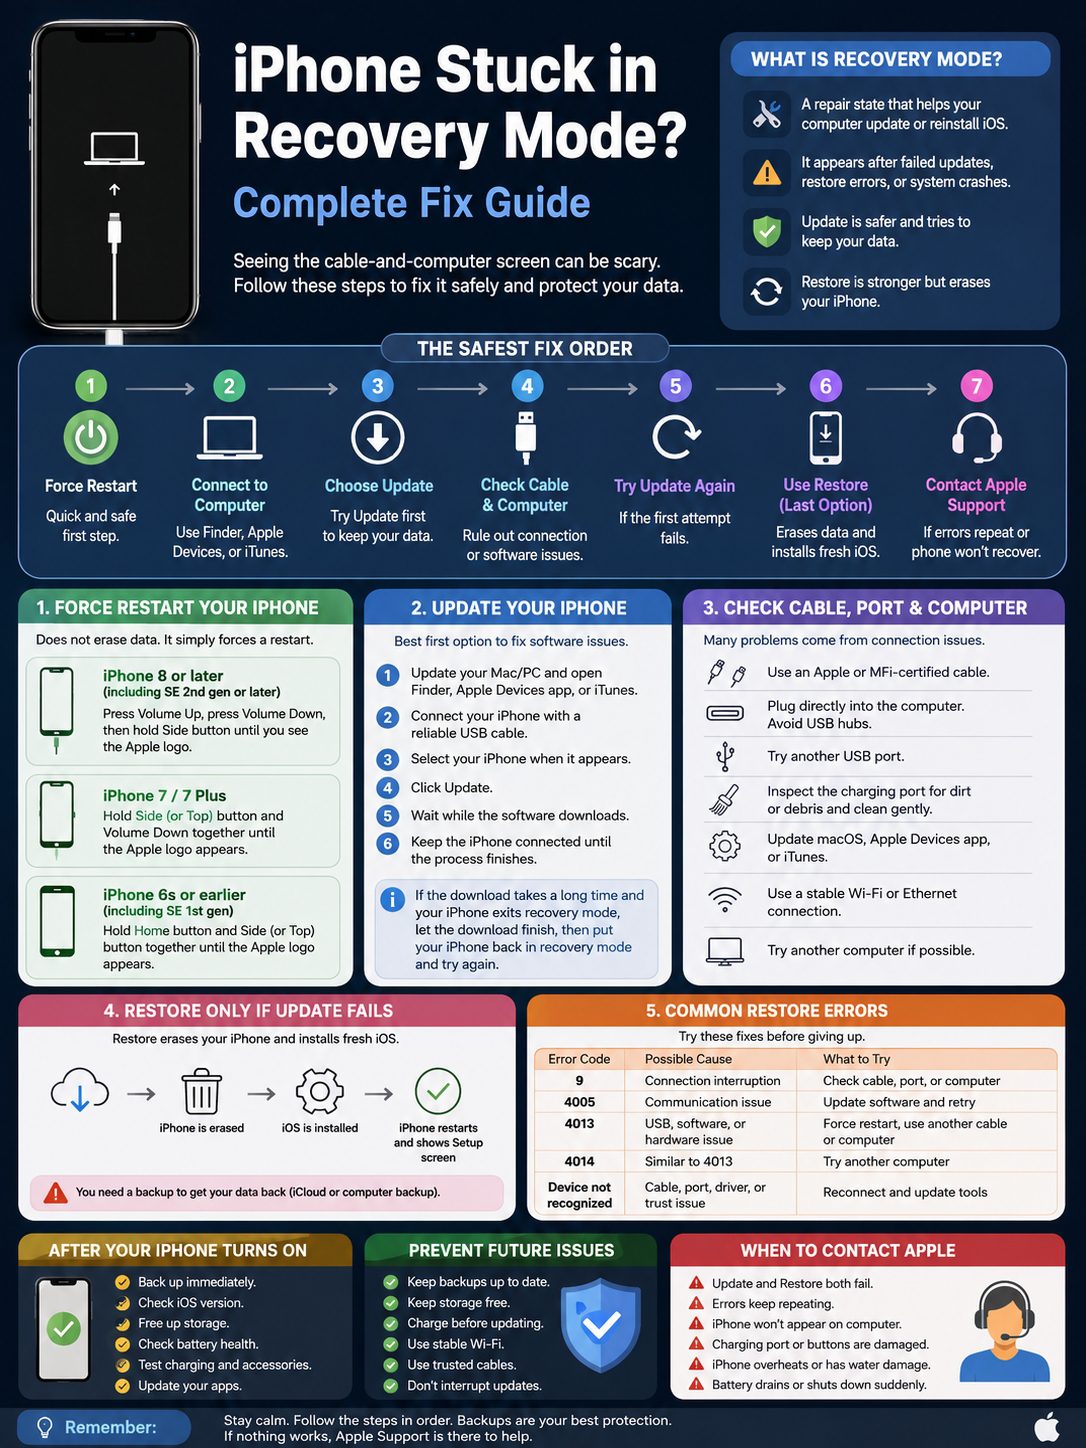
iPhone Stuck Recovery Mode: The Safest Fix Order
|
Step |
Data Risk |
When to Try It |
|
Force restart |
Very low |
First step |
|
Update from computer |
Lower risk |
If force restart fails |
|
Check cable and computer |
No data risk |
Before Restore |
|
Restore |
High risk |
If Update fails |
|
Apple service |
Depends on repair |
If errors repeat |
When your iPhone is stuck, the order of fixes matters.
Start with the least risky option. Then move to stronger fixes only when needed.
Follow this order:
- Force restart the iPhone.
- Connect it to a computer.
- Choose Update first.
- Check the cable, port, and computer software.
- Try Update again if needed.
- Use Restore only if Update fails.
- Contact Apple if Restore keeps failing.
This order protects your data as much as possible. It also follows the safest repair logic: try to update before you erase.
What You Should Not Do
Avoid these mistakes:
- Don’t unplug the phone during an update or restore.
- Don’t keep pressing random buttons.
- Don’t click Restore before you understand the risk.
- Don’t trust unknown tools that ask for your Apple Account password.
- Don’t ignore repeated error codes.
- Don’t assume every issue is software.
If the iPhone returns to recovery mode after a full restore, the issue may be hardware.
Fix 1: Force Restart Your iPhone
|
iPhone Model |
Force Restart Steps |
|
iPhone 8 or later |
Press Volume Up, press Volume Down, hold Side button |
|
iPhone SE 2nd gen or later |
Same as iPhone 8 or later |
|
iPhone 7 and 7 Plus |
Hold Side/Top button and Volume Down |
|
iPhone 6s or earlier |
Hold Home and Side/Top button |
|
iPhone SE 1st gen |
Hold Home and Side/Top button |
A force restart is the best first move. It does not erase your data. It simply forces the iPhone to reboot when the system is frozen.
For iPhone 8 or later:
- Press and quickly release Volume Up.
- Press and quickly release Volume Down.
- Hold the Side button.
- Release it when the Apple logo appears.
For iPhone 7 or iPhone 7 Plus:
- Hold the Side or Top button.
- Hold Volume Down at the same time.
- Release both buttons when the Apple logo appears.
For iPhone 6s or earlier:
- Hold the Home button.
- Hold the Side or Top button at the same time.
- Release both buttons when the Apple logo appears.
If your iPhone starts normally, back it up right away. Then check storage and update iOS later when the phone is stable.
If it returns to recovery mode, move to the computer update step.
What If the Buttons Feel Stuck?
A stuck button can keep triggering recovery mode.
Try this:
- Remove the case.
- Check if any button is pressed down.
- Wipe around the button with a dry cloth.
- Don’t use sharp tools.
- Don’t press harder.
If a button feels broken or jammed, stop troubleshooting. A software fix won’t repair a physical button.
Fix 2: Choose Update First on a Computer
|
Option |
What It Does |
Data Risk |
Best Use |
|
Update |
Reinstalls iOS without trying to erase data |
Lower |
First computer-based fix |
|
Restore |
Erases the iPhone and installs iOS fresh |
High |
Last software fix |
|
Restore from backup |
Brings data back after erase |
Depends on backup |
After a successful Restore |
When your iPhone appears in Finder, Apple Devices, or iTunes, you may see two options: Update and Restore.
Choose Update first.
Update tries to reinstall iOS while keeping your data. It can repair damaged system files without wiping the phone.
This is the best next step if your iphone stuck recovery mode problem started after an update, restart loop, or frozen Apple logo.
Which App Should You Use?
Use the tool that matches your computer:
- Mac with newer macOS: Use Finder.
- Windows PC: Use the Apple Devices app.
- Older Windows or older macOS: Use iTunes.
Before you start, update your computer. Also update the Apple Devices app or iTunes if needed.
How to Update an iPhone in Recovery Mode
Follow these steps:
- Connect your iPhone to the computer with a reliable USB cable.
- Open Finder, Apple Devices, or iTunes.
- Select your iPhone when it appears.
- Choose Update.
- Wait while the computer downloads iOS.
- Keep the iPhone connected.
- Let the process finish.
Read Also: How to Find Saved Passwords on iPhone in 2026
Don’t unplug the phone. Don’t close your laptop. Don’t let the computer sleep.
If the download takes a while, your iPhone may leave recovery mode. That can happen. Let the computer finish downloading the software. Then put the iPhone back into recovery mode and choose Update again.
Fix 3: Check the Cable, Port, Computer, and Internet
|
Item |
Why It Matters |
What to Do |
|
USB cable |
A weak cable can break the repair process |
Try another Apple or certified cable |
|
USB port |
Loose ports can disconnect the phone |
Try another port |
|
Charging port |
Dirt or damage can block connection |
Check for debris |
|
Computer software |
Old tools may fail to detect iPhone |
Update macOS, Apple Devices, or iTunes |
|
Security software |
It may block Apple server contact |
Pause only if needed |
|
Internet |
iOS download must finish properly |
Use stable Wi-Fi or Ethernet |
Many recovery mode problems come from the cable or computer, not the iPhone.
The repair process needs a steady connection. If your cable is loose, damaged, or low quality, the update can fail. If the USB port is weak, the phone may appear and disappear from the computer.
Try these checks before you restore:
- Use another cable.
- Plug directly into the computer.
- Avoid USB hubs.
- Try another USB port.
- Restart the computer.
- Update macOS, Apple Devices, or iTunes.
- Use a stable internet connection.
- Try another computer if possible.
Check the Charging Port Safely
Look inside the charging port with a flashlight. Lint and dust can block a solid connection.
Be careful here.
Don’t use metal tools. Don’t pour liquid into the port. Don’t scrape aggressively.
A safe approach:
- Unplug all cables.
- Turn off the iPhone if possible.
- Wipe the outside with a soft, dry, lint-free cloth.
- If you see debris, remove it gently.
- Try the cable again.
If the cable still feels loose, the port may need service.
Fix 4: Restore the iPhone Only If Update Fails
|
Restore Fact |
What It Means |
|
Restore erases the iPhone |
Photos, apps, settings, and local files are removed |
|
It installs fresh iOS |
The phone gets a clean system |
|
You need a backup |
Your backup decides what comes back |
|
It may still fail |
Repeated errors can point to hardware |
|
Activation Lock may appear |
You may need the Apple Account used on the phone |
Restore is the stronger fix. It can repair serious software damage, but it usually erases the iPhone.
Use Restore only when:
- Update fails
- The phone returns to recovery mode after Update
- Your computer says the iPhone must be restored
- You already have a recent backup
- You accept the risk of data loss
This is where many people make a painful mistake. They click Restore too fast, then realize their latest backup is old.
If your data is not backed up and Update fails, you may not have a simple way to save it. That’s why Update always comes first.
How to Restore from Recovery Mode
Follow these steps:
- Connect the iPhone to your computer.
- Open Finder, Apple Devices, or iTunes.
- Select your iPhone.
- Choose Restore.
- Confirm the warning.
- Keep the phone connected.
- Wait for iOS to install.
- Set up the iPhone after it restarts.
After Restore, you can set it up as new or restore from a backup.
If you use iCloud Photos, your photos may sync back after you sign in. If you use WhatsApp, Google Photos, OneDrive, Dropbox, or Messenger, open those apps and check their backup settings.
Fix 5: Handle Common Restore Errors
|
Error or Alert |
Possible Cause |
Best Action |
|
Error 9 |
Connection interruption |
Try another cable, port, or computer |
|
Error 4005 |
Update or restore communication issue |
Update computer software and retry |
|
Error 4013 |
USB, software, or hardware issue |
Force restart, retry, check cable |
|
Error 4014 |
Similar to 4013 |
Try another computer |
|
Device not recognized |
Cable, port, driver, or trust issue |
Reconnect and update tools |
|
Restore fails repeatedly |
Possible hardware fault |
Contact Apple Support |
Restore errors look worse than they sound. Most users don’t know what error 4013 or 4014 means, and that’s fair.
Focus on the pattern. Did the error happen once? Or does it keep coming back after you changed the cable, port, and computer?
Start with the basics:
- Restart the computer.
- Update the computer.
- Update Apple Devices or iTunes.
- Use another cable.
- Use another USB port.
- Avoid USB hubs.
- Try another computer.
- Check your internet.
- Turn off VPN temporarily if it blocks Apple server access.
If the same error appears on different computers and cables, stop repeating the same restore. The phone may have a hardware fault.
When Error 4013 or 4014 Is Serious
Errors 4013 and 4014 can appear during iPhone restore. They may come from a bad connection, outdated software, or hardware damage.
Try this order:
- Update the computer.
- Force restart the iPhone.
- Use a known good cable.
- Plug directly into the computer.
- Try Update again.
- Try Restore only if Update fails.
- Try another computer.
- Contact Apple if the error returns.
If your iPhone was dropped, exposed to water, repaired recently, or had battery issues, mention that when you contact support.
What to Do After Your iPhone Turns On Again
|
Step |
Why It Matters |
|
Back up immediately |
Protects your data after the scare |
|
Check iOS version |
Confirms the repair worked |
|
Free storage |
Helps prevent update failure |
|
Check battery health |
Weak battery can cause shutdowns |
|
Test charging |
Confirms a stable connection |
|
Update apps |
Reduces crashes after iOS repair |
Once your iPhone starts normally, don’t just move on. Use that moment to protect your data.
First, back up the phone. Use iCloud Backup, a Mac backup, or a Windows backup through Apple Devices or iTunes.
Then check storage:
- Open Settings.
- Tap General.
- Tap iPhone Storage.
- Delete unused apps, large videos, and old downloads.
Try to keep several GB free. A nearly full iPhone is more likely to struggle during updates.
Next, check battery health:
- Open Settings.
- Tap Battery.
- Tap Battery Health and Charging.
If the battery is weak, your iPhone may shut down during demanding tasks. That can create update and startup problems again.
If Data Is Missing After Restore
Some data takes time to return.
Check these areas:
- iCloud Photos
- iCloud Drive
- Messages in iCloud
- Notes account settings
- WhatsApp backup
- Google Photos backup
- OneDrive or Dropbox sync
- App Store downloads
- Mail account login
Keep the iPhone on Wi-Fi and plugged into power. Large backups can take hours to finish.
When You Should Contact Apple Support
|
Situation |
Why It Matters |
|
Update and Restore both fail |
Software repair did not work |
|
Error codes repeat |
Hardware may be involved |
|
Computer never detects iPhone |
Port or board issue may exist |
|
Cable feels loose |
Charging port may be damaged |
|
Buttons are stuck |
Recovery mode may be triggered physically |
|
iPhone overheats |
Battery or internal fault may exist |
|
Water exposure happened |
Moisture damage can cause loops |
Some iphone stuck recovery mode cases can’t be fixed at home.
Contact Apple Support or visit an authorized service provider if:
- The phone keeps returning to recovery mode
- Restore fails on more than one computer
- Error 4013 or 4014 keeps showing
- The cable connection is unstable
- The charging port looks damaged
- The phone was dropped
- The phone had water exposure
- The battery drains suddenly
- Buttons are stuck or broken
Don’t keep restoring the phone again and again. If the same error returns after using different cables and computers, repeated attempts won’t do much.
Be Careful With Third-Party “Exit Recovery Mode” Tools
You’ll find plenty of tools online that promise a one-click fix.
Some may help with simple software loops. But don’t treat them like magic.
Before using any tool, check:
- Who made it
- Whether it explains data-loss risks
- Whether it supports your iOS version
- Whether real users trust it
- Whether it asks for your Apple Account password
- Whether it installs unknown profiles
- Whether it explains Update vs Restore clearly
Avoid tools that promise guaranteed data recovery after a full erase. That’s not realistic.
Never give your Apple Account password to unknown software.
How to Prevent Recovery Mode Problems Later
|
Prevention Tip |
Simple Habit |
|
Keep backups current |
Turn on iCloud Backup or back up to a computer |
|
Keep storage free |
Don’t run updates on a nearly full iPhone |
|
Charge before updating |
Use at least 50% battery or plug in |
|
Use stable Wi-Fi |
Avoid weak networks during updates |
|
Use trusted cables |
Avoid loose, damaged, or uncertified cables |
|
Don’t interrupt updates |
Let the iPhone finish fully |
The best fix is prevention.
Before your next iOS update, do this:
- Back up the iPhone.
- Free up storage.
- Charge the phone.
- Use stable Wi-Fi.
- Keep the phone plugged in.
- Don’t restart it during installation.
- Wait if the Apple logo stays for a while.
A recent backup changes everything. Without one, every restore feels risky. With one, recovery mode becomes annoying, not terrifying.
Best Backup Setup for Most Users
Use two backup layers if you can:
- iCloud Backup for automatic daily backup
- Computer backup before major updates or repairs
If you have important photos or business files, add one more layer:
- Google Photos
- OneDrive
- Dropbox
- External drive export
- Manual photo transfer
It may feel boring today. It feels priceless when your phone gets stuck tomorrow.
Final Thoughts
|
Main Lesson |
What to Remember |
|
Start safe |
Force restart first |
|
Protect data |
Choose Update before Restore |
|
Check basics |
Cable, port, computer, and internet matter |
|
Restore carefully |
Restore usually erases data |
|
Get help when needed |
Repeated errors may mean hardware trouble |
|
Back up often |
A backup is your real safety net |
An iphone stuck recovery mode problem feels scary, but it has a clear fix path.
Start with a force restart. Then connect the iPhone to a computer and choose Update first. Check the cable, charging port, computer software, and internet connection before you move to Restore.
Use Restore only when Update fails and you understand the data risk. If restore errors keep coming back, or the phone keeps returning to recovery mode, contact Apple Support or an authorized service provider.
The real lesson is simple: keep backups current. A fresh backup turns recovery mode from a disaster into a repair job.
Uncommon FAQs About iPhone Stuck Recovery Mode
|
Question |
Quick Answer |
|
Can I fix it without a computer? |
Only if force restart works |
|
Will Update erase my data? |
It is designed not to, but risk still exists |
|
Does Restore erase everything? |
Yes, in most cases |
|
Can a bad cable cause it? |
Yes, especially during update or restore |
|
Is it a virus? |
Almost never |
|
Can water damage cause it? |
Yes, hardware damage can trigger loops |
Can I fix iphone stuck recovery mode without a computer?
Sometimes. If the phone is only frozen, a force restart may work. But if iOS needs repair, you need a Mac or Windows PC.
Why does my iPhone leave recovery mode during download?
If the iOS download takes a while, the phone may exit recovery mode. Let the computer finish downloading the software. Then put the iPhone back into recovery mode and continue.
Can I back up an iPhone while it is stuck in recovery mode?
Usually, no. The iPhone must boot normally for a standard backup. That’s why regular backups matter before problems happen.
Is recovery mode the same as Activation Lock?
No. Recovery mode is a repair state. Activation Lock is a security feature tied to Find My and your Apple Account. After a restore, Activation Lock may ask for the Apple Account previously used on the iPhone.
Can water damage cause recovery mode loops?
Yes. Moisture can affect the charging port, battery, buttons, or logic board. If the phone was wet, avoid repeated restore attempts and get service.
Can a full iPhone cause update failure?
Yes. Low storage can create update problems. iOS needs space to download and install system files. Free up storage before major updates.
Should I use DFU mode?
Only if recovery mode fails and you understand the risk. Most users should try normal recovery mode steps first.
Is it safe to sell an iPhone after fixing recovery mode?
Yes, if the phone works properly and you erase it correctly. Remove your Apple Account, turn off Find My, erase all content, and confirm Activation Lock is removed.